Japanese Cat Baskets

omg that’s cute

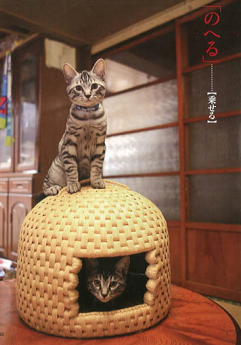
Someone help me, I’m obsessed with Japanese cat baskets (稚座 or neko chigura).  Like all traditional Japanese crafts, they are functional and stunningly beautiful.

Mrs. Root Simple and I want to learn basket weaving just to make one of these things. Woven out of rice stalks, there are, thank you for asking, Youtube videos showing how they are made:

And, yes, you can watch cute videos showing their use–say goodbye to office productivity today!

According to Modern Cat (I’m somewhat embarrassed to admit I read that blog) these things aren’t available in the US, though you can admire this Japanese website that sells them. Guess we will have to make our own.

Note from Kelly:  Say we make one of these…100 hours and 1000 curses later, won’t our kitties promptly adopt their new 稚座 as a scratching post? The Japanese must have figured this out. Back to the  research!

Saturday Linkages: Urine Soaked Eggs, Currents, Squirrels and School Gardens

Urine-soaked eggs a spring taste treat in China city: http://reut.rs/HqBQny

Amazing wind map.

Equally amazing water current map: http://www.theawl.com/2012/03/soothe-yourself-with-the-oceans-swirl

Bald eagle, fox, and cat are porch friends: http://boingboing.net/2012/03/29/bald-eagle-fox-and-cat-are.html

HOWTO build a robotic squirrel-squirting water sentry-gun, with python: http://boingboing.net/2012/03/26/howto-build-a-robotic-squirrel.html

Tips on running a school garden: http://bit.ly/GKA3Md

@bikejuju blog post: Freak Bike Friday: Bed Frame Bike http://is.gd/f18Q5A

These, and more linkages, are from the Root Simple twitter feed.

A Food Forest in Los Angeles

The great thing about this blog is that I get to meet people like Ron Finley, profiled in the video above. Ron got busted for this garden (the city of Los Angeles requires all parkway plantings to be mowed to 2 inches). Ron is now leading an effort to get the rules changed. We wish him luck and hope that his garden inspires many others around the world.

A Rocket Stove Made From a Five Gallon Metal Bucket

The principle behind a rocket stove is simple–rather than cooking on an open fire, you burn wood in an insulated chimney. Rocket stoves are highly efficient and easy to make. They run on twigs, so you can avoid cutting down a whole tree just to cook dinner.

We’ve had a rocket stove made out of brick in our backyard for several years. The post we wrote on it in 2007 is–oddly–the most frequently searched post on this site. I figured that since there was so much interest in the topic it would be good to offer one that didn’t require masonry work. Better yet, I figured that it should be portable, so I made it out of a five gallon steel paint bucket. (eta: for your googling pleasure, it seems retailers call these cans “steel pails” rather than buckets). The project took less than an hour to complete and I’m very pleased with the final result. We created a pdf with full instructions that you can download at the Internet Archive. What follows are some photos showing the building process:

Using a piece of 4″ vent pipe and a 90º elbow, I made the chimney. See the pdf for the exact dimensions.

I traced the outline of the vent pipe on to the lid of the bucket and cut this hole out with a jig saw. Tin snips would also have worked.

Using the vent pipe as a guide again, I cut out a 4″ hole near the bottom of the bucket.

I used one part clay (harvested from the yard) to six parts vermiculite as my insulation material. Mixed with water, the clay holds the vermiculite together. I could also have used dry wood ash, but I had the vermiculite and clay on hand so that’s what I went with.

With the vent pipe in place, I packed the insulation into the bucket and let it dry for a few days before putting the lid on.

I found a barbecue grill at Home Depot that rests on the top of the bucket to support a pot.

Next you want to get yourself a tin can, take off both ends and open it up with tin snips. Cut a piece to serve as a shelf in the mouth of the pipe. It should be about 4″ long–so it sits forward in the mouth of the vent. The rear part of the vent, where the fire burns, is open. The twigs rest on top of the shelf, the lower half is for drawing air.

The last step was to add the new Root Simple stencil to the back.

Some fire tips from the little lady, our resident pyro:

A rocket stove isn’t like a campfire–you don’t throw on a big log and kick back. Cooking on it is intense and concentrated, best suited for boiling or frying. The best fuel source is twigs, small ones–I prefer pencil-sized twigs, and I never try to burn anything thicker than a finger.

To start a fire just shove some paper or other tinder under the shelf toward the back of vent. Lay some very thin twigs, pine needles or other combustibles on the shelf. Light the paper and watch it go. Start adding larger twigs to establish the fire. Of course, twigs burn fast and hot, so you have to keep adding more fuel. Also, the twig are burning from the back (the fire is concentrated in the bend) so as the fire consumes the sticks, you just keep shoving the unburned parts to the rear.

There’s a balance between choking the vent with too much wood and having too sparse a fire. After a few minutes of playing with it you’ll get the hang of things. If you’re doing it right, there should be no smoke, or almost none. These things burn clean.

Let us know if you like the pdf and if you would like to see more similar instruction sheets (maybe in an ebook format) of these types of projects. There’s also a good book on using rocket stoves as heaters:  Rocket Mass Heaters: Superefficient Woodstoves YOU Can Build by Ianto Evans and Leslie Jackson.