California poppy tea

 
Mrs. Homegrown here:


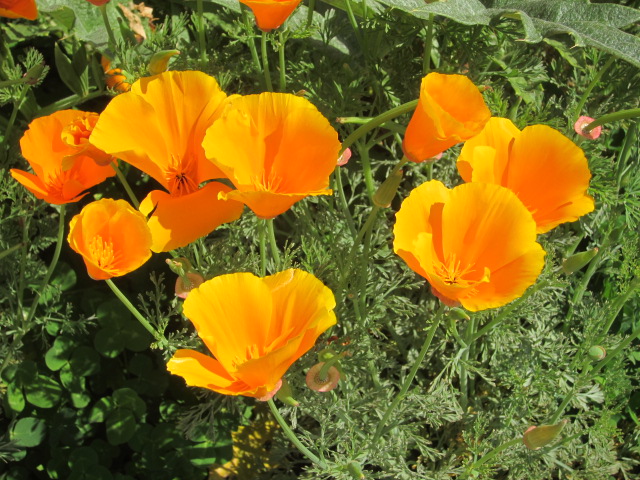
Where we live, this is the poppy time of year. California poppies (Eschscholzia californica) are blooming all over our neighborhood, and most especially in our yard. I have to admit I have a mercenary attitude toward plants, my main thought on meeting one being, “What can you do for me?” California poppies, lovely as they are, have become more interesting to me since I’ve started consuming them. Now, don’t get concerned (or intrigued): the Root Simple compound has not turned into an opium den. California poppies are not part of the famous Papaver somniferum species, and they can’t get you high, nor are they addictive. However, they can help you relax.


I’m all for using plants that grow readily in your yard or general area, rather than trying to coax more exotic species along. There are many herbs that can be used to make relaxing teas (valerian, catnip, linden, chamomile, etc.), but this one intrigues me because it’s essentially a weed where I live. If it doesn’t grow readily where you live, I’d encourage you to investigate other herbs which grow more easily in your area. 

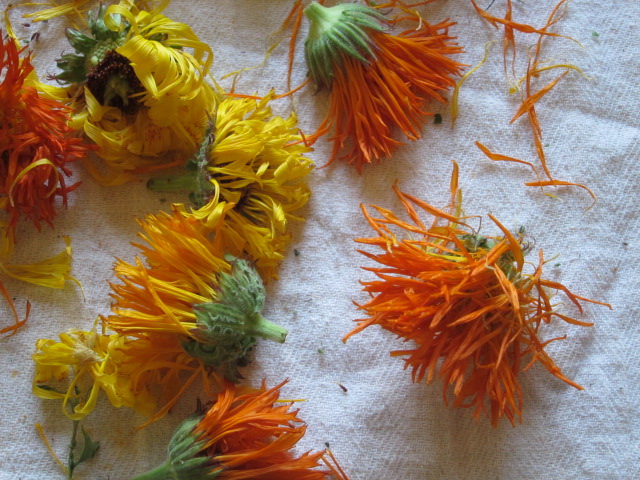
But for those of you who can grow California poppies easily, I’ll just say that I’ve been making tea with fresh California poppy foliage this year and must report that I really like it. I like it so much that I’m drying plants so I have a store to last me through the summer and fall, and may make a tincture of it, too. 

It makes a soothing tea. I find it useful in two types of situations: first, when I have a nagging tension headache–the kind that comes about when you’re cranky, and can’t find any way to de-crankify, because your head hurts so damned much. I find that this tea de-tangles my brain enough that the headache goes away. The second situation I take it in is when I’m really tired but am resisting going to bed for whatever reason.

What do experts say?

There’s lots of somewhat conflicting information about the California poppy on the Internets, and even my herb books at home say different things about its properties. Overall I think all sources do agree that it does have sedative quantities and that it won’t hurt you. In fact, in Europe, it’s often used as a component in sedatives for children. Taking that as a starting point, I’m trusting my own evaluation of its effect in regard to me. Everyone reacts a little differently to herbs, and everyone has different needs, so I’d encourage you to try it and see what you think.

In Medicinal Plants of the Pacific West, Michael Moore says its a “…surprisingly effective herb for use with anxiety” and “When used as a sedative, it promotes relaxation and genial lethargy.”  He notes it has some mild analgesic effects in higher doses.

One thing he does address is the question as to whether drinking this tea would make you test positive on a drug test. His answer is that though the plant does not contain the same alkaloids found in opiates, it contains alkaloids that are similar enough that they might create a false positive on an urine test. I’ve also heard firm opinions from other sources that it absolutely will or will not show up.

California Native Americans use Eschscholzia in their own way. According to Healing with Medicinal Plants of the West, the Chumash made a poultice of the pods to stop breast milk. For them, this was (is) the plant’s primary use. Secondary uses include using the root for toothache and a decoction of the flowers to kill lice.

How to use:
 
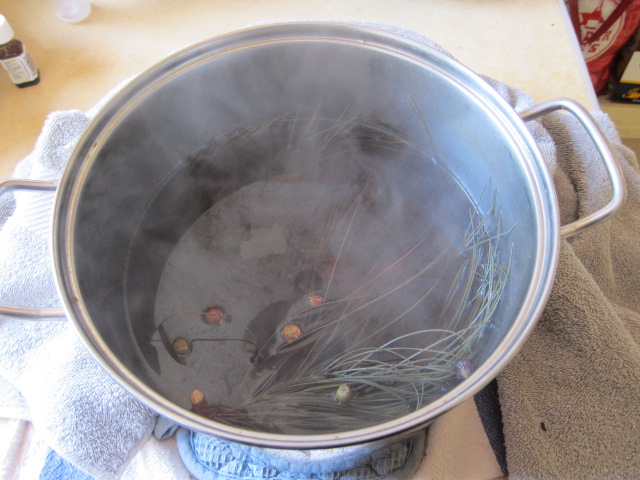
You can make tea with any of the above-ground parts of the plant: leaves, stems and flowers. You can use these parts fresh or dried. I’ve been using fresh so far. I just stuff my tea basket with fresh leaves, pour hot water over them and let it steep a good long time–maybe 10 minutes. I put a saucer over the top of the cup to help keep the tea warm. The long soak ensures a stronger, more potent brew, obviously.

All the sources I’ve read note that this tea is unpleasantly bitter. I’ve not found that to be so, but my palette may be affected by Erik’s ongoing fascination with bitter Italian greens. Sometimes I throw some mint in with it just to liven up the flavor, but I honestly don’t find it unpleasant straight.

(ETA: Coming back in September to add to this post. Now that summer is almost over, I can say that the plants get more bitter as they get older and the weather gets hotter. It’s the first flush of growth that’s most palatable.)

In terms of dosage, all I can say is that the more of the tea you drink, and the stronger you brew it, the more pronounced will be the effects. If I just want a bedtime brew, analogous to chamomile, I’d just make a cup of tea as I’d make any cup of tea. If I have a headache, I’ll make a small pot of tea (2-3 cups) and brew it strong and sip it until I feel better.

You can also tincture the plant, fresh or dry, in alcohol, and take it in that form. This isn’t the place for a tincture how-to, but if you already know how, Moore says: Dried plant tincture: 1:5,  50% alcohol; Fresh 1: 2; Both 30-60 drops, up to 4x a day, for anxiety. 

I’ve heard that the root can be held against a sore tooth–in places other than the Chumash source–but I don’t know if it works. Some sources I’ve read use the root as well as the above ground parts for tea, but I’ve not tried it. I’ve decided that the root must have slightly different properties than the foliage and haven’t stirred myself to investigate those yet. 


Growing California poppy: 

If you live where this plant is native, all you have to do is throw some seed around your yard in the fall, and the plants will magically appear after the winter rains. There is no special care or soil prep to be done. You don’t even have to bury the seed. The plants will thrive on their own until the summer heat and dryness kills them. Before they go, though, they will spread seed and more plants will appear the next year on their own. I’m not so sure how you’d grow it in other climates, but I assume you’d toss the seed around after the last chance of frost. If anyone has experience growing California poppy in other climes, please let us know what you do.

Nanny state precautions:

You should maybe not drink a lot of this and then drive, or operate drill presses, table saws, curling irons, etc. You probably should not mix this with prescription drugs without consulting your physician, especially if you’re on sedative drugs. If you’re pregnant or breast feeding, you know the usual drill–consult your practitioner. And anyway, that part about drying up milk might be of concern. Finally, California poppies are protected by state law. It’s illegal to pick them except in your own yard.

Harvesting and Drying Calendula

Mrs. Homegrown here:

Okay, so in a previous post I talked about growing Calendula. This post I’m going to talk about harvesting and drying it. The next post I’ll do on the topic will be about making a skin-healing salve from the dried petals, olive oil and beeswax.

When to harvest: 
Start harvesting your Calendula as soon as the first flush of flowers is in full bloom. Don’t try to “save” the flowers. The more you harvest, the more flowers each plant will put out.  After the first cutting, you can probably return to harvest more every 3 days or so.
The ideal time to harvest is in the morning, before it gets warm, but after the dew dries. You want them all fresh and perky and at their peak. This is traditional wisdom. However, I believe it’s better to harvest when you can than not at all, so I harvest at all times of day.
A side note regarding seeds:
If you don’t harvest the heads, they die back on their own, and then they’ll go to seed fast. If you don’t like the idea of Calendula volunteering all over your yard the following year, you’ll want to collect all the heads before they die back. However, you may also want to monitor them carefully and collect ripe seed for planting the next year (you want to collect the seed when it’s brown, not green).  And if you want to keep track of such things, if you make a point of saving seed only from the plants with the best blooms, your favorite colors, etc., over generations you can breed your own line of Calendula.
Alien beauty. A seed head in its early stages. The seeds are the green things that look like bugs.
What parts to harvest:
I harvest the flower heads only, though I understand that the foliage has much the same properties as the flowers. If I were short on plants, and knew I’d get few flowers, I’d harvest and dry the leaves to make up that lack. Given a choice, though, I prefer the flowers, just because they’re good for cooking and decoration as well as my salves. People used to eat Calendula leaves (they’re known as “pot marigolds” because they used to go into the cooking pot), but I’ve tasted them, and I don’t think I’ll be making them part of my diet unless I have to.
To harvest, I either pinch off the heads or cut off the heads with scissors. This often leaves a long, beheaded stem behind. That stem can be trimmed back to the first set of leaves, for the sake of aesthetics. Or not. (ETA: A commenter recommends that you always cut the stem back to the first set of leaves, so the stem does not become a conduit for rot. Makes sense.)
How to dry:
Bring the flower heads indoors, into an area out of direct sunlight. Don’t wash the heads.

Spread the heads out face down on a dishtowel or a sheet or newspaper or for fancy, an old window screen stretched between two chairs. I find laying out the heads an oddly satisfying activity.
Of course, if you have a dehydrator you could use one of those. Calendula should never be subjected to high heat, so oven drying is out of the question. Set your dehydrator to 90-95 degrees F.  
If you’re air drying, turn the flowers over every so often. Keep them out of direct sunlight.
They’ll shrink quite a bit as they dry, so you’ll have room to keep adding fresh specimens as they come in.
When are they dry enough?:
They must be completely and absolutely dry before they go into storage. Believe me when I say this is important. A couple of years ago I was impatient and put a few chamomile buds which must have been not-quite-dry in to a jar with the rest of my (painstaking) chamomile harvest. The next time I opened that quart jar I got a big nasty whiff of mold. I almost cried.
So–the flowers must be dry. They should be fragile, crispy and very dry, like crepe paper. Make a habit of feeling them at different stages of drying to develop sensitivity in your finger tips. You’ll notice that when they’re not quite dry they’ll *look* dry but when you touch them they are a bit cool compared to a truly dry flower. In other words, you can feel the water in them. Leave those for another day or so.
The green part, the flower head to which the petals are attached, dries more slowly than the petals themselves, because it has a greater mass. Be cautious of this. If you’re going to store the heads whole, then you need to allow extra time for the green parts to dry.  Which brings me to the next item:
To pluck or not to pluck:
There isn’t a right or wrong here. Everybody does it different. 
If you plucked all the petals off the heads when you first brought them indoors, those petals would dry very fast. But that, in my frank opinion, would be a pain. It would be like playing a game of “He loves me, He loves me not” that lasted for hours.
If you want to leave the petals on the heads that’s fine. The heads (green parts) have medicinal properties too, so you can use them whole. The only thing is that you must make sure those heads are completely dry before you store them, as I said above.
What I do is is wait until the petals are dry, then I pluck them from the heads, to avoid the whole “is the head still damp?” issue. When the petals are dry, they come off the head very easy. In fact, the ease with which they come off the head is an indicator of their dryness. If they’re resistant at all, they’re not dry. To work in bulk, you can take a whole bunch of dry heads and put them in a bowl and rub them between your hands. The petals will fall off. The heads will collect at the bottom of the bowl, because they are much heavier than the petals. Or you can strip them by hand. When they’re dry, this only takes a single gesture.
Only the driest petals go in the jar. All that debris around the jar is stuff that’s not dry enough yet.
Can you use the flowers fresh?:
Yes. And no. Depends. The next step in this series of posts is the making of an oil infusion.  I never put anything “wet” in oil, because of the slight chance that botulinum toxin might develop in the oil.  Herbalists who I respect put fresh matter in oil nonetheless, and I envy them, because I suspect they’re getting more out of the plant by doing so. But I’m not going to take that risk–or write about it if I do. This is just safer. 
You can use the flowers fresh other ways. You can make them (and the foliage) into a tea, which you could use as a skin wash for sunburn or irritation–or drink. Fresh flowers could go into your bathwater to make a soothing bath. Fresh flowers can also be soaked in alcohol to make a tincture.  
Storage:
I keep my very dry herbs in sealed mason jars in a dark cupboard. You don’t want to expose any dried herb to sunlight for any length of time. I use jars because I don’t take any chances with pantry moths (it’s amazing what they’ll get into). The risk with jars, as I’ve said, is that if the herbs aren’t perfectly dry, you’ll get mold. This is why other people opt to keep their dried herbs in paper bags–bags breathe a bit, so lessen the chance of mold. This is a good option, too.
I try to switch out my dried herbs every year–at least the ones I grow. Some of the things in my cupboard are older than that. I think some herbs keep their properties longer than others, but in general you should try to use them in a year or so. Like spices, the are best fresh, but usable, if not as potent, as they age. 

Label and date all your herbs. Even if you think you’ll never forget, somehow or another you will, and at some future find yourself standing at your cupboard, holding a jar full of strange plant matter and saying to yourself, “What is this?”

Advances in Gardening Series: We’re maturing

November–seedlings new planted
January–all the foliage is in
End of February–the flowers really start to pop

Stuff grows. You just gotta remember to plant it!

A quick photo update on progress for the Phan of Pharmacy and the Hippie Heart, mostly for our own record keeping. Maybe it will inspire those of you surrounded by rain or snow with dreams of your own spring planting.

Back in November, I cleared ground and planted the Phan/Fan with medicinal seedlings. See some of that history here. Now we’re at the end of February, and the Calendula and chamomile plants are mature. The Calendula (the yellow flowers in the pic) is giving off lots of blossoms, the chamomile–not so much. That’s garlic growing on the far right. It’s beginning to brown at the tips, but I don’t think it’s going to be ready until May. The poppies, hidden in the back, are slow, and not near blossoming yet. Note the rogue borage in the foreground.

Meanwhile, the Hippie Heart, planted with flax in the center and lentils around the edges is coming along very well. It waves hi to the police helicopters overhead. The point of the Heart was to have a place where I could experiment with planting seeds, beans and spices right out of the pantry. Soon I’ll need to decide if I’m going to let the flax and lentils go to seed, and collect that seed for fun, or if I’ll pull it out early in favor of more experimentation with new pantry crops over the summer.

January 22nd
February 25th: I can hardly wait ’til it blooms.

Borage: It’s what’s for dinner

image courtesy of wikimedia commons

Our friend Milli (Master Gardener of the Milagro Allegro community garden) stopped by today to pick up some sourdough starter. On seeing our back yard swamped abundant with borage (Borago officinalis), she mentioned that she’s been really digging borage tacos lately. This was very exciting news to us, because we’d never eaten our borage leaves–only the flowers.

So tonight I went out and cut a whole mess of stiff, prickly borage leaves. The prickles vanish on cooking. Some sources say only to use small leaves for cooking but I say fie to that. I used leaves of all sizes and after cooking there was no difference between them. Borage is actually rather delicate under all its spikes and cooks down considerably in to a very tender, spinach-like consistency.

Instead of making little tacos with it, we folded it into tortillas with a bit of goat’s milk gouda to make yummy green quesadillas–a quick, light and satisfying meal at the end of a busy day.

How did we cook it? –>


We cooked the borage as we cook all of our greens, no matter what kind. It seems we can’t be bothered to develop any variations on this theme. First we saute chopped garlic in lots of olive oil along with chile pepper flakes, then add piles of chopped wet greens–any greens– to the pan. These get tossed until they wilt to the point where we want them, which varies. If any green seems particularly tough, we put a lid over the skillet for a moment to steam them. Salt and pepper and maybe a squeeze of lemon finishes them off.

I used this technique on the borage and it came out very nice. Tender, as I said, with pleasing bit of cucumber flavor. There is also the faintest hint of a mucilaginous texture, but nothing off-putting. Borage is a cooling herb, like mallow (Malva sylvestris)–which we like to eat as a green as well. Because of this cooling quality, both are refreshing to eat, especially on a hot day. I’m writing this a few minutes after dinner and this coolness lingers in my throat. It’s also supposed to be a soothing, grounding herb and now I’m wondering if I don’t feel a bit more grounded, too, post-quesadilla.

Borage is also a medicinal plant–as a compress, tea, tincture or oil extract it has different uses and effects, which will have to be covered in another post.

More people are familiar with borage’s star-like edible flowers, which can be preserved in sugar for cakes, or tossed into salads. I’ve heard of freezing them in ice cubes for fancy drinks, which is a lovely idea.

Obligatory health warning:  I’m going to quote this directly from the very useful Plants for a Future database, from their entry on borage:

The plant, but not the oil obtained from the seeds, contains small amounts of pyrrolizidine alkaloids that can cause liver damage and liver cancer[238]. These alkaloids are present in too small a quantity to be harmful unless you make borage a major part of your diet, though people with liver problems would be wise to avoid using the leaves or flowers of this plant.

Also, I’ve seen warnings regarding pregnant and nursing women eating borage here and there, too, although I don’t know the exact reasons for the warning. As per usual, check with your doctor if you have concerns.

We figure as long as we’re only eating borage a few times a week, and only for a limited period–“borage season,” as it were–these pyrrolizidine alkaloids are not going to get us down.

Strange brew: herbal steam for a chest cold and sinus pain

Mrs. Homegrown here:

I’ve had a bad cold for almost a week now. It’s gone through all the classic steps: the sore throat, then the snot factory, then the ghastly “productive cough” that keeps you awake at night, and on top of it all, the lost voice. Oh, the fun! I thought I was almost out of the woods, but then I seem to have hit a cul-de-sac involving the sinuses. Sinus trouble is a new malady for me–I’m just not prone to it–so it’s been a learning experience. My new best friend in this experience is my steaming pot-o-herbs.

Most folks know that you can inhale steam to ease congestion, whether that be in a hot shower, a steam room or by tenting a towel over a bowl of boiling water. What I’m going to talk about here is the bowl technique, tricked up by spiking the water with powerful healing herbs.


My inspiration came from the book by well-known herb expert, Stephen Harrod Buhner called Herbal Antibiotics: Natural Alternatives for Treating Drug-Resistant Bacteria. It’s a slender, informative book profiling the actions of a short list of top antibacterial botanicals, some of which, like ginger and garlic, are quite commonplace. Highly recommended reading.

This is Buehner’s steam for upper-respiratory infections:

Get yourself a big cook pot–stainless, glass or enamel are recommended for working with herbs.

Fill it with a gallon of water

Into the cold water put:

2 oz. dried eucalyptus leaf
1 oz. dried sage
1 oz. dried juniper or crushed juniper berry

Bring to a rolling boil, then take off heat (I kept the pot covered to keep the good stuff in).

No need to transfer the liquid out of the pot into a bowl. Just put a trivet or folded towel on the table and put the pot on it. Lean over the steam with a towel over your head. Breath deep until the steam dies, or you can’t stand it any longer.

Don’t throw out the pot contents. Just put the lid back on when you’re done and heat it up when you need it again. If it seems to be losing potency, throw in another handful of herbs.

I used my pot for a night and a day before it began to look a little tired. It was also completely full of solid matter! At that point I dumped it out in the yard and started a fresh pot.

Alternative herbs:

You may not have all these ingredients, and that’s okay. You could get by with just one–e,g. only juniper. If you have access to fresh material instead of dried, that’s good, if not better. Don’t worry too much about quantity, just toss handfuls in the pot.

You can also use essential oils of the same herbs in the water if you have those on hand. Buhner says 30 drops of each–I think that’s overkill. I’d start with 2 drops of each and see how that works for you.

My first steam contained dried sage and juniper, and a few juniper berries. I had no dried eucalyptus. Eucalyptus has that nice, lung-opening menthol action which is hard to replace. Fortunately, I had some eucalyptus essential oil and would add one drop of it to the water each time I went into the tent. From now on I’m going to be sure to have eucalyptus essential oil on hand at all times.

On steam round two, I wanted to freshen the mix and had no more dried sage or juniper, so I added a big spray of fresh pine (baby cone and all) from the neighbor’s yard. Pine is considered a good substitute for juniper, followed by fir, cedar and spruce–in that order. You might not have a well stocked herb cupboard, but most neighborhoods and parks have evergreen trees. Just make sure you don’t pick the branches of the yew tree (the conifer with thimble-like red berries), because yews are toxic to consume. I don’t know if the steam would harm you, but I wouldn’t fool with it. I don’t know of any other toxic evergreen.

Remember, these particular herbs were chosen because of their strong antibacterial properties. You can also take steams with other healing herbs that may not have quite the power of these, but which have their own benefits. I’d recommend trying lavender, rosemary and mint as more gentle, but pleasing alternatives.

And failing all that, a plain water steam is better than nothing.

The results:

The idea here is that aromatics opened up my poor nose, sinuses and bronchial passages, loosening all that gunk so my body could  send it on its way. Beyond that, I believe the antibacterial steam killed, or at least inhibited, the nasty bacteria it found on the way. I steamed intensively for 24 hours (every 2 to 4 hours, I think–whenever my head hurt I went back to the tent). Today I feel a lot better, so only did a steam in the morning.

When my sinus pain was at its worst, I’d take a washcloth in the tent with me, wet it in the herb water and use it as a compress over my sore face while I was breathing the steam.

The foremost effect of steaming for me was keeping sinus pain at bay–which it did very well. Ibuprofen did nothing. (And I don’t like OTC decongestants, in case you’re wondering) Steam took care of it just fine. The secondary effect is that my nose and chest have cleared up. The third effect is that my facial pores are now remarkably refined. 😉

Tonight I am pain free, snot free, feeling chipper and happily noshing on a cupcake Erik baked I post this.