
From The United States Department of Agriculture Farmer’s Bulletin #397, a well dressed beekeeper circa 1910.
From The United States Department of Agriculture Farmer’s Bulletin #397, a well dressed beekeeper circa 1910.
This one strikes me as particularly pertinent after all the head-scratching about cleaning products and GMO’d cat litter this week:
Not liking the pre-fab stepping stone options out there, I decided to take matters into my own hands and make one with glass mosaic tile. It’s easy to do using what’s called the “indirect method” in which you press the tiles onto a piece of contact paper. You then use that sheet of tile to cast your new, custom stepping stone.
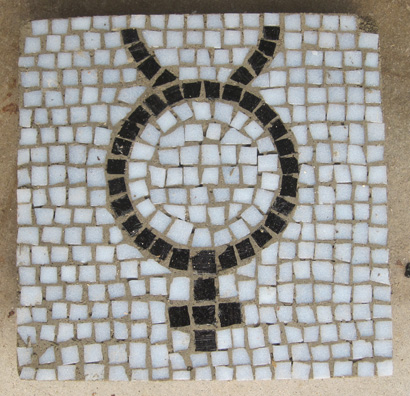
The first step is to come up with a design, either hand drawn or printed out from the computer. Since you’ll be working in reverse, you flip your design left-right. I chose the mercury, the symbol of transformation (it seemed like a good metaphor for a garden). No need to flip this particular image, of course. When sizing the design I like to keep in mind the size of the tiles I’ll be using so that any lines are about one tile wide.

I transferred the design to a piece of clear contact paper. Next, I taped the contact paper, with the sticky side up. to a piece of melamine coated fiberboard. Melamine is a good material to use because it helps it has a very smooth, even surface and is unlikely to warp. In addition, using melamine for the sides of the mold helps it release more easily. I built this mold out a piece of a discarded Ikea bookshelf.
While I was cutting the bottom piece, I cut four additional small pieces of the bookshelf to form the sides of the mold.The dimensions of these pieces determine the size of your stepping stone. I made a simple box by joining the pieces with screws at the corners. If you wish, you can spray the sides of the mold with WD-40 to help release the mold later. I forgot to do this, but it released fine anyway
For the mosaic itself, I used glass mosaic tile leftover from an old project. The glass picks up reflections and shimmers on a sunny day. The drawback is that it’s pretty expensive. The brand we’ve used in the past is Bisazza. You can also, of course, use broken plates, pebbles, pieces of metal or tile left over from other jobs.
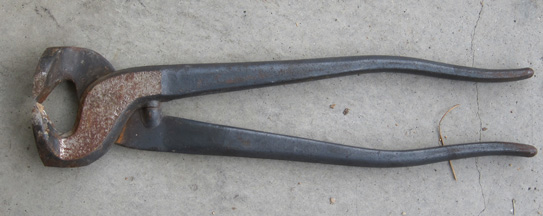
To cut glass tile I use a pair of tile nippers. I like to break the square tiles into four small pieces to simulate the irregular look of ancient mosaics. I wear a pair of safety glasses and do the cutting in a box to keep shards of glass from flying around. I also do this outside or in the garage so little shards of glass don’t end up in our house. Once cut, I press the little tile pieces against the sticky side of the contact paper–face down, or “good side” down. The sticky paper holds them in place.

When you’re finished sticking all the tiles down, it’s time to mix up some concrete. I used one part Portland cement to three parts builder’s sand. I poured my concrete into the mold and used some chicken wire as reinforcement. I just cut the wire into a rough square that would fit in the mold, poured half the concrete, placed the wire in the mold, then finished the pour.
Once cast, I put the stepping stone in a garbage bag to slow down the curing process. After a couple of days I carefully removed the mold. One advantage of this technique is that it’s “self-grouting”: the concrete should flow between the tiles during the pour. It worked well, but I will have to do a small amount of grouting to fix a few spots the concrete did not reach.
You could also use this same reverse method to make designs that could be pressed into a mortar bed when tiling, say, a kitchen or bathroom.
For more garden mosaic ideas see a previous post we did on the subject that includes a link to the stunning pebble mosaic work of Jeffery Bale.
 |
| Drum full o’ cat litter |
WARNING: Human waste and cat waste contain dangerous bacteria. I fully believe that composting is a safe and sane solution to a waste stream problem–that’s why I’m writing about it, after all– I also know that it can be handled badly. (The stories we hear!) So please, read up on the subject before starting. You should have a solid foundation in regular compost to begin with, because all the basics apply. Take a good composting class or find a compost mentor. Read the Humanure Handbook. For complete safety, all cat/human waste compost should be allowed to sit for two years, and it should not be applied to food crops (but it can go around fruit trees).
Last year at the end of July I posted about our experimental cat litter composting solution in The Cat Poop Portal post. It’s been a while since we reported in, and I’ve received some gentle pokes from readers, so this is an update.
Long story short, it’s going slowly. At the time of the last post we’d installed a 50 gallon drum in our side yard. That drum filled up fast. We have two indoor cats now (I think we only had one when this started) and they are slinky little poo machines. Also, we were using pine pellets which require a complete change-out more often than clumping litters, so we managed to fill the drum in about four months. That was faster than I expected, and a little disappointing, but there are two ways to ease this problem.
1) Changing litter, so we use less. Most clumping litters are either clay-based, which is not good for compost, or have sketchy chemicals in them. We’ve recently found World’s Best Cat Litter, which is a clumping litter made of corn. I called World’s Best to make sure there was nothing added to the corn, and they promised me that there’s nothing added to the standard formula–the magic is all in the way the corn is processed. So yes, we’re supporting Big Corn…but what are you going to do? The stuff works really well and is compostable. Now that we’re using it we’ll reduce our overall litter waste volume. (Of note: our friend John, a madman with six cats, swears by Swheat Scoop, which is wheat based. I don’t find it works for me, but he blames my litter management skills. It’s an alternative.)
2) We’re offloading half-finished cat compost to My Big Fat Worm Bin. Regular readers (and Vermicomposting workshop participants) might remember that composting expert Nancy Klehm had us add a good amount of mature cat litter compost to the mix when we built up the bedding material for the worms. She said she wouldn’t want to foist raw cat litter on the worms, but when it was well broken down they could handle it.
The drum has been, shall we say, resting productively over the winter. Today I went and dug it up to see how it was doing. As with any pile, the stuff on top was less finished–it looked pretty much like a cat box. It isn’t stinky, though, as long as I make sure all the cat poo is buried.
Down lower the material was more broken down. It’s an interesting rusty orange color. But I didn’t get the sense of lots of activity going on. It was a cool pile, and it showed very little insect life. This is not necessarily a bad thing. The pile is decomposing, just on a long timeline. But at this rate of decomposition I suspected it would need at least another year of sitting to be fully broken down, and then it would need to rest even longer for safety. Compost made from carnivore and omnivore poop needs a two year cycle to allow the pathogens to die off.
 |
| Digging down all I see is decomposing red sawdust |
Wanting to move it along faster, I did what I’d do for any compost pile that was a little pokey: I turned it, and added nitrogen and water.* Shoveling 50 gallons of kitty litter is exactly what I want to be doing on any given Saturday! As I shoveled, I decided that if I didn’t already have Mad Kitty Disease, I’d have it by the end of the day. As if to confirm this, Trout sat in the bedroom window over the poo-bin, wearing a peculiar, self-satisfied expression while he watched me slave away over his waste. (Phoebe didn’t join in, because she doesn’t admit to creating waste at all.)
 |
| Okay, he doesn’t look smug here because he’s wondering what I’m doing with the camera. Prior to this I assure you he he looked very smug. |
But back to business. For those of you who are new to composting, turning a pile stirs everything up, increasing bacterial activity, making the materials hotter. This speeds decomposition. There’s much debate over whether to turn or not to turn and how often to turn, and I’m not going into any of that right now, except to say that humanure piles are not usually turned, and I’d hoped not to do so with this catmanure pile, either, but necessity drives.
Just like turning, adding a nitrogen source to the pile heats it up. All compost piles are a balance between carbon and nitrogen sources, aka “greens and browns.” Too much carbon and your pile is cool and slow. Too much nitrogen and its slimy and stinky. But if you get the balance right, you end up with lovely compost.
In kitty litter composting, the litter is the carbon and the urine and poo deliver the nitrogen. Starting out on this path, I had no idea how the natural carbon to nitrogen ratio in a cat box would play out. Now it seems to me that the ratio is carbon heavy. Cat litter materials, such as compressed sawdust, are really dense carbon sources and need tons of nitrogen to balance them.
So my preliminary finding on this point is that it might be help to add extra nitrogen when you add a new layer of litter. Extra nitrogen could come in the form of green yard trimmings, veg scraps, urine, fresh horse manure, etc. Today, though, I decided to add alfalfa meal because we had some wasting away in the garage. Alfalfa meal is ground up alfalfa. It’s used as a natural fertilizer and top dressing, and is high in nitrogen. Generally speaking, I think nitrogen should be free, but if you don’t have a lot of scraps/trimmings/spare urine around, you could do worse than to have some alfalfa meal on hand to perk up your compost pile if it’s gone carbon heavy.
 |
| Mixing in the alfalfa meal and water |
When it was all done, I thought my pile looked a little more loved, and I think it’s going to heat up nicely. I was able to move ten gallons of the more mature compost over to the worm bin, but the barrel is still pretty close to full.
 |
| Adding the kitty compost to the worm bin |
For the near future we’ll probably be able to send about half our litter to the barrel, and the other half will have to go to the landfill. Eventually we’ll get rid of this big mass of pine litter, and I hope that by using the clumping litter will keep the bin from filling up quite so fast, and will somehow reach cat:compost equilibrium.
*To be clear, I added water because the pile was dryish, not because water in itself is a magic activator to be used in all circumstances. If a pile is too wet, I’d blend in dry stuff while turning. The goal is for the materials in the pile to be about as wet as a wrung out sponge.
 |
| Photo from Weeding Wild Suburbia |
A fierce windstorm on the night of November 20 of last year left in its wake the evidence of years of negligent tree care in Southern California. A good arborist and crew cost money, and too many homeowners, landlords and municipalities go the cheap route and hire the first idiot with a chainsaw they can find.
A local blog I just discovered Weeding Wild Suburbia, has a nice summary of things you can do to prevent trees from falling down in the next storm. See her posts, Cleaning Up After the Storm, Tree Care Part 2, and Selecting and Planting Trees for Long Term Success.
One things I noticed after the storm were huge trees with shallow root systems that topled over. It’s the result of combining trees and lawns–keeping the lawn green with frequent light waterings results in trees with shallow root systems. Yet another reason, if there weren’t enough already, to ditch the lawn in a dry climate!
Extra bragging rights if you can name the problem in the picture above.
Thanks to Ari Kletzky for the link.