
UPDATE: I have completely revised this recipe–thanks to Dana Morgan for testing and input!
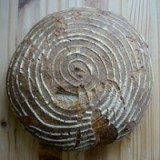
In the interest of health, I’ve focused my bread baking obsession of late on 100% or near 100% whole rye sourdough loaves. I’ve used as my guide a nicely illustrated book How to Make Bread by Emmanuel Hadjiandreou. His specialty is just the sort of rustic German style breads I’ve always wanted to learn to bake. What I love in particular about his caraway rye sourdough loaf (pictured above) is the crust. Unlike most other breads you don’t slash it before tossing it in the oven. The goal is a kind of perfect imperfection–a hard, thick crust with as many fault lines as the state of California. And this is a bread that requires no kneading so you can easily fit it into a busy schedule.
Here’s how I make it (recipe based on Hadjiandreou’s caraway rye sourdough):
70% Rye Bread with Caraway-based on a recipe by by Emmanuel Hadjiandreou from How to Bake Bread
Starter
125 grams dark rye flour
125 grams water
1 Tbsp mature starter
Final Dough
350 grams dark rye flour
150 grams white bread flour
10 grams sea salt
1 teaspoon caraway seeds
250 grams rye sourdough starter (see step one)
475 grams warm water
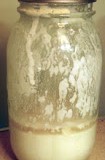
Building the starter
- First build: take one tablespoon of mature starter and add it to 50 grams of rye flour and 50 grams of room temperature filtered water. Let sit for between 8 to 12 hours at room temperature.
- Second build: add 75 grams of rye flour and 75 grams of room temperature filtered water to the first build. Let sit for 8 to 12 hours at room temperature. You will end up with 250 grams of rye sourdough starter to use in your dough.
Mixing, proofing and shaping
- Combine the 250 grams of starter you made with 475 grams of warm water (80 to 85º F). Mix in the rest of the ingredients until everything is fully integrated and there are no more bits of dry flour. No kneading is necessary. Let the dough rest in a covered container for a half hour.
- Dust a counter or cutting board with flour. Rub your hands in some flour to prevent sticking. Dump the dough onto your work surface and form into a boule (round).
- Dust your banneton and the boule HEAVILY with rye flour. Place the boule into the banneton and cover. Let proof at room temperature for approximately 3 hours. Note that rye ferments considerably faster than wheat.
Baking
- A half hour before you’re ready to bake, pre-heat your oven and a dutch oven or combo cooker to 475º F.
- Just before you’re ready to bake, turn the oven down to 450º F. Put the boule into the dutch oven and cover. This style of bread is not slashed. Bake, covered, for 20 minutes.
- After 20 minutes remove the cover from your dutch oven and bake for another 20 minutes or until it is dark and the cracks in the loaf are just starting to burn. Josey Baker calls this “bold” baking. In other words don’t make the newbie mistake of pulling the loaf out of the oven too soon.
- Resist the urge to cut into the loaf until it has cooled and sat for many hours. It’s best to wait between 12 to 24 hours before cutting into the loaf.
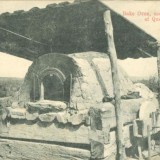
It’s in German, but you can see this exact style of bread being baked in a wood fired oven. Note the steam is created by mopping the oven just before the loaves are tossed in:
Beautiful looking loaf, I thought I’d share my technique. I tried over and over with the dutch oven but I always flopped my loafs or degassed them too much when putting them in. What I do know is form my boule on a piece of parchment paper, preheat a stone and also my dutch oven upside down in the oven or sometime a pyrex bowl and then transfer the loaf to the stone and cover it with the dutch oven. I get the same crust and I get to control the shape of my loaf a little better and I don’t ever worry about burning myself. Need to make sure the oven sits flat on the stone though because you are capturing the moisture in the bread and don’t want to loose that.
Great idea! I’m going to try this! I too have had my share of misshaped loaves due to the “flopping” step.
Pingback: Homesteading Links For January 4, 2013 | Weekend Homestead
One question, does this bread sit in the basket all day….. To double in size…? What am I looking for? Thankyou, wonderfull website.
Hi Patrick–it will not rise as much or as fast as bread with commercial yeast. It’s hard for me to say when I know its ready. It comes with trying it several times. If it’s too dense when done you need to let it rise longer the next time. If it flattens out too much, like a pancake, when you remove it from the form then you need to let it rise less next time. Temperature is also a factor. That being said, it will taste good even if it’s under or over proofed. Let me know how it goes for you and please leave another comment if you have any trouble. Best of luck.
Im just starting my starter today, and I will keep you posted. Your two hour response time was very impresive, Ill keep you posted, thank you.
Hallo! Guten Tag! I am just returned to the States from Bavaria, where I partook daily of delicious German breads. I am trying to recreate them here now. I have made a %50 rye sourdough loaded with soaked sunflower, flax and sesame seeds, and I used a sourdough starter that has a mix of rye and AP flour. But that recipe still used commercial yeast as well.
I want to make the Bauernbrot, or farmer’s bread, that is traditionally a rye sourdough, with the Carraway seeds. I see that your recipe does not use a commercial yeast and wondered, how do I know if I need the commercial yeast or not? How do I know if my starter will work? It is the sort of starter that I feed a day or two before I bake with it, then I take some out for the baking, feed it some more and stick it back in the fridge til the next round of feeding/baking.
Many of the traditional recipes seem to use a ‘sponge’ and the soaker seeds instead of a constant feed starter. What is the difference in the end loaves? Do you know?
Guten Tag! I’d suggest picking up a copy of Emmanuel Hadjiandreou’s Book How To Make Bread. He’s got a couple of good German bread recipes made with a sourdough starter as well as clear instructions on how to make and feed a starter. To sum up the process, you mix flour and water and feed every day. After a week it will start bubbling and smell yeasty. From that point on you either keep it on the counter and feed it every day or stick it in the refrigerator.
I think that breads made with a starter taste better and are better for you (sourdough starters essentially pre-digest the flour for you through their microbial magic). You know the starter is ready to use when it floats in water and when it makes a successful loaf. It’s easy once you get the hang of it. But don’t let perfection be the enemy of the good. I’d encourage you to try to make German bread at home either with commercial yeast or with a starter. You can’t get good German bread here so you have to make it yourself.
I tried this recipe. Followed the recipe except that onchanged the white flour to wheat. but the final dough turned out to be too wet. I should have add water slowly because every flour is different. In the end I added another 1.5 cups of flour. It rise beautifully after 2 hours of proofing. However it turned out to be dense.
This is not a recipe you can go all whole wheat with–will be too dense. There are other recipes in Hadjiandreou’s book that are 100% whole wheat and very good–such as volkornbrot, but the dough is handled differently with much longer fermentation times.
Thank you, will search for the recipe!
Instead of using the 150 grams of white bread flour, can I make this with all rye flour?
can I make this using all rye flour instead of part rye, part white bread flour?
I have not tried it with 100% rye. You would need to add more water, most likely. I’m working on some 100% whole rye recipes but they aren’t ready for blogging about just yet. If you do try it let me know how it works.
I make 100% rye bread,I use sour dough, the dough is tricky to work into a kneadable loaf, but with patience it comes together, you should always aim for a sticky dough, and doesn’t need to be kneaded for long ,only to shape the loaf.I cook it in a wood stove for a long slow cooking….
Lovely bread, I baked it and it came out wonderful. I used emmer wheat flour instead of white bread flour.The dough was very sticky though and extremely difficult to work with, so the second time I tried it with less water (308gr, 68% hydration) and it came out just fine. The crust is equally lovely and crusty. Very different crumb texture, more dense and crumbly, less “masticky”, but very nice. I want to try different flour mix like maize, barley or buckwheat, if you have tried anything like that please post it! Thanks 🙂
I’ve been working on a spelt bread recipe that is similar to this rye bread recipe (except that there is no white flour). I’d still recommend a higher hydration level, however, as whole wheat soaks up a lot more water. I’m pushing 90 to 100% hydration. The dough can get difficult to work with so often I’ll use a bread pan instead of trying to shape a loaf.
I know this is an older post, but I thought I’d share my trick (well, alright, it’s not really *mine* but rather one passed along by more knowledgeable bakers) for checking whether your loaf is done proofing — just poke it with your fingertip. If the dough springs back that means there’s still enough “gas” behind it and it’s not yet done rising. You’re good to go when your finger leaves a slight indentation.
I have found that by starting with 35% to 40% by weight of water compared to the rye flour, it is possible to knead the mix slowly by hand, and then by slowly adding almost drop by drop water into the dough, while kneading,I can have a 100% rye flour bread with up to 75% water. Baking with the higher amount of water gives it a softer , voluminous internal structure. I also add quite a bit of olive oil – say 50g of oil for 400g rye flour.
This is such a great recipe. Simple, easy to follow, and the result was fantastic. I couldn’t believe there was alsmost no kneading, stretching, folding, etc. I’m German and have been trying to bake proper German bread for the past 3 years (I live in the U.S. now). This is it! A good solid German bread. I made the first one two days ago, and ate about half of it yesterday :-). I didn’t put any Caraway in the bread (most German breads don’t have Caraway), and preheated my oven to 500F and turned it down to 450F when I put in the bread. I used the entire 400g of water, and brushed some water on the surface of the dough after putting it in the banneton for proofing. The dough was quite wet and sticky but as far as I know that’s what rye dough looks like. Proofing took less time than expected/ described in the recipe. The dough was ready to go in the oven after about 4 hours. Thanks for sharing this great recipe!
Hi Ronita,
Many thanks for your feedback. I’ve been meaning to ask the Germans I know here in Los Angeles for some feedback and you beat me to it! And, thanks for the note about proofing time. You are right that I should probably shorten the time I suggest in the recipe.
As a baker I advise letting the dough grow to just below the basket rim as they do not grow due to no added yeast and relying souly on wild yeast in the flour. As the flip out put what ever you want it on on top of basket and hold two togeather before you flip lack of movement means dough won’t degas and holds its shape better
“In the morning I mix all the ingredients together… In the… evening when you get back from work preheat your oven” — I do not understand how you do not have overproof.?
I’m a beginner, so this might be a stupid question – when you say I the morning you mix all the ingredients together, is that the total amount of ingredients in addition to the portion made the evening before or is it 350g minus the 125g from the evening before? And as far as starter goes, do I really add another 250g starter the next day in addition to the tablespoon I put in the night before? That seems like a lot and would mean I need to grow more starter first.
Notice that there is no yeast in the recipe. To make the this bread rise you use a sourdough starter. That is a form of wild yeast that grows in a water/flour mix. You make it once and keep it alive for months or years, adding more flour and water as you remove starter for baking. So, in this case, you mix some pre-existing sourdough starter with more flour and water to start a ‘pre-rise.’
You can follow the link in the recipe to make your own starter, or borrow a bit from a friend to build your own. Sourdough starter is used instead of commercial use for its distinctive tangy flavor and some folks feel the natural yeast is easier to digest. However, because the wild yeast is less uniform than commercial, rising times can vary. Sometimes a lot.
Also, you might notice that the recipe does not call for kneading the bread. Rye doughs can become gummy if kneaded too much. The recipe calls for just mixing the ingredients. That means mixing them until everything is evenly wet.
I prefer to mix as described, then knead for 5 minutes.
Have fun!
Hi Nicola,
I am about to give this recipe a first try and have the same question. I noticed that Ken has not really answered your question. (I already have a rye flour starter). So…, the 350 grams of rye flour, does that exclude or include the 125 grams used the day before for the starter?
Can I use a starter made with AP flour instead of rye flour for this recipe?
Pingback: Traditional German Rye Bread | Comings and Goings
Hi there. I must try this recipe when I get home but I live in Honolulu, where it is always humid. I have never made bread before but this bread is the healthiest for me and the only German baker we had retired (Fritz’s bakery made real German bread for years). Do you have any advice concerning baking this bread in a hot humid climate? Maybe I should wait till our winter when it will be cooler? Still there will always be humidity. any advice will be appreciated. Also, re the starter, so many foods spoil immediately when left outside of the fridge in Hawaii, can I still follow the advice?
You’ll need to shorten the rise/proofing times, most likely. And when it’s really hot here in Los Angeles I stop baking–I don’t even want to turn on the oven!
Oh, more questions, what size of dutch oven do you use, for this recipe? Most of them come in a range from 3 quart size to 5 quart size. Also do you have a video that shows what the consistency of the dough should look like when it is ready to bake? I think the humidity in Hawaii may require being a bit careful with the amount of water used to wet the rye and wheat flour. Also for the wheat flour, should I look for specifically “bread flour” as opposed to “all purpose flour”, and will unbleached flour be just as good as bleached flour (not whole wheat, just not bleached).
My dutch oven is the 4 – 5 quart size. I recommend a combo cooker: https://rootsimple.wpengine.com/2015/05/using-a-lodge-cassorole-dish-for-baking-bread/
And when I use white flour, it’s mostly all purpose, unbleached. And, yes, the intuitive part of bread baking is all about taking account of the environment–heat and humidity. Take notes and try to bake as much as you can. Good luck and let me know how it goes!
This is great thank you. Having said that, listening to that video with english subtitles is disturbing – mentions dead bodies and shooting starving children; obviously a terrible translation. haha