Poached eggs and greens on toast with wildflowers

 Mrs. Homegrown here:

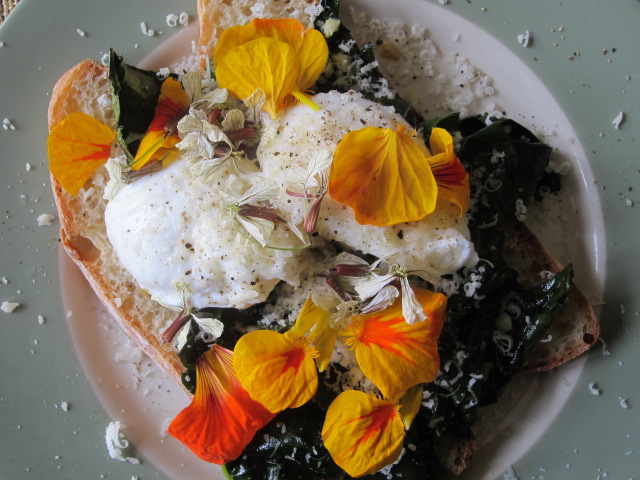
This is a fancy iteration of one of our springtime go-to dishes: eggs and greens on toast. Today, Erik was inspired (perhaps by the spirit of Spring?) to sprinkle nasturtium blossoms and little arugula flowers over the plate.

It was dee-lish–so much so I had to blog it. I sincerely hope we haven’t blogged this before, but it seems like we would have, because we make this dish so often.

Anyway, it’s easy to make:


All you have to do is cook up a mess of greens of your choice: steam them, saute them, do whatever you like. The greens can be spiced up with onions, garlic, hot pepper, etc.–or absolutely plain.

At the same time, get some water going for poached eggs. While that’s heating, toast up some nice big slices of bread. Dress that toast how you like–with butter, olive oil, S&P, a rub of garlic, maybe a bit of some gourmet spread you’ve got in the fridge–whatever.

(And by the way, just because it’s not part of our plan doesn’t mean that some bacon or ham might not have a place in this scenario.)

When the water is simmering, crack the eggs in and cook until they’re poached and still runny–for us, that’s two minutes. This dish is all about runny yokes. When you carve into it, the yoke runs everywhere, coating the greens, soaking into the bread, and doing unspeakably yummy things with the cheese. If you’re no fan of yolk, this is not your dish. Without the yoke factor, it’s not half as good. (We know this because we sometimes overcook the eggs, and then there is much sadness as we pick at our dry toast.)

While the eggs are poaching, pile the greens on the toast. When the eggs are done, slide the eggs on the greens. Add some S&P.

The final stage is cheese. This time, Erik just dusted the whole thing with grated parmesean. You can go one step further and lay thin slices of the cheese of your choice over the eggs, then pop it under the broiler ’til the cheese melts.

Serve it fast, while it’s hot, and the yoke is flowing like golden lava.

Regarding the flowers: Nasturtium flowers are edible, mildly spicy to taste, and strong enough to be tossed in a salad. Arugula flowers (got by letting your arugula go to flower) are delicate white little things. They don’t keep at all–you have to deploy them as soon as you pick them–but they have a very pleasant, sweet flavor all their own. Sometimes I eat them off the bush, much to the consternation of the bees.

A Fast Bean Friday: Khichdi

Lame, lame, lame. I can’t even get it together to put up a picture. I’m just too crazy getting things together for the holidays. I suspect many of you are in a similar state. But I did want to post this, because I think you might want something wholesome and mild to eat over the next week, during your HRD (Holiday Recovery Period).

I learned about khichdi, a lentil and rice dish, very recently. Our friend Ari sent me a link to a basic recipe. It was nothing more than lentils, rice and cumin. I could not help but add some minced onion, but otherwise I followed this simple recipe and came out with something sort of bland but somehow extremely comforting and pleasant.

So I looked up khichdi, and discovered that it is an Indian comfort food–perhaps the Indian comfort food, if I can trust what I’ve read. Plain khichdi is baby’s first solid food. It’s also good for people with delicate stomachs. But it doesn’t have to be plain–it can be spiced up and elaborated with vegetables and toppings of ghee and yogurt. It’s the kind of food that college kids learn to cook when they first go off on their own. It’s the kind of food that each mom cooks a little different.

I’ve been playing with the basic formula, and it’s becoming one of our go-to “fast foods” around here. It cooks up in about a half hour, and you don’t even have to stand by the stove for that half hour. You just saute up the spices, add the rice, lentils chopped veggies and water, put a lid on the skillet and walk away. It’s also a great way to use up vegetable odds-and-ends. You can throw just about anything in there, and the great khichdi magic will make it all work, somehow or another.

I’m going to send you to this excellent post at One Hot Stove for the technique. It’s the best I found in all my research, and I’d just be copying them if I wrote it up here.

(ETA: I’ve been thinking about this over the holidays, and have decided to post the outline of the recipe here, just in case One Hot Stove ever closes up shop. I hate it when posts end up with dead links. I’d encourage you to read the One Hot Stove post if you have the option, because there’s more detail there, and a recipe for another dish called kahdi.  My recipe after the break –> )

Okay, khichdi is just rice, lentils and whatever spices and veggies you might have on hand cooked up into a pleasing mush in a skillet. It doesn’t make a lot of sense to get dictatorial about a recipe. It’s a technique.

This basic khichdi formula, as it lives in my head, is all you really have to remember–the rest is improvised:

The ratio of lentils to rice is 1:2, and the water is twice the measure of the rice and lentils.

For example, for two servings, I’d combine 1 cup of rice and 1/2 cup lentils. That’s 1 1/2 cups total of dry stuff. That means I’d need 3 cups of water.

The basic cooking methodology is to first rinse your lentils and rice, then lightly saute up the onion and spices in a deep frying pan. Then you dump in the lentils, rice and water–and veggies, if you’re using them– bring it all to a simmer, cover and cook on low for 1/2 hour.

(This is a recipe for white rice. Brown rice is better for the body, yes, but it does take longer to cook. Since khichidi is what we make when we’re starving and want food fast, we’ve been using white rice. If you use brown rice you’ll want to adjust the cooking time and water accordingly.) 

The details are where you get to swing. The details are both the vegetables and the spices. These you can add as you please.

Veggies:

This is your chance to use up whatever you have in your fridge, or those singleton veggies coming in from the garden, anything from chopped greens to peas to cauliflower…anything at all. Tomatoes, fresh or canned, are always a good addition. Pre-cooked, leftover vegetables would be fine, too. Chop it all up smallish. If you add lots of veggies, particularly the drier, root vegetable types, you’d want to add some more water to help them cook.

Spices:

It can be as spicy or mild as you like. I think whole cumin seed is a really important part of the flavor profile. I love the scent of whole cumin seed when it hits a hot pan, and it makes the rice fragrant. If you don’t have any whole cumin, I’d encourage you to hie off to the nearest ethnic market and get a goodly sized bag of it. Beyond that, it’s up to you, spice-wise. Salt and cumin only is a fine place to begin.

Still want more specifics? 


My procedure:

This is what I do, more or less. Say I’m making the two serving batch described above. I’d heat up a deep skillet, add a couple of tablespoons of oil and toss in:

1 small chopped onion, or 1/2 a big onion
Let that cook until translucent.

Then all at once, I add the spices, letting them heat just until they’re fragrant:

1 heaping teaspoon of whole cumin
1/2 teaspoon of turmeric
A big pinch of hot pepper flakes
Maybe a teaspoon of coriander seeds, since I’m into those lately
(One Hot Stove recommends garam masala, which I don’t have (yet), but you might.)

When the pleasing scent of roasting cumin starts rising from the pan, I add the lentils and rice and water. You don’t want to burn the spices.

Once the lentils, rice and water are in, I add maybe a half teaspoon of sea salt, stirring it into the slurry to distribute it evenly.

Next I’d add my veggies, if I have any. Anywhere from 1 to 3 cups, chopped. Sometimes we just have the lentils and rice, especially when we’re really tired and don’t feel like chopping. Or thinking.

Bring the whole mess to a simmer, then cover, turn the heat to low, and walk away for a half hour.

Come back to find dinner in a pan.  Scoop it up and serve with yogurt. Top with chopped parsley or cilantro, if you’re feeling fancy.

Return of Bean Friday! Chickpea, Pasta and Tomato Soup

This is the soup at day two, when the pasta started to fall apart. It was prettier day one, with all the pasta whole and springy. But you get the idea.

This one is a keeper. I had to share. We forget how good chickpeas (aka garbanzo beans) can be. They get relegated to hummus duty and not much else. This is a mistake. When cooked right, chickpeas take on a sweet creaminess that ought to make them the queen of beans.

This recipe highlights chickpeas, using them both whole and pureed to make a rich, surprisingly creamy soup flavored with tomato and the faint perfume of rosemary. It also is a very simple recipe, requiring only 3 major ingredients, no stock, and not much in the way of prep. It does take a while to cook, but very little of your time is spent in the kitchen.

I found this recipe in the very useful The Silver Spoon cookbook, where it’s called Pasta e Ceci alla Toscana. The quantity made by the recipe was pretty small, and when I make soup, I make a lot, so I doubled their quantities. This is my interpretation.

————

Allow three hours of cooking time

You need:

2 cups dried chickpeas. Please don’t use canned beans for this recipe–I don’t think it will work. I also doubt other types of beans would work quite as well.
1 28 oz. can of chopped tomatoes, or the equivalent fresh or home canned, chopped to spoon size if necessary.
8 oz. (approx.) of dried penne pasta, or any other shape pasta you prefer.
4 garlic cloves, peeled (and chopped if you don’t have a garlic press)
2 tsp. chopped fresh rosemary
1 tsp. fresh thyme leaves
Olive oil
Salt & pepper
Fresh Parmesan for topping, optional

The recipe called for not only an overnight soak for the beans, but also for three hours of cooking time. That seemed like overkill. What I ended up doing was letting my two cups of dried beans soak on the counter for 2 or 3 hours, by which time they’d doubled in size.  I’m not sure if pre-soaking is necessary at all, really. The long cooking time may be necessary to get the beans silky enough. This will all be the subject of future experiments.

Put your (maybe) soaked beans in a big pot and cover them with about 8 cups of water. Bring to a boil. Cover and simmer for 1 1/2 hours. At that point, scoop out about 2 cups of the beans (about half of the total) and a little of their liquid and puree them until smooth. Return the puree to the pot. (This step is the secret to the soup’s creaminess) Cover again, and cook for another 1 1/2 hours.

In the last half hour or so of cooking time, heat up a couple of tablespoons of olive oil in a deep skillet. Using a garlic press, squeeze the garlic cloves into the oil (or added chopped garlic) and add the chopped herbs. Immediately add all of the tomatoes to the pan, including their juices. In my case, I just dumped in a 28 oz can of chopped tomatoes. Simmer this mix for about 15 minutes.

Add the cooked tomato mixture to the soup pot, and season with salt and pepper to taste. Return to a simmer.

Finally, add the dried pasta (the original recipe called for fresh tagliatelle, just fyi). I added about 8 oz. of penne pasta, because I thought the penne would look nice with the whole garbanzos. Cook until the pasta is al dente, about 15 more minutes.

Add more water at any time during the process if it’s starting to look too thick. This soup can be as thin or thick as you like it, really. 

When the pasta is ready, do any final adjustments with S & P. It’s amazing how little seasoning this soup needs.

Pour into bowls and dress with lots of fresh grated Parmesan, fresh ground pepper and a drizzle of olive oil. The cheese makes it extra rich and tasty, but you can also serve it vegan style.

——

I’d classify this soup as kid friendly, vegan friendly, and husband friendly. Erik really liked it, and he is often suspicious of soup–he just doesn’t think soup is real food. (I know! He a lunatic.) But the pasta in it fooled him into thinking it was more of a pasta dish than a measly bowl of soup. Win-win!

Appletastic Apple Cake

Here’s something easy and delicious for you to make this weekend. You might even have all the ingredients on hand.

It’s a light, flavorful, not-too-sweet cake which is comprised mostly of apples held together by an egg batter. I suppose you could think of it as an apple quiche. It’s very pleasing, and versitile, too–it would be a good addition to brunch, or an afternoon snack, or, if dressed up with ice cream or whipped cream, it would be a fine dessert. This morning, I ate the leftovers for breakfast.

The recipe comes from The Paris Cookbook, by Patricia Wells, which I’ve mentioned before.

The key to this recipe is good apples. The better the apple, the better the cake. Wells prefers acidic cooking apples for this recipe, recommending Cortland, Gala or Gravenstein. But she says sweeter cooking apples, like Jonagold, are good too. I used Fujis because that’s what I had on hand.

You’ll need:

Equipment:

A 9 inch springform baking pan. (These are pans with sides which open up and disengage from the bottom.)  If you don’t have one, you could make it in a regular round cake pan, or even a square one. It’s just that the final product is a little sticky, and the springform helps with a clean release. You’ll lose points for presentation if you have to dig it out of a regular pan, but it will still taste mighty good.

The cake batter:

1/2 cup flour
1/3 sugar
1 tablespoon baking powder
1/8 teaspoon sea salt
1/2 teaspoon vanilla extract
2 large eggs, lightly beaten
2 tablespoons vegetable oil
1/3 cup whole milk

Apples, about 2 pounds worth. Wells says that’s about 4. I found it took 5 Fujis to add up to 2 lbs.

Peel and core the apples, cut them in half and slice the halves into thin slices.

The topping:

1/3 cup sugar
1 large egg, lightly beaten
3 Tablespoons melted butter

Put it together:

Pre-heat the oven to 400 F.

Butter the pan heavily and set it aside.

In a big bowl, combine the batter ingredients in the order listed. The dry come first in the list. Fork or whisk them around to blend them before you add the liquids. I cleared a well in the dry ingredients,  added all the liquid ingredients (vanilla, eggs, oil, milk) into the well, then used the whisk to draw the  dry stuff into the liquid, bit by bit, until I had a nice smooth batter.  But really, this isn’t fussy cooking so I suspect you could just dump it all together at once and stir it up.

When the batter is smooth, add in the apple slices and toss until they’re coated.

Pour the this apple batter mix into the greased pan and sort of jiggle it around until the apples are all lying more or less flat.

Put it on the center rack of the 400 degree oven. Bake this until the top turns golden, and the batter doesn’t look liquid anymore. You should be able to touch the surface and not encounter wet batter. Wells calls this “fairly firm.”  She says this should take 25 minutes.  For me, it took 35 minutes, but my oven may not have been sufficiently preheated.

While you’re waiting for it to bake, mix together the topping ingredients in a small bowl and have that standing by.

After 25 minutes or so, when the cake reaches this dryish, fairly firm state described above, take it out of the oven and pour the topping over the surface, then put it back into the oven to finish.

Finishing takes about 10 minutes. What you’re waiting for is for the surface to turn a yummy deep golden brown, perhaps a little dark on the high points (like a well cooked quiche), and again, for the surface to dry and firm up.  When it’s not quite done you’ll still be able to see liquid bubbly stuff broiling away at top. When it’s ready, it will mostly dry up, and the cake will feel firm when pressed.

(Edit: Comments have helped me remember that while 10 minutes was the recipe’s rec’d time, it took longer for it to brown–more like 15. Don’t pay as much attention to the clock as to color, and the dryness of the surface.)

Take the cake out, let it cool for at least 10 minutes, then ease a knife all around the sides. The browned sides of this thing are my favorite part, so be careful to keep that crusty stuff intact. It also looks nice. After you finish loosening the edges, release the springform.

This cake is meant to be served at room temperature. Wells specified that it should be served in thin slices, but we didn’t really follow that advice. It’s more like we each took half.


Oatmeal: It’s Not Just for Breakfast Anymore

(we’ve really gotta get us a live-in food photographer)

Mrs. Homegrown Here:

Okay, this is one is a little weird.  I’ll tell you right off that Erik won’t eat this stuff (it just seems wrong to him), but I love it.

I’m exploring the world of savory oatmeal. I’m sure there are savory oatmeal recipes on the web, but I haven’t looked because I’m enjoying working without a map.

What I’m doing right now is making oatmeal with seaweed in it, inspired by both my love of Japanese style breakfasts, and half remembered things about the Irish eating dulse in their porridge. I don’t like sweet cereal, so this suits me fine in the morning–but I also like it for lunch or dinner.

What I do is start the oatmeal water boiling and toss in shreds of dried seaweed. I’ve been using roasted nori, the sushi sheets, and also the flavored nori strips, because that’s all I have on hand. But there’s a whole world of more interesting seaweeds to try–including dulse. Anyway, after I shred a lot nori in the water, I add a dash of tamari and a dash of soy sauce, then the oatmeal. And finally I stir in a big pat of butter. This doesn’t jive with the Japanese thing so well, but I find butter just takes the whole thing up a notch in terms of savory, unctuous goodness.

I think this would be spectacular with a little salmon on top. And I’m going to move forward and try adding things like mushrooms, or cooking the oatmeal with stock.

Do any of you make savory oatmeal?