So-So Tomatoes Become Excellent When Dried

As we reported earlier, we weren’t thrilled with our cherry tomato choice this summer. They were just plain dull. They were also rather large for a cherry, more like mini-plum tomatoes, which made them awkward for salads. But they were healthy plants, and very, very prolific. In situations like this it is good to remember that tomatoes which don’t taste good off the bush often cook or dry well. The ratio of skin and seeds to pulp in these tomatoes made them a bad candidate for sauce, so we’ve been drying them.

And man, are they good dried. Like tomato candy. It’s very hard not to snack on them, but I’m trying to save them for the depths of winter, when I really miss tomatoes.

We have maybe a couple of quarts of them now. Several years ago we had an absolute disaster involving a pantry moth, its many offspring, and one big jar of dried tomatoes. For this reason I’m storing the dried tomatoes in a series of small jars, to offset the risk. Another good tip for fending off moths is to freeze any food stuff which you suspect might be at risk for 4 days to kill moths and their larvae.

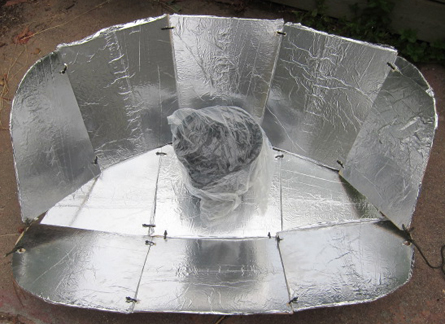
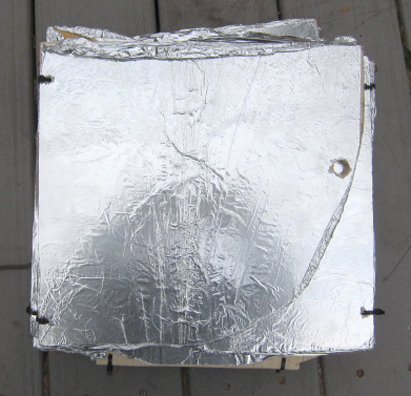
How did we dry our tomatoes, you ask? Usually we use our homemade solar dehydrator, but this year we’ve got a friend’s electric dehydrator on loan. It seemed wicked to run the thing day and night, but it dries a lot faster, and with less work overall, than our solar set-up. (Oh, the wonders of Modern Living!) The one thing I did not like, though, was the constant noise. The dehydrator sounds a little like a running microwave, not loud, but persistent. I was always half-consciously expecting to hear the microwave “ding!” at any moment.

So, while the electric dehydrator let us process this crop of tomatoes in record time, I don’t think we’re going to ever buy one ourselves. Old Betsy, the wonky wooden dehydrator, suits us well enough.

CooKit Solar Cooker Made Out of Wood

The nice folks at Solar Cookers International gave us permission to reprint plans for their CooKit solar cooker in our book Making It. You can access those plans, as well as many other solar cooker projects, for free, on their website here.

I’ve made CooKits out of cardboard and aluminum foil a couple of times. One problem is that I eventually bang up the cardboard and I’ve got to make a new one. This summer I had a lot of  1/4 inch plywood leftover from fixing up Mrs. Homegrown’s writin’ shed. Rather than send that plywood to the dump I decided to make a more permanent CooKit.

I blew up the CooKit pdf from the SCI website using Adobe Illustrator.  I did a tiled printout and taped the pieces together to create a life sized pattern. I used this pattern to cut out the plywood pieces.

I spray glued the aluminum foil to the plywood. Next, I drilled holes in all the pieces and inserted twist ties to, essentially, create little hinges so that I could fold up the CooKit when not in use.

The plywood CooKit folds much better than my cardboard versions did.

This type of “panel” solar cooker works best for things like polenta and rice. Now I’ve got a convenient folding panel cooker for backyard use and camping trips.

Emergency water storage

We’re finally ready for The Big One. In terms of emergency preparedness, we were pretty well set in terms of food, light, fuel, etc., but we didn’t have much water. Just some jugs, a rain barrel that’s empty most of the year, and the water in our hot water tank. This lack made me nervous, so we finally did took the bull by the horns–or the bung hole…

 How much water should you store? 

1 gallon of water per person per day. This is the minimal amount necessary for drinking, cooking and very basic hygiene. If you live somewhere it can get beastly hot, factor in extra water for drinking. In scorching temps you’ll need a gallon per person a day just for hydration.

Expect you’ll need at least a two week supply. That’s a minimum 14 gallons per household member. Then be sure to add extra water for pets and livestock. When we considered all of that, it seemed like a 55 gallon drum was not too much for the two of us and our pets. Ideally, we’d store more. It doesn’t rain here 3/4 of the year, and there isn’t any natural water source nearby. A second drum might be in our future.

What we’re using:

We shelled out the money for a brand new, food grade 55 gallon drum. The reason we didn’t go with a much cheaper used food grade drum is because some food stuffs leave behind residues which is impossible to clean from the drum. These might just manifest as off odors that make the water smell and taste bad, or they might even contain tiny traces of food will lead to bacterial growth during long term storage. For example, it is impossible to clean away traces of dairy, no matter how hard you scrub. It seemed better to just pay the extra money than to worry about it.

I don’t like plastic much, but short of buidling a concrete cistern or something like that, the only other similar option would be to buy a stainless steel drum. I’d much prefer to do so, but new ones priced out in the $800 to $1000 range. 

Accessories for the barrel:

There are two vital accessories that go with any 55 gallon drum: a bung wrench (see pic above) to open and close the drum’s bung holes easily (it apparently can also be used as a gas shut-off wrench) and a siphon pump to get the water out of the drum. There are nice, solid pumps sold for frequent use, but we got a cheap one ($20) and hope it will hold up in our hour of need.  All our equipment came from a surplus store, but many retailers can be found with a little simple googling.

Alternatives:

You might find sturdy 5 gallon water containers more versatile, both for handling and storage. And choosing them instead of a drum will preserve you from ever having to say “bung hole” out loud. Just make sure they are strong, BPA free, and suited both for stacking and long term storage. The less expensive ones may leak, and can’t be stacked. Find them at outdoor and surplus stores, and online.

If you want to recycle, you can store water in plastic 2 liter soda bottles. Don’t use the white milk jug-type containers (whether they held milk or juice) because they don’t age well and don’t seal well. Glass jars are nice because they’re not plastic, but they are heavy and must be carefully stored.

You can just store commercially bottled water. If you do this, change it out according to the expiry date.

Cleaning the container:

Whatever container you use, clean it first by washing with soap and water if necessary, then rinsing it out with a mild bleach solution (1 tsp in a quart of water). Bleach is what The Authorities always recommend. I’m no fan of bleach, but in this case have decided to toe the line instead of trying vinegar instead, because I just don’t want to take any risks in this case.

Filling the container:

City water is already treated with chlorine or chlorine variants, so if your house water comes from a municipal supply line you don’t have to treat it by adding extra chlorine or iodine prior to storage. You can store untreated city water for 6 months.

If your water comes from a well or other untreated source, then you should treat it prior to storage by adding 1/8 teaspoon of regular, unscented chlorine bleach to each gallon of water.  

Treating dodgy water:

If you suspect that your water is contaminated–for instance, if after an emergency you doubt the cleanliness of the water from the tap, you should take steps to purify it before drinking. These are things to commit to memory, or maybe pin on the fridge, because in an emergency, you probably will not be able to check the internet.

Boil it:  If you have the fuel, you can purify water by bringing it to a rolling boil for 1 to 3 minutes. 

Bleach it: Even if you’re a bleach hater, like me, you should keep a small bottle of unscented, regular (not color safe, thickened, etc.) chlorine bleach on hand for emergencies.

Add 16 drops (1/4 teaspoon) of bleach to each gallon of water. Shake, and let sit for 30 minutes before drinking.

Iodine: If you have liquid 2% tincture of iodine, add 5 drops per quart. If you have tablets, follow the manufacturer’s instructions. Apparently adding a pinch of powdered vitamin C or orange drink hides the iodine flavor. And prevents scurvy!

The preceding directions are for clean-looking water. If your water is cloudy, you will want to try to filter it as best you can to remove sediment (filter it though a coffee filter or t-shirt or somesuch), and then be extra rigorous in the purification. Boil longer. If you’re using bleach, you should be able (unfortunately) to detect a faint odor of bleach in your water after treatment. If you don’t, it’s not clean. Repeat the process. If you’re using iodine, use 10 drops per quart instead of 5.

ETA: Forgot! Another way to disinfect water in an emergency situation is through solar water disinfection, or SODIS. Basically you fill up a clear plastic (PET) liter bottle–it has to be clear, and it can’t be bigger than a liter–and put it in intense sun for 6 hours. Filter the water first if it’s dirty. See AfriGadget for details.

Storage length:

Stored water should be swapped out for fresh every six months (except for commercially bottled water–again, check the expiry date on that). Use the old water for your garden, sanitize the containers and refill. We’ve got the swap date marked on our calendar so we don’t forget.

Where to store the water:

Somewhere dark and relatively temperature stable. Also, no matter how sturdy the container, there is always a chance for water leaks, so you should keep that in mind, too. We live in a very mild climate, so we’re keeping our barrel in constantly shady, protected corner of our back yard.

Some resources:

How to Store Water for Drinking and Cooking (PDF from Penn State)

Backpackers Guide to Water Purification

FEMA Preparedness PDF

Dry Farming

Jethro Tull–the agriculturalist not the rock flutist

According to a 2010 report by Ceres “Water Risk in the Municipal Bond Market,” Los Angeles ranks number one in water supply risk. But we’re not alone. Many other US cities including Atlanta, Phoenix and Dallas also face a future of water insecurity.

Due to these water risks we’d all do well to consider ways to grow edibles without supplemental irrigation. This may sound absurd at first, but I’ll note that in our garden we’ve discovered, quite by accident, that many plants such as prickly pear cactus, cherry tomatoes, cardoon and pomegranates will do just fine in a climate where it doesn’t rain for six months out of the year.  Scott Kleinrock at the Huntington Ranch proved that you can grow chard in Southern California with almost no irrigation through a hot summer (the chard thrived in the Ranch’s food forest under almost complete shade).

As an avid gardener in a dry climate I certainly use a lot of water for my vegetables. Most modern vegetables are adapted to copious watering. But this was not always the case. A classic book Dry Farming by John Andreas Widtsoe, first published in 1911 and available as a free download in Google Books, describes how many farmers got along without the modern conveniences of supplemental irrigation.

A dry farmed wheat and alfalfa field in Wyoming from Dry Farming

Other than the advice to till frequently (tilling, among other things, destroys beneficial fungal networks), Dry Farming has some good tips:

  • Maintain soil fertility 
  • Plant deeply
  • Plant varieties adapted to dry farming
  • Know when to plant
  • Pay attention to soil structure

The main takeaway for us home gardeners will be the development of drought tolerant veggies. Native Seed Search is a good start, but seed saving will be the ultimate solution. We’re simply going to have to breed drought tolerance back into our water hungry vegetables. Combined with passive water collection techniques such as sunken rather than raised beds, those of us in arid climates can grow a surprising amount of food with a lot less water.

Clarification: dry farming is not growing during the rainy season (which is called “rainfed agriculture”). Dry farming uses strategies to store water in the soil during the rainy season and then grow during the dry part of the year. Though controversial, dry farming traditionally involves tilling.  It also requires much greater spacing of plants. For more information see the website of the California Agricultural Water Stewardship Initiative.