
This 2011 post has been edited on 7/8/14, also to include new tips and new pictures. Most important of these are directions on keeping the lotion fresh.
Confession: I can’t live without my homemade moisturizer.
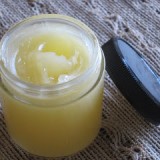
This recipe appears in Making It as Olive Oil Whip. It’s my everyday body lotion/face cream and I figured it was about time to share it with you. It only has three ingredients. It’s safe and wholesome and very effective. It’s so basic and natural that you could eat it!
You might find it heavier than what you’re used to, because it doesn’t contain all the chemicals that the store-bought stuff employs to make it absorb fast into your skin (see the Skin Deep database for the scoop on what’s in your favorite moisturizer). But I promise you that if you use it for a couple of days you’ll get used to the difference–and then you’ll get hooked on the results. My skin has never been so happy as it has since I started using this stuff, and I’m saving tons of money. I will never go back. I don’t even like the way commercial moisturizers feel on my skin anymore.
The Whip
Ingredients:
1/2 cup (125 ml) olive oil
2 tablespoons (.5 oz / 14 g) of cosmetic grade beeswax, either in bead form or grated and packed into the spoons. (You can use vegan waxes instead)
1 cup (250 ml) of 90°F (32°C) water, distilled is best.
Essential oil of your choice for scent, about 10-20 drops, optional
(Notes on ingredients at the end)
Equipment:
You need a double boiler. An improvised double boiler would be a heatproof bowl balanced over a saucepan. I settle a Pyrex (i.e. heat proof) measuring cup in a small saucepan, which is more like a pseudo double boiler, but works for this. If you don’t have a Pyrex cup, you could also put a canning jar in the saucepan.
You will also need a stick blender. It is possible to do this with a countertop blender, but the stick blender works better and cleans up faster. And in case you’re wondering, no, you cannot make this recipe by stirring really fast. So when the zombies come and the power goes out, we’ll have to beat back our wrinkles with salves–most likely salves rendered from raccoon fat.
A kitchen thermometer. I did not use a thermometer when I started making this lotion, but I’ve been much more successful at it since I started using one regularly.
Very clean, preferably sterilized, jars to store your lotion in. This recipe makes anywhere from 1 to 1 1/2 cups. I recommend storing your lotion in several small jars instead of one big one, and we’ll talk about that later on.
Note:
This recipe is verbose, but the actual making of the lotion takes all of 10 minutes. It’s really very simple once you have the details down: melt wax into oil, blend oil with water, pour into jars.

The Procedure
I am going to describe my method for making this. It’s not the only way–you can tinker around to make it work for the equipment you have. I like to do everything in one vessel–in this case, a 2 cup, heat-proof liquid measuring cup.
Melt the wax:
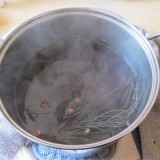
Put all the olive oil into the 2 cup Pyrex (or in the top of your double boiler setup) and add the wax. Place the measuring cup in a small saucepan about half full of water. Heat over gently simmering water, stirring occasionally. until the wax melts and vanishes into the oil. Beeswax melts at about 160°F (71°C).

Pay attention to temperature:
Temperature is very important for the success of this recipe: the temperature of the water, and the temperature of the oil and wax mixture. The wax melts into the oil at about 160°F, as I said. Anywhere between 160°F and 170°F is a good place to be before you go on to the next step.
If you don’t have a thermometer, you know that you’ve hit 160°F when the wax melts, so if you start blending as soon as that happens, you will be at the right temperature. Just don’t super-heat the mix, or let it cool.
Prepare the water:
While the wax is melting, get your water ready to go. I always put my 1 cup of water into a liquid measuring cup, for ease of pouring.
The water needs to be at about 90°F (32°C). I bring the water to this temperature by adding a splash of boiling water to most of a cup of room temperature water, then checking the temp, adding hot or cold water as necessary to get into the 90° range. 90°, 92°, 95° — somewhere in there. It doesn’t have to be exactly 90°
If you don’t have a thermometer, you will have to guess. The water should not feel warm, but it should not feel cold, either. You’re shooting for tepid. This is hard, because how “tepid” feels to you is going to have a lot to do with the temperature of the air, and how cold your hands are… I’ll just say a thermometer is a handy little piece of kitchen equipment.

Get your other stuff together:
If you’re going to use essential oils to add scent to your lotion, make sure you’ve got them on hand in your work area.
Also put your clean jars in the work area.
Prepare the blender:
Get your stick blender ready to go. It helps clean-up if you preheat the head of the stick blender in a cup of hot water before you use it. If you use it cold, the wax in the oil mixture solidifies prematurely when the cold head touches it. It’s not a disaster, just a little harder to clean up.
If you are going to use a countertop blender, put a cup or two of very hot water in the blender as well, to preheat the jar and the blades so similar sticking doesn’t happen. In this case, it’s an essential step, because there’s so much cold surface area to the blender, you can end up with lots of little chunks of wax in your lotion.
The next steps happen quickly:
Add the essential oil to the wax/oil mix
Stir in your essential oil(s), if using, 10-20 drops or to taste. Be quick about it.

Add the water and whirl!
Still moving briskly, take the oil/wax mixture off the stove and move it to where you’re doing your blending. Don’t burn your hand on the Pyrex handle, if you’re using my method.
Put the head of your stick blender into the hot oil and start it whirrrrrring. Soon as its going, pour in all the water in a fast steady stream, and keep blending until the lotion comes together. If you’re using a counter top blender, pour out the preheating water, pour in the oil, start the motor and pour in the water.
You’ll see that lotion-like substance form almost instantly. It’s very thick and shiny, like marshmallow cream, so you’ll have to bounce the stick blender around a bit to make sure it’s all getting mixed. With a countertop blender you’ll have to start and stop it and poke at it with a rubber spatula.
The biggest trick with this stuff is getting the water mixed in. We are not using any chemical emulsifiers, which would bind the water and oil together. We’re sort of uniting them by force of will and our cock-eyed idealism. It doesn’t always go smoothly. Ideally you can get all of that 1 cup of water to incorporate in a few seconds. But sometimes it just doesn’t want to mix in. Don’t overmix the lotion trying to force the issue, or the texture will be off. This is a very fast process.

If after a few seconds you see that you have a lot of stuff which looks like lotion in your jar, but that there’s also pockets of water in there, and the water doesn’t seem like it’s going anywhere, just pause and pour the excess water off. Give the lotion another short whirl to bring up any more water that might be lurking at the bottom and pour that off as well, then call it done.
Note: You certainly may make this recipe with 1/2 cup of water instead of 1 cup–intentionally. The result is a thicker, heavier cream which is really good for harsh weather and outdoor sports, or just those times when your skin is extra dry and itchy. It also makes a good make-up remover/cleansing cream. Basically, the more water, the lighter the moisturizer, the less, the heavier. It’s all good. If you use no water at all, you’ve made a salve–and that’s good too!
Scoop the cream into jars:
While the cream is hot, transfer it to your prepared jars. Let the jars cool a bit, and then cap them.

Clean-up:
I have two words for you: baking soda. It’s hard to get this stuff off your tools, and you don’t want wax down your pipes. Rub with lots of baking soda, which will pick up the grease, and dump the baking soda clumps in the trash. Lots of soap and boiling hot water rinses help with the rest of the residue.
I don’t know if this is TMI, but this is the first stage of my clean-up process: I always plan to shower right after I make this, so I can take my lotion-covered cups and spoons into the bathroom and scrape out every last bit of lotion and slather myself from head to toe. Waste not, want not!
A safety note:
This recipe contains no preservatives. Any time you mix oil and water together, you run the risk of bacteria moving in and setting up house. I make this moisturizer because I want a simple product with no fishy ingredients, so I don’t want to add preservatives. I’ve never had any problems at all after years of heavy use of this recipe, nor have my friends or teachers who use it, as well, but technically it’s “unsafe” because it does not have preservatives in it. But you know, driving a car is very unsafe, but I still do it.vWith the lotion, I’ve decided the risk is very low compared to the rewards.
This is my choice–your choice may be different. If you want to use preservatives, Google will lead you to preservatives sold for home crafters. Alternatively, you could look into making skin care products with no water in them, like body butters.
All that said, you can minimize risk through a few simple precautions:
First, prepare the lotion in a clean environment, with clean tools and clean hands. If you have a dishwasher, send all your jars and tools through the sterilize cycle. Wipe down your counter with the strongest disinfectant you are willing to use, be that bleach, alcohol or vinegar, before you start working.
Second, the best way to keep the moisturizer clean is to use it fast, to stay ahead of bacterial growth. I go through a batch a month or less, because I use it all over my body. Think of it as a perishable food product, like a tub of hummus. This might seem strange at first, because we’re used to cosmetics which seem to have an unlimited shelf life. Not so with this cream. Use it up or throw it out within a month.
Third, keep it clean. Each time you reach into your lotion jar, you leave some bacteria behind to breed. If you keep all of your lotion in one jar, all of your lotion is available for contamination. This is why I recommend splitting the batch into a few jars, and only using one a time, leaving the others pristine. And of course, wash your hands before you reach in there-or even use a little spoon if you want to get all Howard Hughes-y.
Fourth, those extra jars should be kept in the fridge until you need them. The cream doesn’t spread well when chilled, but will be fine again as soon as it warms up.
Finally, use common sense. It is not a sterile product. Don’t put it on sores or wounds.
Rosemary essential oil has good antibacterial properties, so if you like you can add some –it can’t hurt, but I wouldn’t rely on it alone, I’d still follow the above advice. Vitamin E oil is often mentioned as a preservative, but it is actually good for keeping oil from going rancid, not for inhibiting bacteria.
Note that changing this recipe so that you replace the water with novel liquids–such as green tea or aloe–will make a product spoil even more quickly. I do not recommend it. If you insist on trying this, use it fast–as in, over a home spa weekend–and keep it in the fridge.
Whenever you use a homemade product, use your nose and your other senses. If the cream goes off you might notice a change in odor, texture or color.
Problems:
As I’ve already mentioned, the water doesn’t always incorporate well. The very best batches absorb the full cup of water and come together nicely and stay together. What makes them work seems to be a magical combination of temperature, timing and the blessings of the lotion fairies.
You may find a little water sitting in the jar now and then. This is not unusual, certainly not a sign of failure. Just pour it off.
In the not so good batches the amount of water that appears is epic as it comes unbound from the oil day by day. Just pour it off. The texture will be off, but the stuff still works, and is fine to use. It’s just not as nice. Try again. You’ll get the hang of it.
Notes on ingredients:
Olive oil: There’s a lot of debate about what kind of olive oil to use. Some people wouldn’t hear of using anything but the best organic extra virgin olive oil in any body product. I don’t think it’s all that bad to use a lesser olive oil. More processed olive oil doesn’t smell as much like olive oil, which has its advantages. It’s up to you, really.
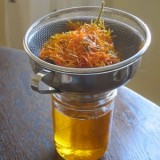
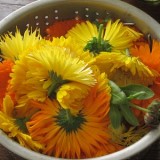
What I do like to do is use olive oil which I’ve infused with herbs, especially Calendula, which helps heal the skin
Beeswax: I use the beeswax pastilles sold by Mountain Rose Herbs. Yes, it’s a pain to have to mail order them, but it’s so worth it. A 1 lb bag will make 30 batches of lotion. I use it to make salves and lip balm, too. It’s very handy.


have also been making my own skin lotion for years, but last batch went moldy for some reason. something was contaminated! Anyway, thanks for the reminder about using baking soda for clean up. Have been using hot water only and this should make it much easier!!
Could I substitute cocoa butter for the beeswax?
I have GOT to try this! Have to see about getting some beeswax…somewhere.
@Morgaine: Did your last batch have any food-ish ingredients? Once I used green tea in place of water and it went moldy real fast.
@Anon: I don’t know, honestly. All you can do is try.
Very cool. But I’d like to recommend that everyone try only two essential oils with face cream: lavender or vanilla. The reason is that all other essential oils have mild skin irritants. OK for skin on the rest of the body but not the face.
Can you make vanilla essential oil? If so how?
As far as I know, you need a still to make essential oil. However, you could infuse your olive oil with vanilla beans, and that would carry a vanilla scent into your product. I’ve done this with lavender buds successfully, but I’ve never worked with vanilla pods this way, so I can’t recommend quantities, but basically you’d put the whole pod(s) is the oil and let it sit for about 3 weeks. I don’t see why that wouldn’t work.
What about jasmine? I’ve rubbed that almost directly onto my face, its really nice
People vary in sensitivity. Lavender seems to be almost universally safe, but that doesn’t mean you can’t try other things. It’s best to dilute your essential oils. If I were you, I’d mix a spoonful of olive oil with a couple of drops of your jasmine and test it on the inside of your elbow. Wait a few hours to see how it does. If it’s good, and you want to be extra cautious, try your face and throat next. If all that’s good, it should be fine for lotion.
Not true. Although some oils shouldnt be used at all on the skin, there are plenty that can. It’s not so much the oils as how much you use. I have rosacea so am VERY sensitive but I’ve used chamomile, rose, geranium, ylang ylang and tea tree to great effect. I trained in aromatherapy long before the “sue you” culture took hold (thanks America! ) and I am shocked at how many oils are considered toxic or irritant. It is sad. Many useful oils are shunned because teachers are afraid to recommend them. I use the British Pharmacopia for info. It’s pure science without the woo fear.
Is there a particular brand of stick blender that you’d recommend? And it would be safe to use on food afterwards, right? Thank you. 🙂
Can you freeze some of it so it won’t go bad?
Off topic:
Re: Human waste composting, is it possible to compost human waste then use it to grow mushrooms? At what point would it be best to use this type of compost for mushrooms?
Am thrilled to try this recipe as we head into winter, I get chapped skin so easily. Any chance you have a recipe more suited for the face? This recipe seems much too heavy for the face…
Thanks for the awesome blog!
@Anon: Thanks–that makes good sense. I use lavender mostly, but I’ll admit that I’ve used a few others without ill effects, but certainly you have to be careful and sensible–peppermint, for instance, would be just terrible (burny!), as would citrus, I think. Quantity also matters. And individual tolerance is everything. So be careful. Much better safe than sorry and itchy and red faced. And really, what things in life smell better than lavender and vanilla?
@StacySix: My stick I found in an alley and probably cost 10 bucks at walgreens when it was new–in other words, it doesn’t work very well. Soup yes, lotion no. I have a friend who makes this recipe with her Kitchen Aid stick and says it works very well. I don’t know what model number it is, but it’s one of the more pricey ones–it runs around $50 and is super turbo charged. Remember a countertop blender works just fine–you just have more cleanup.
@Brett: I doubt it would freeze well, but all you could do is put a little test jar in there and see what happens.
@Anon: Wow. I sure don’t know the answer to that. I don’t know enough about mushrooms. Perhaps you should shoot this question to mushroom guru Paul Stamets and/or to Mr. Humanure, Joe Jenkins.
@Shannon: But this is for the face! I know it sounds heavy. And you will find it heavy when you first try it. But I swear it is the best thing ever for your face. It will not block pores.It will make it feel smooth and resilient, never tight or dry.
I’m on a bit of a soapbox about this. I think our skin is perpetually overdry, between skincare routines that call for washing w. soap, scrubbing with abrasives, shocking with toners (alcohol) and then light moisturizing with lotion that contains yet more alcohol–plus the perpetual dehydration that comes from artificial heat and cooling, not to mention the weather outside–I could go on.
In short, I can only speak to my own experience but I’ve had “problem skin” since day one and looking back I’m sure I made it worse all along by “treating it”. I think skin just wants to be protected.
Heavy as this lotion seems, my skin drinks it up. It didn’t at first, it went on a little shiny, but it adapted. Since using it I’ve had no skin problems–either breakouts or dryness. In fact, I was diagnosed with rosacea, but by coincidence or not, when I started slathering this stuff on, it went away and never returned. It’s been years since I’ve been to the dermatologist.
I’d encourage you to try it. You might try putting it on and then using a tissue to blot some off if feel too greasy/looks shiny. Generally I find it goes on shiny but turns matte as it dries–or settles–or whatever. And as I said before, the more you use it, the more the skin adapts.
Thank you so much for the photos and step-by-step explanation. I have long admired the home care recipes in Annie Berthold-Bond’s “Better Basics for the Home” but never knew, for example, what to do with the beeswax. I’m excited to try this!
Side FYI: In my feed reader, your posts still show as originating from Homegrown Evolution.
I too say Thanks for sharing this recipe! I made some herbal salves for the first time a couple months ago and have been wanting to try lotion too. This sounds pretty easy, so I’m going to give it a try! I have leftover sweet almond oil-lemon balm infused oil – would this work, or is olive oil the best type to use?
@charlie b: Hmm. Well, technically it would work, I’m sure–lotion would occur. I’m not so sure that pure sweet almond oil is the best choice for the face. I believe–and I may be wrong–that it is classified as a “drying oil” –an oil that doesn’t moisturize well. See if you can find anything about that on Mr. Google. You may also want to mix it with olive oil, because you know olive oil is your friend.
i was just wondering if you could use rose water or witch hazel instead of h2o. and thanks for the comment about the sweet almond oil, i was wondering why my hands were getting a dry feeling after using my homemade cream with it in it. i am defanitly going to try your recipe and see how it goes. thanks!!
thanks so much for posting this recipe- i have tried a similar but more complex one and it failed to set up properly. i now have quite a lot of a functionally good creme of an unfortunate (thinnish) consistency. i can’t decide whether i over mixed or under mixed. do you have any recommendations? i’ve considered scooping it out of the containers and blending again- or maybe using an egg beater to try whipping it. have you ever tried this?
by the by- i used steam distilled attar of rose water i made in place of regular water and it seems to have worked- and smells nice too. i don’t think *that* contributed to the consistency issue. 3 months on and there is no mold in evidence. also, i used tansy (chamomile) essential oil and that is, as one might expect, very mild and smells nice and apple-y.
I was just reviewing this post and saw that somehow I missed your comment. Sorry! And you’ll probably never know that I finally answered.
But… re: fixing a bad batch by more whipping, etc.: I don’t think it’s possible. It either goes right or it doesn’t. Emulsions are tricky that way.
And yes, I think floral waters would be fine.I’d be cautious to be sure they are truly water. I know some lavender water,for instance, has alcohol in it. I wouldn’t want that on my skin, and I don’t know how it would affect the emulsion.
Finally, chamomile is a great scent!
Thank you for this receipe…can’t wait to try it…I was wondering if one can use coconut oil in place of olive oil…I have very oily skin…lotions will sometimes “slide” into my eyes and I end up with what the Doc calls oily tears…
I have oily acne prone skin and find that a coconut-jojoba bland works nicely for me. Also when the coconut oil is mixed with other oils it does not solidify at room temperature.
@Mimi: Coconut oil is a very different beast than olive, being as it is solid at room temp, but liquid at body temp. So it won’t work as a simple replacement. I’m not sure what it will do, but I’d suspect you’d make something very thick and almost hard at room temp., kind of like cocoa butter.
I have another recipe in Making It that incorporates it with olive oil and beeswax to make a richer lotion. I consider coconut oil richer than olive oil, so if oiliness is your concern, I’d just try the recipe as is and see how it goes. I find myself that the better moisturized oily skin is, the less oily it is. It’s a paradox!
Hi there! You mentioned earlier that Sweet Almond oil is considered “drying” and (I know from experience): Coconut oil is as well…
Great post, thank you!
Did you say that we can use this as an all-over body moisturiser? (Waste not, want not; )
Once again, I’m happy that I bought The Urban Homestead on a whim and started to follow your blog. You are an inspiration. I made this today with my daughter. Super Awesome! Thanks.
Amazing recipe! Thank you!
I made this yesterday and it feels great on my skin, but I think I did something wrong. It set up really hard. I put some in my hand and warm it up and it becomes spreadable, but was it supposed to be more creamy? Thanks for any advice.
@Ann: It sounds like your wax:water ratio is a little off. I know exactly what you’re talking about because I made that very cream while experimenting–by cutting the water to 1/2 cup instead of 1 cup. It worked, but it set up hard, as you say.
If you didn’t short the water, then perhaps the wax measurement was too generous. Giving recipes by the spoonful can be tricky, because of the different consistencies of wax in its many forms.
I really should do this by weight–but not everyone has a good scale. If you have a scale, the weight of the wax is .5 ounces. I’m going to add this to the recipe.
If you don’t have a scale, the intuitive solution would be to measure the wax exactly as you did before, but increase the water. Try increasing it by half and see what happens. If there’s water that absolutely will not incorporate, pour it off.
In your experiments, have you tried using a moisturizer cream as a hair conditioner? Just curious.
Hey Joss,
I haven’t–and wouldn’t–use it as a hair conditioner ’cause it has wax in it. That would build up and get nasty quick. The only conditioner I use is diluted apple cider vinegar. If you use too much of it, it can make your hair go limp, but it’s good at smoothing and detangling, and vital if you’re using shampoo soap, to adjust the pH.
You sold me on your personal rosacea story – I’ve been told my various estheticians that they think I have it and should go to the dermatologist. I want to start with altering my skin care routine… and this looks like a great place to start!
@Jen C: I hope it works for you! When they diagnosed me with rosacea they gave me some sort of anti-bacterial or anti-fungal ointment to use every day. Also, there’s lots of rosacea advice about not eating spicy foods, not taking hot showers, or even drinking hot beverages! This was really unacceptable to me, and I didn’t like the idea of having to smear this stuff on my face the rest of my life.
What I’ve found works is moisture, moisture, moisture. The rosacea was mostly on my nose, so I just keep the old nose slathered with either balm (my homemade beeswax/olive oil balm) or this lotion. And I never wash my face. Unless, of course, its actually covered in dirt! Then I’ll most likely just use water to wash.
I think no-washing is another key to handling rosacea, and part of maintaining constant moisture in the skin. If I have to remove makeup or something stubborn, like paint, I slather on the homemade lotion and tissue it off, like cold cream. Soap really is the enemy of sensitive skin. Maybe of *all* skin. I’m really down on soap. Homemade, high glycerine soap is fine for the body, but it’s not even gentle enough for the face.
When I was following dr’s orders, I did find that hot showers seemed to irritate my face and cause redness. Since I’ve started the super-moisture routine, I can take long hot showers again. I’ve had no rosacea symptoms for years.
And while you’d think all this oil would block my pores and cause breakouts, I’ve actually had remarkably clear skin since I’ve started heavy moisture. No more blackheads on my nose! I am getting older, and that is part of it, but I suspect that even if I were younger and more prone to breakouts this routine would still work. We’re too harsh with our skin. It just wants protection.
Good luck!
I finally tried washing my hair with a bar of soap and the vinegar rinse the other night. I’d been pursuing a homemade conditioner because previously I’d only tried commercial shampoo with the herbal rinse; while that was shockingly good at making my hair easy to comb, once my hair dried it was all static and frizz. I didn’t realize at the time that it was the store bought shampoo that had dried it out like that. After trying the bar of soap and vinegar rinse, I had the same giddy I-can’t-believe-that-just-worked feeling as when I refilled a lip balm container for the first time with just beeswax, extra virgin olive oil, and little bit of shea butter. Every time I try a recipe in Making It, my notes in the margin amount to “cheaper than Suave, better than Aveda.” Watch your six! Those guys are going to have you disappeared 😉
@Joss: That’s fantastic! Thanks for letting us know it’s working for you. You are using castile soap or a shampoo bar, though, right? Regular ol’ bath soap could cause dryness or build up after a while.
And we’ll keep our eyes out for Proctor and Gamble vans parked outside our house! 😉
Yes, it’s the basic bar of olive oil soap from Making It. Which works so well, I haven’t gotten around to making the shampoo bar yet 🙂
Hi.
I want to start making my own lotions. I’ve been reading different recipes and opinions for a week now. I’m little bit afraid of beeswax, but I found that lecithin is a good emulsifier too. I’m wondering will my lotion harden if I won’t use beeswax? I have coconut oil- would it work as a hardener?
Do you have maybe any recipes that would work with lecithin?
@Milena: Sorry, but I know nothing about lecithin. Coconut oil becomes liquid at warm temperatures, so is not a good solution. Beeswax really is excellent for the purpose, nature-made, easily sourced, good for the skin. The best substitute I can think of is vegan wax, like candelilla wax (I admit I haven’t tried making this lotion with it, though.) Mountain Rose herbs has a listing of waxes here:
http://www.mountainroseherbs.com/wax/wax.html
Hi! I have read both your book and love your blog. I made the olive oil whip and the water did not incorporate, and it did not look like the texture in the picture, so the next day I melted it again. The texture looked better, but the water was still not all incorporated. Any advice?
Thanks!
@Mandy: Sometimes it’s tricky to incorporate the water. Several factors could be at work.
1. Water too cold? That makes the beeswax solidify too fast. It doesn’t work to use hot water (I tried it) but use lukewarm to body temp. water. Also, try prewarming your mixing container.
2. Not enough horsepower? My stick blender, for instance, doesn’t have enough oomph for this, but my friend’s stick does–which I’m jealous about, because her cleanup is much easier. I have to use my big blender.
3. Are you blending the bejeezus out of it? If there’s water forming at the top, stop blending, stir to break that up, and keep blending. This all has to be fast.
4. If there’s water not incorporating it’s okay to pour off the excess. Better to pour it off than have it hanging around.
5. You can reduce the amount of water you use to a certain extent. Do it too much and you’ll get a very different sort of product, something more like butter or balm rather than lotion, but still useable. Experiment!
Ok thanks. I was using my blender and there was a bunch of water on top, and I kept at it.
Will try again with warmer water too. Thanks I really want this to work!
mine has seperated in jar is this normal
@fat2thin: It shouldn’t separate once it’s whipped. If it’s completely broken down, it probably means you didn’t mix it fast enough or thoroughly enough–or something is off in the proportions.
On the other hand, occasionally a bit of water will gather on the surface of the lotion–just a tiny bit– and if that is what you’re seeing, it is no cause for concern. Just pour it off.
Made this last night and used orange oil for the scent. Turned out GREAT! Always looking for both food and personal products with less than 5 ingredients that a 5th grader can pronounce.
Stacey from Feeding My Tribe blog
I’m so happy it worked for you. I swear, I always sigh in relief when I hear from a happy customer.
One thing, though. I’ve heard that citrus oils can make the skin photosensitive (they make you more likely to burn in the sun), and for that reason they are not used in products like lotion or lip balm. You might just want to do a little research on the type of oil you used and see what you find out.
You can try added some vitamin E which acts as a preservative as well as being excellent for the skin
hmmm… In your recipe, you indicate to add 2 tablespoons (.5 oz) organic beeswax. According to my calculations, 2 tablespoons is one ounce. 15.ml = one tablespoon so 2 tablespoons would 30 ml. or one ounce… Correct? Also, because of the nature of bees, I do not think beeswax can be organic, however it is a natural product.
Our three daughters and I made this for my husband’s 92-year old grandmother’s birthday present and she loves it!!
We are getting ready to make another batch (or two) since Nanny passed her jar of lotion around for other family members to try it out. They all have requested their own jar of this wonderful lotion!! 🙂
Thank you for the best, and easiest, recipe ever!!
Thank you, Colleen! Your story really makes me happy. I’m so glad you like it.
Can I use jojoba oil instead of olive oil?
I think so–but I haven’t tried it. Jojoba is more “waxy” than olive oil. I suspect the texture might be different, but not necessarily bad. Try a small batch to start.
ok thanks! i’m gonna try it and i will let you know
I just made this, but decided to try with the olive oil and then added some jojoba to the whole mixture.. There was a lot of water that didn’t get incorporated so I poured it off and the lotion is very thick. It looked well mixed but when I got it out of the blender, there were some thick waxy spots, so it is a little chunky.. My blender is not the best though, so maybe I will invest in a better blender next time. I’m sure it will get the job done anyway! Thanks so much!
Ah, welcome to the tricky world of emulsions! They are super-sensitive to heat and proportions and power. So a better blender might help–but it might take some experimentation to perfect the recipe.
Also, though I’m suspicious of the jojoba’s waxy nature, it may not be the jojoba’s fault at all. It may be that your wax is seizing up a little too fast. That could be a temperature thing, or yes, the blender being a little too slow.
Jojoba being so expensive, what I like to do with it is infuse it with dried herbs, then make a salve out of it. If you add a relatively low proportion of beeswax to the oil (6:1, 8:1?) the salve doesn’t come out hard, like Chapstick, but soft like butter that’s been sitting out all day. That stuff is great for rubbing on dry skin.
But good on you for trying it, and I bet the lotion will work well despite the lumps. I’ve worked my way through a few strange jars in my time! 😉
I just tried this and I love it….thank you for posting. My skin is so dry and this is just what I needed! I’m new to making my own beauty products but this is a keeper! The only thing I had trouble with was when I put it in the blender and added the water, it separated and I couldn’t get it to blend at all. I started over, but this time used a hand mixer and blended it right in the Pyrex measuring cup – worked like a charm!!
Fantastic! At this point I do believe a hand mixer is the way to go with this stuff. We don’t have a good hand mixer, so I developed this with the blender and have learned to sort of rodeo my way through any problems. But folks I know with good stick blenders say — like you — that it works like a charm. It may even be worth it for me to buy a good stick blender–after all, I haven’t bought face cream or body lotion for years now, so I think I can justify it!!!
Thank you very very much for posting this!!!
I was looking for beeswax cream recipe that calls for more water than oil. As a huge fan of beeswax moisturizer, I’ve been making my skin care stuffs with beeswax with different oils, recipes and various ratios but always ended up with too much oily creams since these contains more oil than water. I’m so happy that I found your post!
There is a minor problem, though…I have to make large batch so I could use stick blender! Usually I make a very small batch at once, like 50g or maximum 100g with a cute miniature stick blender…way too far from power horse-;;
But still! I’m thrilled! Can’t wait to try this! Thank you again-:)
You could probably try cutting the quantities in half and still be able to use a stick blender.
Regarding the quantity: some people think this is only for the face, and if you only use it on your face, 1 1/2 cups is quite a bit of cream! But I also use it on my whole body after I bathe, and as hand lotion throughout the day, so I go through a batch quickly. It’s a great general purpose moisturizer.
Can I use apricot kernel or avocado oil instead of Olive oil? or what other oil do you recommend?
I’d encourage you to experiment with any oil you like. Good ol’ olive oil has worked for me for so long that I don’t use anything else.
Also, can I add other types of raw materials to this? like, silk powder — or is baking soda better?
Basically, it’s all about playing around and seeing what works.
All I’d warn against would be food-ish additions. For instance, I’ve made this with green tea (instead of water) and it spoiled rather quickly. In fact, that was the only time I’ve seen mold in my lotion. Teas, milk, oatmeal water, juices, etc. all qualify as “food-ish” ingredients in my book.
Then again, if you kept lotion made with food-ish ingredients in the fridge and used it relatively fast, you could use those ingredients. Depends on your priorities.
I don’t know anything at all about silk powder, so sorry, I can’t help you there.
And baking soda? I suspect it would leave white residue on your skin. And it would probably dry out your skin, too. But it’s a great exfoliant when used on its own.
Pingback: The Whip: A Homemade Moisturizer How-To from Making It | Root … | ClubEvoo
During our recent transition to wordpress, we lost a few comments. This is one:
Anonymous11/7/12 4:33 PM:
Thank you so very much for sharing this recipe!!! All the other recipes out there seem so daunting! I just whipped up a batch today and it came out beautifully – I’m keeping my fingers crossed that I don’t break out! I have a couple of questions for you – can you wear this in the day under make-up? and sunscreen? And how would you make this more anti-aging? When I see other diy lotions they contain about 50 million essential oils and other ingredients, I’m lost and don’t know where to begin… Thanks again:)
And this is my answer:
Hi! I’m so happy the recipe works for you!
Yes, you can wear it under makeup, etc. It’s just like normal lotion. The only exception is that goes on “wet” — you need to give it a few minutes to “dry” on your skin. Commercial lotion has alcohol and chemical driers in it to whisk away the water, mine doesn’t. That’s good, because I don’t want to put alcohol on my skin. But you might want to wait a couple of minutes before putting on make-up. Experiment.
I always make my lotion with oil that I’ve infused with calendula flower petals. Calendula is supposed to help heal and rejuvenate the skin. You’ll see it in many fancy face creams. It’s easy to make this yourself, with either flowers you grow at home (calendula is super easy to grow) or you can buy flowers at herbal suppliers.
Here’s my how-to: https://rootsimple.wpengine.com/2011/07/how-to-make-calendula-oil-infusion.html
I had a go making this over the weekend as I have been struggling to find a moisturiser I like (and I recently took up making my own lip balms so this seemed a natural next step). I made a half amount in case I didn’t like it but, although it has only been a few days, it is great so far. Thanks for sharing the recipe.
Just made some of this for my mum as a birthday gift, I know she is going to love it! The recipe is really simple, I have lots of beeswax left to make more too! Wonderful!
Is it possible to use half cocoa butter and half beeswax?
I’m sorry, I really can’t say. Try it!
Rather than half & half, I just made it with the full amount of beeswax and the same amount of cocoa butter and I like it! I might try just with cocoa butter next time and see what happens. I also added some vitamin E as my first batch started to spoil after about 3 weeks (it is heading into summer here so that could have had an impact or I as deascribed below, it may not have emulsified as well as it shoudl have which may have had an impact too) as I understand it can help preserve home made lotions etc (I use it in my lip balms).
The first time I did this I used my stick blender (aka hand blender), with the blender attachment. I thought it emulsified fairly well but as I used the lotion I did find a bit of water coming out of it so it musn’t have worked as well as I thought. Still felt OK, a bit more like a butter than a lotion. This time I used the whisk attachment to my stick blender and it worked much much better and looks more like the lotion on the site.
Pingback: Homemade Lip Balm and Body Lotion: A DIY Holiday Gift Idea | Books for Better Living
Just made this successfully, although I had to pour off some water. This is because I thought I was done way too early. There must be a magic temperature for this: similar to CP soap (~100deg). I emulsified most of the mix but then it got too cool or something. Took me a lot of mixing with my stick blender to get to an emulsion, mostly because my mix was hot. I think.
So glad I found this recipe! I plan to try it ASAP! My family of 3 are just getting into homemade natural products and I’m so excited. Last night I made my own laundry detergent and we are playing with a recipe I found for liquid Castile soap! Right now my moisturizer is organic unrefined coconut oil! I literally just dip some out of the jar and apply and it’s been marvelous. The health benefits for coconut oil are just amazing to!! I also use pure aloe gel in with it sometimes to and use both of these as a hair/scalp mask to for awesome help w fly always and it makes my ends look awesome. However, my significant other doesnt like using the coconut oil because of how oily he feels, so I’m looking around for other recipes we both could use. I’m working on shampoo recipes, dish washing liquid recipes etc,…
I seen you mentioned using baking soda as an exfoliant… I’ve always used warmed honey, brown sugar and a little green tea for a few times a month exfoliant and its always works wonders for me!
…on a side note, I suffer hair loss from hypothyroidism/hormone problems… Any advice, recipes you’ve heard/seen for such things? I’m 25 and it is devastating, but I think just limiting the chemicals in my life can surely help.
Thanks!
It’s fantastic that you’re experimenting and making so many positive changes! As far as your hair loss question goes, I’m afraid that’s beyond my expertise.
I think you’re right that limiting chemicals is going to help. Treat your skin, scalp and hair gently. And sometimes when conventional medicine fails, alternative medicine like acupuncture or herbalism can help, especially with subtle, systemic issues.
Hey there! Not to butt in or anything, but you should really look at your diet and try to exclude gluten. Interesting studies have been conducted on gluten and it’s impact on the adrenal glands and Thyroid.
Hi,
This looks fantastic and I can’t wait to try it, having found that other recipes are more ‘butters’. Have been looking for a ‘lotion’ that is easy to make and doesn’t have a whole bunch of ingredients I need to source and can’t pronounce. Thank you!!
Wondering though if instead of olive oil, one could possibly use sweet almond oil, or avocado oil….?
Thanks again!
I think avo oil would be lovely. Sweet almond oil is, if I’m not mistaken, a “drying oil” so won’t moisturize very well. It’s well worth while to play with different oils–they’ll each yield a slightly different product.
Thank you Thank you for posting this! We are doing Christmas a little late with my husband’s side of the family and I was trying so hard to find a cream to give the nieces for face and body.
Thank you for such wonderful ideas everyone! I plan to try several variations. I am allergic to a lot of things (i.e. I’m anaphylactic to bananas) so I have had a hard time finding products without certain ingredients in just about everything in the stores and recently with several natural recipes.
I cannot thank you enough for this recipe. I will definitely report back what I come up with.
A couple questions..
1. Can I double or triple this recipe safely, meaning without it not mixing completely or getting hard too quickly? I want to have enough for 11 people. Since it only keeps for a short time I don’t plan to make a ton of it for them but I don’t want to have too much that I won’t use it all up either.
2. Does the cream keep better in dark containers? And/or in the fridge? A face cream I made way back in the day had to be kept cool and in a dark glass container.
3. I will be trying it out for my rosacea. My face is sometimes dry and sometimes really oily. I know it’s a balance thing but will this cream make my oilyness worse?
Thanks again!!
Hi! This sounds lovely! I use coconut oil mostly in my products. But this sounds very nice! I have a question though. I own a jewelry/body products store. I make everything myself. The body care products are a fairly new addition to my jewelry making. I have had great success with my all natural and organic body scrubs and soaps. I wanted to start also making lotions. I made a batch of lavender/vanilla lotion that came out incredible! However after putting it in the containers, after about 4 days it seems to have seperated or hardened. It won’t come out of the squeeze bottles. The water and scent comes out but not the lotion itself. It worked fine at first. Is there a way I can keep this from happening? And is there a natural preservative I could add so that I could make bulk stock to keep on hand like my soaps and scrubs? I put no chemicals, dyes, or unnatural preservatives in my products so it’d have to be organically or natural based. I was hoping you’d be able to help me out?
I’m sorry, but I can’t be of much help. I’m no cosmetic expert — I just know about my lotion and its funny ways. I don’t know anything at all about natural preservatives. Good luck to you.
Hi, I made a batch similar to this recipe, and as a preservative I used grapefruit seed (citricidal) extract available from health food stores. In Australia here it is now marketed differently for use as a water purifier due to its antimicrobial properties.
I have tried this method 3 times. Every time I have had trouble incorporating the water. Most of it will blend in, but always, as it sits or we use it, the liquid separates. I have used a blender, a hand mixer, and a stick blender. The temp of my ingredients has varied between slightly warm or room temp. Any thoughts?
I’m wondering how much water separation you’re experiencing. It’s pretty typical for a little water to show up in the jar as you use it. Small amount– say a dab forming in a low spot. It doesn’t hurt anything or indicate spoilage. Major separation indicates a bigger problem with the emulsion.
I’m working on a new version of this recipe that might work more consistently–but consistency is hard with emulsions!
Some other thoughts. 1) If you have a thermometer, try the water at 100 degrees F. Temp. is something I’m working on right now. 2) Add your water quickly and keep blending til it all mixes. After a minute or so, whatever water isn’t incorporated probably won’t, so pour it off 3) Blend with the most powerful machine you have 4) You could try adding less water, like 3/4 cup instead of 1 cup. The lotion will be a little heavier, but it might be easier to incorporate less liquid.
I have been making the olive oil/coconut oil version of this and can’t imagine going back to commercial lotions. I hosted a holiday craft party where we made homemade gifts and this project was a huge hit among that crowd.
Now that we are in the dead of a cold and snowy Michigan winter, this recipe is spreading through my large winter running group. Many winter runners still rub petrolium jelly on their skin after exposure to freezing temperatures. They have been delighted to find this natural, luxurious, and far more effective alternative! Many, many thanks from mid-west winter runners!
Thanks so much for letting me know, Anne Marie. I love thinking about your fearless Michigan runners braving the elements with homemade lotion.
So I RARELY comment on anything online, but I HAD to leave you a delightful message about this Beeswax concoction. I have literally been researching for HOURS (probably 12-15 total in the last few days) on how to made a really good facial moisturizer. My main issue has been the attempt to stay all natural/organic, and what to use as a preservative. There’s so much information! I’m also a licensed Esthetician and Massage Therapist, and I’m looking into homemade creations to benefit myself and my clients as well. Once I learned the benefits of Beeswax, I really wanted to conjure up a grand moisturizer. However, I have been up for the last 6 hours attempting to create a really good Beeswax/Oil moisturizer, and let’s just say it was a lot of trial and error. I came across your website and tried exactly what you said, and it worked magnificently. I literally jumped up and down like a little school girl once I saw how silky and luminous it looked and felt on my skin.
As a side note, instead of using solo Olive Oil, I decided to use Coconut Oil, Cocoa Butter, Pure Vitamin E, Lanolin, and a tad bit of Organic Honey. Not all of the water took (I have a pretty crappy blender, so that could have contributed), but it still came out splendid. It feels great on my skin and I’m so excited to use this concoction every single day.
I’m going to make another batch and add Lemon Juice or Lemon Oil for the mild cleansing effect and high Vitamin C content to counteract (a tad) the high content of oils, seeing as how that might appeal to people with more acneic skin. I was also thinking that the acidity of the lemon juice might help keep the whip preserved longer, but I’m not really sure if that will work.
Anyway, thank you SO MUCH. I’m so glad I found your page and this recipe, and I will boasting about it forever. You’re amazing!
I just made this and it turned out just as you said, “like a butter consistencey”. I am in the Peace Corps in Ukraine and have been having lots of problems with acne around my chin, lips and lower cheeks. I think most of it is due to the high salinity of the water here. Anyway, I have been trying all kinds of natural remedies to help my dilemma and to heal the scars that come after. Beeswax has been something I just recently decided to toy around with because it is extremely easy and cheap to get here. I was using honey for awhile, but that wasn’t doing anything. I have used the moisturizer already once to clean my face of dirt, and it worked wonderfully, and afterwards, (you were right) it soaks up well and does not leave your face feeling or looking greasy. Thanks for the recipe.
I tried this recipe using cetyl alcohol pastilles instead of beeswax. I also used avocado oil instead of olive oil. I was very careful to use tepid water to blend and I thought everything was going well until the recipe sort of curdled. It looked creamy at first (using the immersion blender), then curdled. Maybe I blended too little, or too much. One thing I found is that avocado oil should be used sparingly (perhaps mix it with mostly olive oil). The odor is very strong and doesn’t mix well with essential oils.
I am fair-skinned and sunburn very easily. At 53 I have started noticing light age spots and am concerned about skin cancer. I’ve read quite a bit about Frankincense and its positive effects in the prevention and treatment of skin cancer. I would like to add some frankincense essential oil to this moisturizer but since I am new to essential oils I do not know how much to add. Do you have any recommendations?
Hi Kathryn, I’m sorry, but I don’t know anything at all about Frankicense, especially as medicine. I can’t speak to the issue of cancer, and am not a doctor, but calendula is supposed to be helpful with helping skin regeneration. That’s why its in so many high end creams, and I use oil infused with calendula flowewrs in my lotion. If you search calendula on this blog you’ll find all the how-to’s.
Hi, Kathryn
Yes, I use lavender and frankincense with this. I had a major cut/burn on my leg that I used lav. and frank. on directly, and it healed marvelously. That’s when I decided I wanted to find a way to make my own facial moisturizer to use them.
It’s wonderful. I also don’t know much about it’s anti-cancerous properties, but it is very healing for the skin. As far as how much to use, I found a general guideline that said 10-20 drops for a mixture of this size. I prefer the smell of lavender simply because frankincense is so powerful, so I’ll do about 8-9 drops of it and 4-5 drops of frankincense.
I made this about a week ago, and I love it, but it is already separating…it gets pools of water collecting in the middle and I have to pour it off before I can use it. Is that normal? Does that ever happen to you? I wonder if it’s because I put it in the fridge for a night or two, thinking that it would help it to keep longer. The water is like, separating back from the oil.
Hey Eden,
It’s pretty normal to get a little water separation, and that doesn’t mean it’s bad at all. Just pour it off. The holy grail is no separation, but I’m still trying to figure out why it happens sometimes and sometimes not. Major separation, like curdling, shows more of a problem, but a little showing up in low spots is pretty typical. I’ve learned to sort of like it (this is the DIY spirit talking here!) because that wetness goes down on your skin, then the lotion seals it in, and it helps it work better. Kinda like how lotion works best when you’re still damp from the shower, you know?
I have heard that heating up olive oil to a high temp is bad. We are still absorbing this lotion through our skin. I have made this lotion for years but now i am starting to wonder if i should use another oil… What do you think?
Olive oil is not good for high-temp cooking, like deep frying, but the gentle warming to melt the wax is different–the temps aren’t comparable. Perhaps I don’t understand your question? Some olive oils are more processed than others–organic cold-pressed oil would be the least processed oil if that’s what you’re concerned about. I trust olive oil for skin care–it’s been used for skin care for milennia.
I just used this recipe for the ratios, but elaborated based on what I had around the house. It turned out great! For the half cup of oil, I used 1/4 cup apricot kernel oil, and 1/4 cup coconut oil; in the water, I steeped some lavender leaves; the essential oil of choice was sweet orange; plus, I added a smidgen of raw honey for its healing properties. I was worried at first that the texture was going to be runny, but after about 30 seconds more of adding water and using my immersion blender – it whipped up nicely!!! Definitely will continue to use this recipe.
Congrats! Your recipe sounds amazing–almost edible!
Help! Once again instead of a lotion/cream I have clumps and water.
I used calendula infused olive oil with some avocado oil and a squirt of grapeseed oil – with the grated beeswax,
then used tepid lavender/chamomile infusion – very slowly at high speed – I have a powerful stick blender
added a few drops of Lavender and Sea Buckthorn oil
and the whole thing became a mess
All these wonderful ingredients with little to show.
What am I doing wrong? Please help with any suggestion
Hi Petra,
Sorry you’re having trouble. I know the pain.
It’s impossible for me to do an autopsy at a distance. This is what I’d recommend. Do a basic batch with just plain ol’ olive oil and beeswax — no water infusions, no nothing– just to get a feel for the emulsification process. The reason for this is two-fold. First, if it is a mechanical issue, you can work through that without much cost or waste or disappointment (and the product is still very useful, just not fancy). The second is that every time you add a new element to the mix, there is risk. Some substances might cause curdling, for instance. The key when experimenting is to create something that works, then add one new element at a time.
Outside of that, a few more tips.
–Add essential oils to the oil/wax mix just after you take it off the stove, not during blending.
–Heat your water to about 100 degrees
–Don’t add the water too slowly. Pour it in a steady stream.
–Don’t over mix
We’re going to make a video of the process soon.
Hi, the emulsifying worked perfectly and my whi is pretty well set, but when I use the lotion it melts to the touch and feels watery. Is this normal?
Hmm. It’s hard to say without seeing it myself. My less successful jars of lotion are more watery. The stuff still works, but it’s “wet”. Ideally it should not be super wet. But it is totally normal for a little water to appear in the jar.
Hmm. There is no water visible in the jar, but when you press the lotion, water appears. I guess I should just try another lot, but not sure where it went wrong so guess it will just have to be trial and error. Thanks anyway.
Kelly is out of town for a few days and she’s the expert on this recipe. Send us an email if you have any more questions.
I love, love, love this lotion so does everyone else. I always have to make enough to share like loaves of bread. I use sweet almond oil and evening primrose oil. So nice I dont know why anyone would want to use coco or shea at all. Thanks for the blog, thanks for the tips and thanks for everything.
Hi, My name is Svetlana. I have rosacea and a very sensitive skin, as I discovered since my journey to go natural started. I even started making my own soap and friends and family liked it. So I opened a store on Etsy, not fully stocked yet but I thought I’d give it a try:
http://www.etsy.com/shop/MedicineRiverSoapCo?ref=seller_info
But to be frank, sometimes I feel like giving up. I tried some store bought natural creams and they were great but gave me clogged pores and break outs. So I decided to make my own and discovered that I am allergic to bee wax. What a bummer, all the homemade recipes of creams that I was able to find had bee wax in them. I made a whip without it. The face seems to be fine but I started to get dry patches under my eyes, so obviously it isn’t working for me. Feel very discouraged and lost. Any ideas on how I can make a cream that would work for me. My formula currently includes cocoa butter, pumpkin seed butter, rice bran oil and Apricot kernel oil. That’s it, nothing else.
Mixing a solid oil, like cocoa butter, with oil and no water makes a body/face butter — which is what you’re doing, and it seems like a good idea to me. Maybe you just have to jigger around with the ingredients to find something your skin really responds to. I don’t know what you’re allergic to, but maybe you should try shea butter as your solid, instead of cocoa butter. Just to see. And fool around with your oils, too. I gotta say I really like my olive oil. A little jojoba oil, maybe?
I don’t know if you already do this, but if you apply the butter to a wet face, or rub it between your palms with a teeny bit of water, that feels good on dry skin. You may also want to search for something extra special for under your eyes, if that’s the only area not responding, and keep using your mix for the rest of your face, if it seems to be working otherwise.
Hang in there. It sounds like you’re close!
I’m definitely going to try this! How much lavender essential oil would you suggest adding to this?
Thanks!
There’s a lot of flexibility in how much essential oil to add, and a large part of it is personal taste. You can’t really screw it up. 5 drops would create a light scent, more would be stronger. Maybe start with 10 drops for your first batch and adjust accordingly thereafter?
I just needed to say that I made this cream the other day and my face LOVES IT! I normally have terrifically dry flaky skin and this put a stop to it. I made two batches. One with the ingredients as listed, and in the second batch I used my own blend of nourishing oils just for kicks. Both are great. I’ve noticed little drops of water on my skin while I’m rubbing it in (which rub away) but I’m totally okay with that. The only thing I would advise is to blend the cream in the pyrex measuring cup, then you don’t need to preheat the immersion blender, and you can pour the cream directly into the storage pots you’re using. Enjoy!! 🙂
Dear Mrs. Homegrown,
I am enjoying reading your recipes and plan to try some soon, however I need a special one. I have pretty bad psoriasis on my feet and elbows and nothing I have tried seems to work very well, not even prescription ointments and salves and I am so tired of walking around tender footed! So my question is, should I add more oils or beeswax to hold the oils and moisture in? I know I am a tough case, but I can’t help it!
Sonja
Hmm. I’m not a herbalist, I just use herbs, so please take all I say with a grain of salt. In particular, I know nothing about psoriasis.
But I do know that you can improve the healing properties of the lotion by making it with herb infused oil instead of regular oil. This means simply soaking herbs in oil for a while before you use it. It’s easy, it just takes the patience to wait while it infuses.
The herbs that come to mind for you are Calendula (pot marigold) petals and chickweed. Calendula helps skin regenerate–it’s just all around good for skin. Chickweed (stellaria media) is well known as a soothing and cooling herb–it’s often used for baby rash. It’s also a common weed, easy to find. You can also order both online at an herb seller, like Mountain Rose Herbs, or buy it locally if you have any kind of herb/hippie/witchy shop near you.
I wrote a series of posts on growing Calendula and making oil out of it:
https://rootsimple.wpengine.com/2011/07/how-to-make-a-calendula-oil-infusion/
You’d follow the same directions if using dried chickweed.
You could use both herbs in a single infusion, or do one infusion of each. You can mix two types of oil in the recipes, or try one at a time to see which works best.
You may also want to try making an infused oil into a salve instead of a lotion. Lotion is lighter. Salve stays on and protects better. It’s also easier to make, keeps longer and travels well:
https://rootsimple.wpengine.com/2011/07/making-salves-lip-balms-etc-close-of-the-calendula-series/
To answer your question more directly, don’t monkey with the proportions of oil and beeswax in the lotion recipe.
All you can play with is the water. If you use less water, you make something heavier, more like a salve.
I’d also recommend you add a little lavender essential oil to your lotion or salve, 10 drops or so.
best wishes
Kelly
I live at 7,000+ elevation with extreme weather. I can only whip about 1/2 cup water into the oil. Does elevation affect this? End product is great.
Gosh, I have no idea. Glad it works for you, though!
I have my own incredients and i need it to convert it into a white cream . Could you please help me .
I can even pay you if you could help me on this . Thanks very much .
I am currently having it as a liquid form .
This recipe is a good starting point for a whole slew of lotions. I added some saw palmetto oil to the mix and reduced the olive oil a bit and it resulted in a lotion that got rid of wrinkles! I also made it with callicarpa oil and wound up with a mosquito repelling lotion. Who knows what other goodies can be made using this as a vehicle!
I’m looking for a good lotion recipe. This one was good but is a little runny with water the next day. I tried a entirely different recipe and it came out crunchy. Any suggestions?
Only use half as much water. The less water, the thicker the lotion.
Pingback: Ladies: I'm Nuts for This Travel Gear - The Wondernuts
I very much enjoyed reading your blog !
Since i only use my own cream my skin is in a much better state as before, It used to by very dry, whatever store-bought cream I put on it. What I use is the gel of fresh aloe vera leaves instead of water and that works great for me and I never even measure anything, so sometimes it turns out a little thin, sometimes quite thick but that doesn’t bother me at all. Today I made a batch with aloe vera, olive oil, coconut oil, a little grape-seed oil, a few drops of lavender oil and a few drops of vitamin E oil. Great stuff ! at the end i mixed in some more aloe gel to make some very light and refreshing body lotion, too, because i want to stop using any chemicals on my body in general, and where i live ( a small village in Greece) the water is full of chloride, so that is bad enough already. This time instead of clean and ready to use wax I had to clean some stuff i got from a beekeper straight from his hives and I can tell you, it was very difficult to seperate the wax from the rest and I ended up with lots of pans and sieves full of wax residue 🙂 busy day aha ! keep up the great work !
Pingback: Coconut Oil Good Vanilla Moisturiser Recipe » Coconut Oil Good
I have had a couple of experiences where the water separates and it looks curdled .However following your advice from Making It, I just gently preheated the mixture to body temp(just stuck my clean finger into the mixture) and it blended back up beautifully! I Love this cream and my husband says I look younger!! My mother demanded a jar of her own after raving about how good my complexion looks.Thank you, Thank you!!!
Where do you find the little tins and jars? I’m in the midst of infusing my calendula oil for the first time & looking forward to making salves and lip balms. I know what I will use for the salves (the smallest mason canning jars), but don’t know where to find the little tins for lip balms. Thx
I love that cleanup tip. Always have trouble cleaning my used pots.
Thanks! 🙂
Pingback: Top 10 Ways To Remove Facial Hair At Home And Skin Care After Removal - Top Inspired
I made the entire lotion in a single jar; from start to finish. Used a a single beater on a hand held rotary beater. It worked well and turned to a yellow frosting-consistency quickly. (I was the happy the jar didn’t break.) Question: I used reg. yellow beeswax and don’t know if it was “cosmetic grade”. Hmmm. Is that a problem?
Congratulations on your success!
I use beeswax pastilles from Mountain Rose Herbs. They are described as “suitable for food and cosmetics use.” I don’t know exactly what you mean by regular beeswax — where it comes from. But I will admit that once, when I was traveling and desperate for some lotion, I made some by melting down beeswax birthday candles that I bought at a health food store! I didn’t break out in a rash, and don’t seem to be poisoned… but obviously you want the best for your skin, so wax noted as food/cosmetic grade is best. Maybe you can seek out better wax for your next batch.
Hi,
When my boy/girl twins were little, I grew lavendar and made lavendar pillows for them, along with lavendar infused lotion. Both developed precocious puberty, a condition by which they both were thrust into puberty years early. Our pediatric endocrinologist does international research on this, and identified my use of lavendar – an endocrine disrupter – as the trigger. (Soy and tea tree oil can also be culprits). My son has probably lost 3 to 5 inches off his height because of this and long term effects we are not sure. I would caution EVERYONE to read up on using whatever ingredient they are adding into a product, especially for children. In doing what I thought was natural and good for my kids, I inadvertantly did harm. Since we have stopped using lavendar (one of my favorite scents), their precocious puberty has stablized. Peace. JB
Pingback: 5 Tips for Skin Care Before and After Facial Hair Removal
I’ve been meaning to try my hand at whipped olive oil lotion and just googled it (and landed here!) to make sure it was possible. Thank you for all the detailed info in this post. It will make my experimentation a whole lot more productive and hopefully I’ll wind up with such a great result as you have.
Hi,I made calendula cream a while ago.But I didn’t add any water.I wonder,why did you put it?What’s the function?
Thank you.:)
Pingback: Top 10 Best Homemade Moisturizers - Natural and Healthy Living
I just made this with 1/4 cup olive oil and 1/4 cup water. I learned from another website that I can just put it in a mason jar, put just ONE beater on my old fashioned mixer, and mix it straight in the jar! Be careful though…I just flung it all over the counter unintentionally 🙂 That said, it worked great! I love olive oil but hate the liquid spillage. I also learned recently that water on the hands (damp hands) makes it soak in better so it stands to reason that the addition of water here would help as well. Thanks for the simple way to make a lotion!
I made this lotion as Mother’s Day gifts. I used teas and coffee instead of water. It worked pretty great, but wish I had read through the comments first… I really don’t want these to mold, dammit! Guess they could be kept in the fridge??
I just tried this with glass bowl over pot and heating up distilled water in microwave to about 100*. I used my handmixer to mix it and had no problems. Very easy and I have already used it! Love how easy it is, going to give some to my Mom who complains of dry skin. Thank you for the recipe on how to do it!
I followed your instructions to the T and it came out perfect! Thank you. This is a great recipe!
I’m majorly surprised to see water in this mix without some sort of preservative. Water added to any product, without a preservative (and no, grapeseed oil isn’t a preservative, it’s an anti-oxidant) will grow all sorts of horrible bugs and bacteria, visible or not – particularly in warm or tropical climates (ew!).
Having made skin care products for years, I’d never not include a preservative where water is introduced – it’s just common sense – but for the low down, there are plenty of professional sites that explain why their use is essential in any product containing water.
However, I can’t see a need for the inclusion of water in your formula – the oil and wax should blend just fine without it.
Thank you for reminding me that need to update this post to accommodate that concern.
Do you think aloe juice would be okay to use for some of the water portion?
Any time you add something foodish to this recipe — like aloe or tea it will make the mix more perishable. It might go bad very quickly — I have no experience with aloe. I’d say try it and use it fast.
Pingback: Have you tried our moisturizing cream? | Root Simple
Did not read all of the comments so my suggestion may have been already offered. Always pour hot into cold. So the oil mixture should not go over 155 degrees but the water mix should be hotter, 165 degrees. The emulsion will always happen. The properties of the essential oils will be destroyed if added over 120 degrees, add around 118 degrees.
As a skincare maker, it’s great to see this basic Galen formula in circulation.
A couple of comments . . . bacteria flourishes in the water phase of any emulsion and will begin as soon as you have created your batch. By the time you see evidence (separation, mold, change in color, texture), contamination is already in the billions. Since you never know what kind of wild strain is growing, there’s a chance you could be spreading pathogens such as Staphylococcus aureus on your skin. Any minor abrasion could then be a gateway for said pathogens to enter your body. It’s simply not worth the risk, especially when there are acceptable options for product preservation. I recommend researching them.
By reducing the amount of water, you can reduce (not eliminate) bacterial contamination because your emulsion will tend towards an anhydrous blend (a balm).
Small jars and refrigeration are key as well. You could also look into using an airless pump. I don’t use them because they are made out of plastic, not glass (non-reactive).
Please consider sterilizing your equipment and surfaces before making a batch. You can use a high proof vodka (Everclear 190 proof) to spray everything just before using. You should also sterilize your jars. I wash first in hot soapy water, then dry in the microwave on high. I then spray with high proof alcohol and microwave again until dry. Finally I spray again just before filling. I’ve tested my products and can tell you this really helps reduce the amount of bacterial contamination. I always use sterile gloves and spray with alcohol before handling equipment.
Vitamin E and rosemary extract are antioxidants that retard oxidation of your oils. These are NOT preservatives!
Enjoy!
I’ve been making an easier recipe for several years: 3/4 cup organic sunflower oil (or olive oil – it makes me itch), 1 ounce of beeswax. Combine these ingredients in a small jar and melt in a pan 1/2 full of water over low heat. When completely melted, remove from the pan and let sit a few minutes. As the mixture cools stir every five minutes with a bamboo skewer until you have a creamy lotion that looks like the one in this article.
To use this, take a small amount and rub it between both hands. Then run some warm water on your hands and rub again. Apply to skin. Add more water as you go along if it feels too heavy. This eliminates the need for a blender and removes the possibility of bacteria growing in the jar, but you still get the water you need to make this a moisturizer. I store most of it in the fridge and keep a small amount in the bath medicine cabinet.
Ha! I’ve been making this lotion since you first posted it to the blog! Everyone I know makes this recipe too (because they ask what it is that I use and I direct them to your site)! I’m never without a small jar somewhere in my home and car. I make them and give them away as gifts! Do you have any idea how many moms-to-be, teachers and friends have gotten a jar or two of The Whip from me? You are genius!
Thank you so much! I’m so happy to hear that you like it, and are sharing it! I hope you will review the new safety instructions in this post, though. I think it is better to use smaller jars, and keep the extra in the fridge, and am doing that myself now.
This recipe is the one I used when I tried making my first EVER lotion. I’ve always made salves and whipped salves and such, but never dared to add water! I was so scared the entire thing would go terribly after seeing those “horror stories” about jars of homemade lotion going mouldy. I was so surprised that this lotion actually turned out for me! After adding the water (I used green tea) my stick blender shot lotion all over my kitchen! It kept sputtering hot waxy liquid for a while! Eventually I put the whole oil and water separated mess into the fridge for a while, and then took it back out and blended it. It turned out PERFECT, took the entire cup of liquid (with none coming up from the surface!), and was smooth and beautiful. Thank you so much for the recipe and I will make this again as soon as this batch runs out. Take care 🙂
I have heard that honey and beeswax have antibacterial properties it seems the cream would have natural preservative properties on its own ?
They do, but the beeswax in this recipe doesn’t prevent spoilage.
This looks great! I’m going to try making some at the weekend. Can’t wait to ditch my shop bought moisturizers!
After cleaning the stick blender, can it be used again for food products – soups, etc.? Or should I get a second blender for just face cream?
I confess I use my stick blender for both–logically I don’t see what harm could be done, as there is nothing toxic in the moisturizer–it’s edible, actually. Of course you would want to clean the mixing head very well between uses–it would be even more important to clean it well *prior* to making the moisturizer, because you wouldn’t want to contaminate it with food bacteria. That said, if I had spare money and spare cabinet space, I would have a second blender for non-food projects, just to make it easier.
Hi ,
Firstly, Thanks for sharing this recipe. I followed the procedure exactly. But my lotion was fine in the beginning but then I had water and oil separation. Also it was very greasy. Any ideas what might have gone wrong?
Pingback: Make The Money Get The Whip - Surveys
Pingback: Beeswax Candles | Sparrowpost.net
Hi, I tried making lotion for the first time today and it was wonderful! I used a bit of lemongrass essential oil and I can’t stop myself from slathering some on every now and then. However, I live in a very hot hot hot climate (talking about 40 degrees Celsius) and this is a bit too greasy for that sort of weather. Can I cut down the oil in half or lessen by 25% ? I found that it incorporated with the water well, probably about 15ml of water that’s separating out every now and then that my dispenser bottle conveniently squirts out first and then I get my gorgeous lotion 🙂 I’d love to make this again, I’d just want to cut down on the olive oil, think that would be okay?
Hmmm. I’ve never tried cutting down on the oil, so all I can say is try it–why not? Or you might want to use a different kind of oil and see if that effects the feel of the lotion.
Thanks 🙂 I’m going to try this out today and maybe put the oil in water instead of the other way round to see if it makes a difference. I love how olive oil feels on my skin but I’ve picked up extra light virgin olive oil to see if it makes this less greasy 🙂
I would not recommend using light olive oil– “light olive oil” is usually olive oil mixed with some kind of random vegetable oil, which probably would not be good for your skin. You might want to try sweet almond oil instead.
Oh I’ve already made this batch :/ But I’ll switch back to regular olive oil with my next batch. My lotion started going bad in a week since I live in a warm country and I hate having to run back and forth from the fridge. I have added a bit of citric acid, cinnamon and swapped regular water with green tea water and also added in some geranium essential oil to increase the shelf life. Do you think this would work?
Hi! Stumbled into your blog quite accidently and love it! Over the past few months, I began making my own all-natural skin care products (including deodorant!). I haven’t created any creams using the doubler boiler method yet. I’ll give it a whirl (get it?
Pingback: Why Olive Oil is the Perfect Valentine’s Day Gift | Mediterranean Drizzles
Thanks for the great post! I have made this lotion a couple of times, successfully but painstakenly, with the big kitchen Aid mixer…. a lot of splatter and mess and re-doing the batch to make it work! I don’t know why I hadn’t considered using a stick blender! So I found your post, and VOILA! SOOOOOOO easy! In just a few minutes i had 4 baby food jars worth of lotion 🙂 I won’t ever fret making my lotion batches again!
I just made this moisturizer following your instructions and it worked perfectly! I used a combination of oils (argan, jojoba, apricot, sunflower, and olive) and I’m excited to see how it will work on my very dry skin.
Pingback: How Make Soap | Health.teslatour.net
Pingback: How To Make Lotion | Health.teslatour.net
Just wondering can the water be substituted for floral water or aloe vera juice/gel?
Pingback: Olive Oil: 35 Wickedly Cool Uses For Your Home & Body | Food Renegade
I’m going to try this and add a few drops of Agrisept to help combat mold, etc. My natural practioner recommends it to kill candita and I also put a couple drops in pet water dish, steam mop resevoir, humidifier,or anywhere I want to combat mold.
I know I’m coming in here late, like three years late, but have you ever tried whipped body butter? If you’re determined to not use preservatives you need to avoid water in your mix. Water invites mold and bacterial infestations. A simple rule of thumb is 2 ounces of any butter, shea or cocoa or mango, whatever, and 3 ounces of liquid oil. I like to mix that up with skin loving oils like castor, olive, borage, evening primrose, avacado, you get the idea. And if it’s for mature skin there is not much better than carrot seed essential oil, and you can use your olive to infuse LOTS of botanicals. Dandelion, plantain, violet, rose petals, lavender and many others can be used. You melt the oils and butter (slowly and gently) and pour into a bowl and place that bowl inside another bowl filled with ice (your ice bath) and start whipping. It takes a while, but the ice bath helps to speed things up. It will change quickly when it changes, and suddenly it looks just like white whipped frosting. Gorgeous! It will melt in hot weather so keep it cool cos if it melts and resolidifies the texture will be ruined. You’ll want to add any e.o. at the last minute when the oils are cool enough to not have the goodness evaporate from the heat. One of my favorites is peppermint foot butter. Yummy and the tootsies love it!
Thank you for the tips, Pat. Somewhere in that epic post I do mention that water-free butters are a safer alternative. Actually, righ now I’m experimenting with a shea butter, and I’m liking the way it feels, though I don’t know if I can learn to live with that faint shea scent that the EOs can’t cover. Next stop, cocoa butter! But once I work this out, I’ll be posting on body butters, and I’ll keep all your wisdom and technique in mind when I do.
Pingback: How To Take A Screenshot Without Rooting | Fix How To
Tip: I know this is late but If you add a small amount of vitamin E, (depending on how large of a batch your going to make if about four to six jars you may want to add 2-3 tsp ) its not only good for your skin but works as a natural preservative and your moisturizer will last longer because the other ingredients wont do this. I started making soap. lotions etc some years ago and ended up ordering books for all these projects. I’m just getting back into it again but I do remember this being a good natural preservative. Their are others you can research.Argon oil would be a good one sensational oil its great for the skin. Anyways great recipe defiantly going to give this a try . Also one with lavender for the younger kids, thanks for the share and these are just tips but the E would be good for a longer lasting product, Have a Good Day/Night.
Thanks, Peggy. As I understand it, Vit E helps keep oils from going rancid, so does extend shelf life in that way, but it is not a true preservative, so will not help prevent general bacterial growth.
Pingback: Stacy’s Top Picks Ways To Remove Facial Hair At Home And Skin Care After Removal | Stacy's Club
Pingback: Top 10 Ways To Remove Facial Hair At Home And Skin Care After Removal | Viseem
My apologies I meant to keep the essential oils and any oils your adding from doing rancid, Rosemary oil extract does as well, but since they are antioxidant’s they are also natural preseratives and I am speaking of vitiman E as well and other citrus extracts. If your using a fragile oil in your product it will extend the shelf life of the product your making. Anti-Microbials: Coconut oil and Grapefruit seed extract is good for keeping other bad bacteria away. away. These are tried and tested by professionals Dr’s who are all for women making their natural beauty products at home because they do not have the harsh chemicals and they are better for their skin and body.
Sorry lol didnt have my glasses on cldnt edit.
Tanx a lot for this recipe. I tried it out and for the first time my homemade cream turned out well.
If it feels heavy or greasy use a different oil! olive is known for its slow absorb time. If you switch to sweet almond you will get a very different lotion. And if you want to make a separate batch for your face use Hempseed oil. Hempseed is one of the safest choices to put on your face; the fatty acids in it don’t aggravate acne.