
Mrs. Homegrown here:
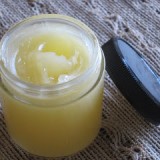
Okay, so in a previous post I talked about growing Calendula. This post I’m going to talk about harvesting and drying it. The next post I’ll do on the topic will be about making a skin-healing salve from the dried petals, olive oil and beeswax.
When to harvest:
Start harvesting your Calendula as soon as the first flush of flowers is in full bloom. Don’t try to “save” the flowers. The more you harvest, the more flowers each plant will put out. After the first cutting, you can probably return to harvest more every 3 days or so.
The ideal time to harvest is in the morning, before it gets warm, but after the dew dries. You want them all fresh and perky and at their peak. This is traditional wisdom. However, I believe it’s better to harvest when you can than not at all, so I harvest at all times of day.
A side note regarding seeds:
If you don’t harvest the heads, they die back on their own, and then they’ll go to seed fast. If you don’t like the idea of Calendula volunteering all over your yard the following year, you’ll want to collect all the heads before they die back. However, you may also want to monitor them carefully and collect ripe seed for planting the next year (you want to collect the seed when it’s brown, not green). And if you want to keep track of such things, if you make a point of saving seed only from the plants with the best blooms, your favorite colors, etc., over generations you can breed your own line of Calendula.
 |
| Alien beauty. A seed head in its early stages. The seeds are the green things that look like bugs. |
What parts to harvest:
I harvest the flower heads only, though I understand that the foliage has much the same properties as the flowers. If I were short on plants, and knew I’d get few flowers, I’d harvest and dry the leaves to make up that lack. Given a choice, though, I prefer the flowers, just because they’re good for cooking and decoration as well as my salves. People used to eat Calendula leaves (they’re known as “pot marigolds” because they used to go into the cooking pot), but I’ve tasted them, and I don’t think I’ll be making them part of my diet unless I have to.
To harvest, I either pinch off the heads or cut off the heads with scissors. This often leaves a long, beheaded stem behind. That stem can be trimmed back to the first set of leaves, for the sake of aesthetics. Or not. (ETA: A commenter recommends that you always cut the stem back to the first set of leaves, so the stem does not become a conduit for rot. Makes sense.)
How to dry:
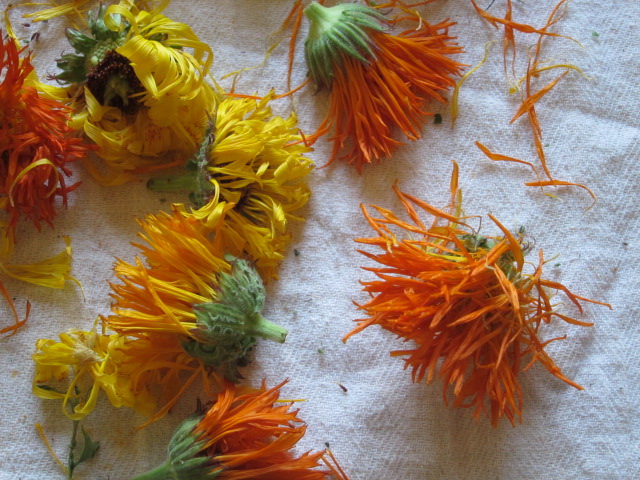
Bring the flower heads indoors, into an area out of direct sunlight. Don’t wash the heads.
Spread the heads out face down on a dishtowel or a sheet or newspaper or for fancy, an old window screen stretched between two chairs. I find laying out the heads an oddly satisfying activity.
Of course, if you have a dehydrator you could use one of those. Calendula should never be subjected to high heat, so oven drying is out of the question. Set your dehydrator to 90-95 degrees F.
If you’re air drying, turn the flowers over every so often. Keep them out of direct sunlight.
They’ll shrink quite a bit as they dry, so you’ll have room to keep adding fresh specimens as they come in.
When are they dry enough?:
They must be completely and absolutely dry before they go into storage. Believe me when I say this is important. A couple of years ago I was impatient and put a few chamomile buds which must have been not-quite-dry in to a jar with the rest of my (painstaking) chamomile harvest. The next time I opened that quart jar I got a big nasty whiff of mold. I almost cried.
So–the flowers must be dry. They should be fragile, crispy and very dry, like crepe paper. Make a habit of feeling them at different stages of drying to develop sensitivity in your finger tips. You’ll notice that when they’re not quite dry they’ll *look* dry but when you touch them they are a bit cool compared to a truly dry flower. In other words, you can feel the water in them. Leave those for another day or so.
The green part, the flower head to which the petals are attached, dries more slowly than the petals themselves, because it has a greater mass. Be cautious of this. If you’re going to store the heads whole, then you need to allow extra time for the green parts to dry. Which brings me to the next item:
To pluck or not to pluck:
There isn’t a right or wrong here. Everybody does it different.
If you plucked all the petals off the heads when you first brought them indoors, those petals would dry very fast. But that, in my frank opinion, would be a pain. It would be like playing a game of “He loves me, He loves me not” that lasted for hours.
If you want to leave the petals on the heads that’s fine. The heads (green parts) have medicinal properties too, so you can use them whole. The only thing is that you must make sure those heads are completely dry before you store them, as I said above.
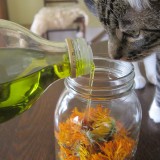
What I do is is wait until the petals are dry, then I pluck them from the heads, to avoid the whole “is the head still damp?” issue. When the petals are dry, they come off the head very easy. In fact, the ease with which they come off the head is an indicator of their dryness. If they’re resistant at all, they’re not dry. To work in bulk, you can take a whole bunch of dry heads and put them in a bowl and rub them between your hands. The petals will fall off. The heads will collect at the bottom of the bowl, because they are much heavier than the petals. Or you can strip them by hand. When they’re dry, this only takes a single gesture.
 |
| Only the driest petals go in the jar. All that debris around the jar is stuff that’s not dry enough yet. |
Can you use the flowers fresh?:
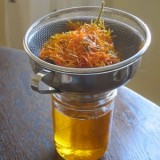
Yes. And no. Depends. The next step in this series of posts is the making of an oil infusion. I never put anything “wet” in oil, because of the slight chance that botulinum toxin might develop in the oil. Herbalists who I respect put fresh matter in oil nonetheless, and I envy them, because I suspect they’re getting more out of the plant by doing so. But I’m not going to take that risk–or write about it if I do. This is just safer.
You can use the flowers fresh other ways. You can make them (and the foliage) into a tea, which you could use as a skin wash for sunburn or irritation–or drink. Fresh flowers could go into your bathwater to make a soothing bath. Fresh flowers can also be soaked in alcohol to make a tincture.
Storage:
I keep my very dry herbs in sealed mason jars in a dark cupboard. You don’t want to expose any dried herb to sunlight for any length of time. I use jars because I don’t take any chances with pantry moths (it’s amazing what they’ll get into). The risk with jars, as I’ve said, is that if the herbs aren’t perfectly dry, you’ll get mold. This is why other people opt to keep their dried herbs in paper bags–bags breathe a bit, so lessen the chance of mold. This is a good option, too.
I try to switch out my dried herbs every year–at least the ones I grow. Some of the things in my cupboard are older than that. I think some herbs keep their properties longer than others, but in general you should try to use them in a year or so. Like spices, the are best fresh, but usable, if not as potent, as they age.
Label and date all your herbs. Even if you think you’ll never forget, somehow or another you will, and at some future find yourself standing at your cupboard, holding a jar full of strange plant matter and saying to yourself, “What is this?”

So grateful for this!
Have been harvesting Calendula for years and making wonderful skin lotion from it, mixed with Comfrey. Steep in Olive Oil or Coconut Oil for less “greasiness”. Agree with you about working with dry herbs. Moisture sometimes molds in the salve – that happened with my very first salve and the last time I ever used fresh ingredients.
This year the pantry moths got into my dry tomatoes and totally ruined some of my wool rugs. What a pain!! Does anyone have any suggestions for keeping them at bay?
Hello, I’m about to make my first Calendula infused oil and was curious about your experience with coconut oil. The coconut oil i have right now is solid–they say it will remain so at room temp. So when you make your infusion, do you have to make sure it’s warm enough that it remains liquid?
Also, do you happen to know of anyone using Castor Oil as a carrier?
Thank you!
Hi Kit. I don’t know if Morgaineotm will see your question, and I haven’t ever steeped herbs in coconut oil–but I’ll tell you what I know.
Coconut oil is liquid over 75 degrees F. So right now, my jar of coconut oil that I use for cooking is totally liquid, and has been all summer, because my house is warm. I don’t know if your coconut oil has been treated somehow to stay solid, or if you just live somewhere cooler.
At any rate–yes, the oil should be liquid for the infusion process. You need to figure out how to apply gentle heat to your oil for the duration of the infusion. My stove top is always warm, for instance. A jar of oil would stay liquid there. Other people have warm ovens, due to their pilot lights. Or stacks of hot electronics. Or maybe a car window?? Or a solar cooker??? You get the idea. Just find somewhere that’s generally warm and the oil should stay liquid. It’s okay if it solidifies once in a while during the process–it won’t harm anything.
As to question 2, I don’t know of anyone using castor oil as a carrier.
Hi Kit,
There are 2 types of coconut oil. The first kind is regular coconut oil, and as Mrs. Homegrown has said, that the only reason it is liquid is because her kitchen and pantry are warm. The second kind of coconut oil is Fractionated coconut oil. This is a coconut oil that has had the fatty chain removed, so it is more saturated, and stays liquid even at room temperature. This is the kind of coconut oil that is typically used in lotions, massage oils, and other beauty products. It’s considered a dryer oil because it absorbs quickly, and doesn’t leave a greasy feel.
hope that helps
-Kit
Kit, thanks for the clarification!
I have read that flying insects dislike Basil. I tried putting some Basil leaves on top of a basket of Tomatoes on the counter and it really did seem to stop the usual swarm of gnats..
-Ceres
put a bay leaf every couple of feet in your pantry/cupboards and you won’t see those moths again. did the trick for me!
Yes, Morgain — I should have said, the problem with putting fresh herbs in oil is not only the faint, faint chance of the oil developing the botulism toxin, but the more likely chance of it developing common mold, bad scents, etc.
Thanks so much for sharing. I am growing calendula for the first time this year, because it comes up in so many herbal recipes and remedies that I HAD to add it to the garden.
I’m planting calendula in the river rock planters near the artichokes tomorrow. Such a great post. Lovely photos too.
Such PERFECT timing. I just had a rogue calendula plant (planted months and months ago, grew 3 inches, died, and is now gorgeous) start to flower yesterday! I make soap and wanted to know how to dry it. Your post is sooooo timely :-).
I advise clipping the stem back to the first set of leaves, as this reduces the chance of fungus or disease invading the cut stem and working its way down to ruin the entire plant.
@Mitty: Good tip! I’ll amend the post.
Thought you and some of your readers might be interested in these tips for drying flowers that I found. It has a really nice chart on it for best ways to dry different plants.
My first calendula plant started to flower this week. I am so glad I found your post. It’s so well done, with photos and advice harvest advice and safety warnings and everything! Thank you!
I would like to learn what to do with the dry flowers like recipes for lotions etc. something what would help my skin. Have a lot of calendulas they self sow every year. Thanks for your tips;
Apparently, per my herbals, the greens – stems and leaves (separate from the flowers which I haven’t found this specific reference for) are really good as a topical compress to treat varicose veins. Apply the compress over the bad veins for a half hour or so, preferably with area ( leg, foot usually) raised. I had my dad try it last year, he said it was soothing; though I hadn’t sent him very much, so no long term regular application first hand knowledge…
Bunchberryfarm.blogspot.com
I was just listening to you guys being interviewed on a podcast yesterday and low & behold you popped up when I was researching Calendula! Cool!
A note on the drying-I have been known to use my car as a dehydrator for herbs. I pop an old window screen up on top of the seats and leave the car parked in the sun with all the windows up for a day or two (or three). . .
I wrote a post on it a couple years back-http://www.frugalupstate.com/frugal-skills/dehydrate-herbs-in-your-car/
note: my husband thought I was nuts.
I grew Calendula from seed in a south facing garden…They may have gotten to hot, I had many nats or fruit flys not sure which. Next time I will harvest from the first blooms and trim back to the leaves to see if this helps. Thanks so much for your article.
Thank really for your help, I sewed my calendula 2 and a half weeks ago and now I have 113 calendula seeds grown. I have read that they need 40 to 50 days to start blooming and I only need to wait about 30 to 35 more days, but I would like to know how much flowers do they bloom the first days and how much grams does a flower head weight. Thank you in advance. You really helped me with this. Oh, by the way, I raise them for selling AND for my self so I REALLY need this information. Buy
Sorry I can’t help you. How many flowers a plant produces and how big the flowers are varies a lot: it’s both a factor of cultivation and variety. It’s something you’re going to have to learn over time with experience with your yard, climate and the varietals you use.
Thanks, but can you tell me how big should a pot be for a calendula. I have read it needs to to about 12 to 18 inches in diameter, but I am not sure so I would like an advise from you. Thanks once again.
I’m sure that pot size will be fine.
I am really impressed with your blog and can’t wait to read more! I also found this particular post REALLY helpful because I just planted some calendula and am excited to learn how to harvest it..thank you!
This is my first year growing and harvesting Calendula. I’m so excited! I’ve just harvested the first flowers, but I live a block away from the beach which makes it incredibly humid here. I’m wondering if there are any ways to dry them in the oven….perhaps not turning it on, but just putting them in there and using the little heat from the pilot light?
Anyone have any experience with this?
Thanks!
I have been working on building up my herb garden for 3 years. Finally, I am to the point of being able to harvest the fruits of my labor. Thanks for this post it is very enlightening and would like to use my calendula to make facial lotion. Any good recipes? Thanks a bunch!
I have been growing and harvesting calendula for a few years. I had heard that only the flower petals were used for infusions oils salves ect. So I embarked on the process of cutting the flower heads and waiting for them to dry to pluck just the petals. Not a big deal but a little time consuming and tedious. This plus the fact that you then don’t have seeds to save for future planting was a real downside for me. I now wait until the seed head is developed and the flower petals are still attached but ready to drop before harvesting just the petals. The petals release very easily at this stage leaving the seed head intake on the stem to mature and be collected at a later date. I collect just the loose petals in a clean basket. I then set the basket aside to further dry the petals shaking it every few days to insure complete drying and no clumping before using or storing. This does require multiple trips to the garden as new seed heads develope every few days but not a biggy for me as I am in my garden daily anyway. Wondering what others think. Am I collecting my petals to late in the game missing out on essential oils in the process ?
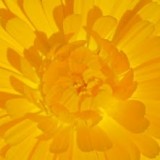
love the golden pictures
Pingback: Harvesting and Drying Calendula » The Homestead Survival
This is the information I needed for today, thanks so much for providing just the information that I needed and nothing more!
We grow aloevera to treat sunburn. I recently was referred to calendula for sunburn relief while traveling. I loved the stuff and got me to researching it. Now wondering how aloe infused with calendula would work?
hey thanks! calendula in salade is awesome.
We grew calendula for the first time this year, but some of the flowers have yellow (or golden) centers and some have brown centers. Does it make a difference which ones we harvest?
No, it shouldn’t. As long as the seeds you were using were marked Calendula officinalis, they’re going to be the right kind.
I have no idea. We got the seeds from a couple sources including a friend (who is more of a gardener than an herbalist) and Dr. Jones (The Homegrown Herbalist), but they match your descriptions and photos.
I’m sure it’s fine. Calendula comes in many different colors and petal configurations.
Okay. Thank you!
oh what a lovely lovely post! This is my first year harvesting calendula but we’ve been using the cream for years.
sharing on my facebook page!
Pingback: i’ve always thought Calendula would make a great girl’s name | helenlehndorf
What species of Calendula are you drying, here? Mine (Calendula resin) have not been gifted with nearly so many pet as per head!
I have a suggestion for the moth problem; Moth Mullein…Verbascum blattaria.. It just arrived in a quiet corner of my garden on the woodland edge and its stunning! It would be 7 feet tall if it were standing but it laid down and sent flower spikes up a foot or two at intervals along the stalk.. spikes which terminate in striking little yellow flowers. What a pleasant surprise. The purple stamens look like moth antenna! From my research it does not share the medicinal properties of it common sister but women used to put it with their linens to protect them from moths. I guess I will put some leaves in my herb cupboard. 😉
Pingback: How to Harvest Calendula for Tea | Family - Popular Question & Answer
Thank you for your Calendula blogs – I on my way out for day 2 of picking and will be making calendula oil and tincture and having some petals in my salad. Your clearly written instructions give me just the confidence I needed to get to work – blessings to you and yours!
Thank you for the wonderful post on calendula. I am growing and harvesting it for the first time this year and when picking the flower heads I notice tiny little bugs crawling around in the petals. I wonder if it is okay to give them a quick rinse in a colander and put them right into the dehydrator or if I should dry them with the bugs still on them? I noticed you said not to wash the flower heads.
Thanks! Yes, if you have bugs go ahead and wash them — but yes, dry them well so no mildew sets in.
Thank you for this article. Just growing calendula for the first time this year and I’m in love with this beautiful plant! Your pictures are wonderful, and I love learning that they’ll volunteer next year!
Pingback: The Harvest, and what to do with it | Beyond the Burden
Pingback: The Harvest, and what to do with it | This Life in a Prairie Garden
Thank you. Very nice.
Hi, great post! I just bought a Calendula it has no flowers or anything, how long til it grows some flowers usually?
Fantastic! I’m new to growing calendula, this article was just what I was looking for. Love it! Ever grow ground cherries? They’re amazing too.
I grew ground cherries one year, but it was a variety that didn’t taste very good. I’ll have to try it again sometime.
Thanks for your blog.very interesting.studying aromatherapy.nearly qualified.infusing calendula at the moment.planning to make healing balms.definitely going to plant some marigolds too.am thrilled to have found your blog. I am a keen fan of calendula from personal experience its a very good healing herb,plant particularly scarred tissue.keep up the good work.best wishes. Eils.
Pingback: Harvesting and drying Calendula | ~Heidi's Magickal Haven~ Blog
thank you so much for this very clear and concise information. your info will save me from easily made mistakes.
Pingback: A Natural Homemade Salve Recipe
Hi all. Ok, so I’ve cut off the first few flowers that have bloomed to start drying them out. I’ve found a space under cover on the verandah with thick shade cloth to protect against sun, wind and rain and after scrounging around for a container, ended up putting them in an old plastic ice cream container with holes punched into it. However, the holes are not very big to stop any dried flower falling out. How much air flow would I need? Would it be worth making bigger holes in the container, especially near the top of the container, to get more air flow?
You know, a paper bag is a good container for drying blooms. I use small, lunch-sack sized ones myself. I think smaller bags are better, so that you don’t end up with too much weight and compression. Also, each bag can hold an individual harvest, so you know all the blooms inside are the same age.
Paper bag, huh? Ok, but how does the air flow get into the bag? I assume when you said that that you put holes in it, or perhaps not?
I might still have to put them in said paper bag and then put that in a dish/bowl/something to hold them in place as I don’t have any option of hanging them anywhere right now. I might be able to rig something up in the kitchen where the curtains used to hang. It’ll be out of direct sunlight, but it is still bright nonetheless so if that is a problem I’ll have to stick to the tabletop outside.
No holes necessary. You can leave the top of the bag open when they are freshly picked, and that is enough air circulation. Later, when the herbs are dry, you can staple the bags closed, or transfer the flowers to other containers. Paper bags are good because they don’t hold moisture in. You don’t have to hang them, you can just collect your bags in a box or something, out of the sun and elements.
Pingback: How to repel hornworms
Thank you for this article. It was extremely informative and much needed. My hands are so dry from working in a hospital. I can’t wait to try this! Thanks!
Oops! Posted under wrong article. Meant to put this under the calendula salve 🙂
Calendula is one of my favorite herbs! I use it in a daily infusion that’s wonderful! This would be such a good post to share on Wildcrafting Wednesday, I hope you’ll join us! 🙂
This is a great post. Thanks for the advice and information. I hear you didn’t enjoy the leaves as a vegetable. I agree that they dont tasye great when prepared in the usual manner of veg preparation. Try to blanch them and then add some peanut butter together with onions and tomatoes. (blend raw nuts to form a smooth consistency then add the liquid to the blanched vegetables – simmer on low heat until cooked (10 -15 minutes). This is another way of enjoying them.
I’m looking for a good book on herbs, oils salve,and medicinal uses. I’m about to see my first calendula flowers soon.
Pingback: Calundula | Hope When All Hope is Lost
I’ve been successfully growing, harvesting, and drying calendula according to your instructions for years, and this year I’ve come across a new problem. I keep finding caterpillars (and their droppings) mixed in with my partially dry flower heads. after I first noticed them, I started checking the flowers carefully as I set them out to dry, but would still find lots of caterpillars over the next several days. I’ve also tried soaking the flower heads in salt water as I would to remove cabbage worms, but that didnt seem to help, either. Has anyone else had this problem? does anyone have any other suggestions on ways to remove the caterpillars (aside from checking the partially dried flowers every few days and picking them out by hand)?
I have been having the same problem…not caterpillars but very tiny worm like bugs. Isee them in my calendula, chamomile and red clovers…any type of flower really. Even when I think I get them all more appear…they are very good at hiding! I would love some tips on getting rid of them too. The thought of using them with all these little bugs is kind of gross!
Very interesting. Thank you I will continue to follow you.