Advances in Gardening: Introducing the Germinator™

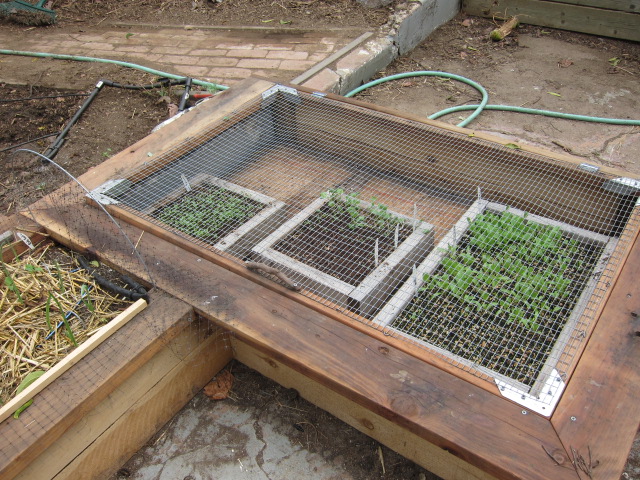
I’ve built a kind of seedling Guantanamo which I’ve dubbed the “Germinator™.” Why? Two reasons:

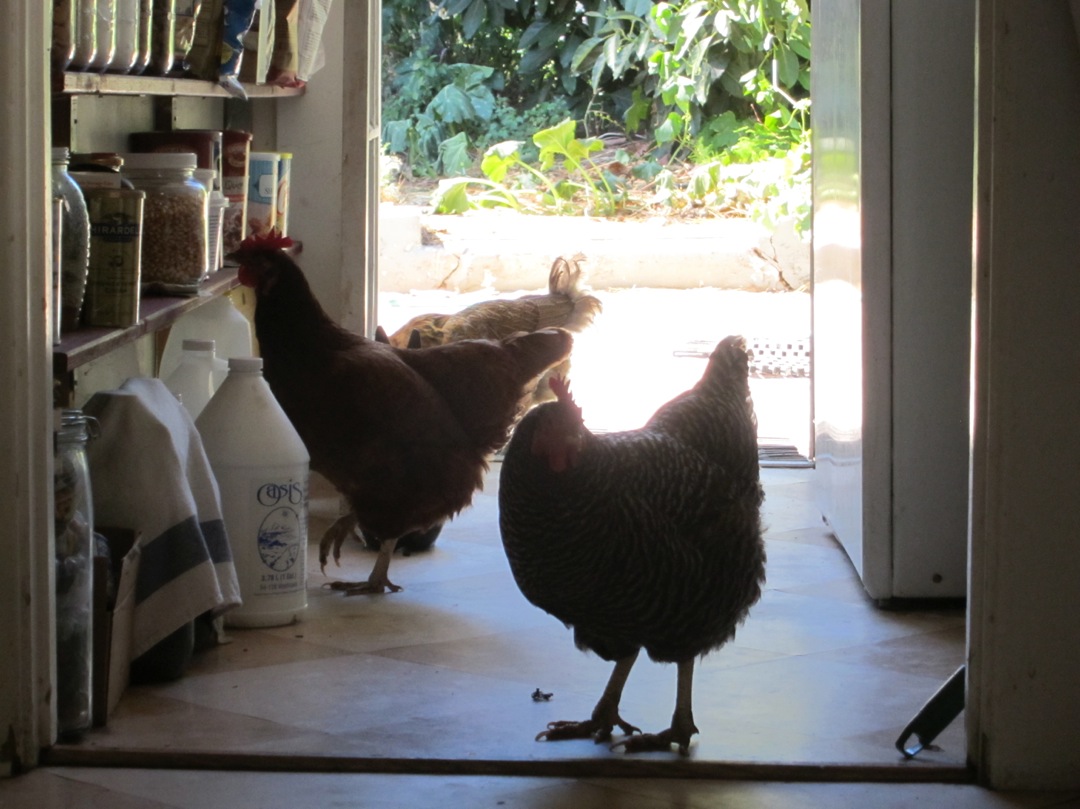
1. Damn squirrels and chickens. Both have gotten into my seedling flats in the past and wreaked havoc. This is why the Germinator™, for most of the year, has a wire mesh top. That wire mesh also takes down the harsh Southern California sun a notch so the flats don’t dry out.

Univent Greenhouse Automatic Vent Opener2. During the cooler spring season, I can trade out the wire mesh for a translucent plastic top and I’ll have a cold frame. Last year my tomato seeds failed to germinate due to cold weather. I’ve vowed not to let that happen next year.

I’m going to trick out the hinged top of the Germinator™ during the cool months with a Univent Greenhouse Automatic Vent Opener, a gadget that promises to automatically open and close the top. The Univent requires no batteries or power and aims to maintain a temperature range between 62-73 F. We’ll review the Univent when we try it next year.

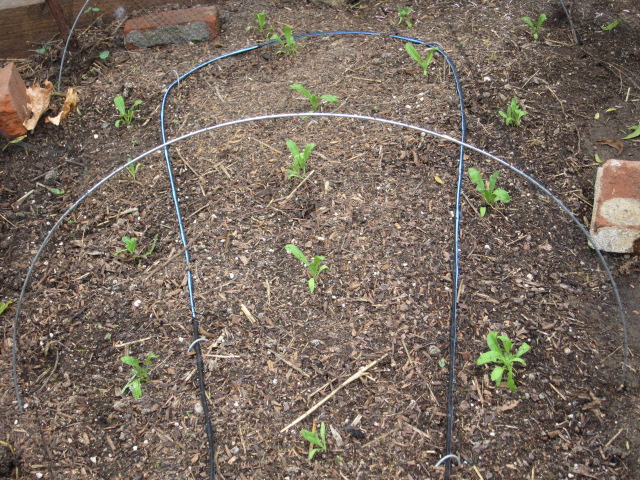
So far the Germinator™ has worked well, providing a safe haven for our winter seedlings: artichoke, spigarello broccoli, nettles, sweet peas, white sage, Italian dandelion, chard and more. We could sow directly in the ground but, due to construction of our new garden infrastructure, starting seedlings in flats allowed me to get going ahead of time.

Advances in Gardening Series: The Fan

Yet another heat wave slowed our backyard redesign project, but the weather is looking more cooperative at last and things are coming along. What we thought we might do over the next few days is share some of the new things we’ve put in, and how/why we built them, just in case any of it might be useful to you.

Everything is pretty rough and ragged right now, but it will be fun to report back in a couple months and do a compare/contrast.

The Concept:

Above you see the bones of my herb fan (and lots of chaos beyond). This space used to be my herb patch, which consisted of a bunch of random plantings, some perennial, some seasonal. It somewhat useful and occasionally attractive, but  didn’t earn its keep. So what I’ve done is split my herb production into two categories: kitchen and medicinal.

The kitchen herbs are going to live in a smaller planter box, all compact and tidy (because really, how much marjoram do you need?). This new bed, The Fan, is for medicinal annuals, because I need more space to produce them in useful quantities. For instance, you need a good number of chamomile plants if you want enough to put away for tea and a little more for salves. With this in mind, I’m going to rotate “large” crops of annuals through this space, one variety per wedge.

This winter’s fan is planted with, from left to right, Calendula, chamomile and bread seed poppies. I started the Calendula and chamomile in flats ahead of time, simply to get a head start, then transplanted them into their wedges this week. Poppies don’t like to be transplanted, so I sowed those seeds today.

The original herb garden was a rough quarter circle. We kept that footprint, but used spare bricks to divide the shape into 3 smaller wedges. The bricks give me a way to walk between the wedges without compacting the soil. 

The Process:

To prepare the ground…

I first forked the original soil, because while it’s not bad soil, it was compacted. Poppies have deep taproots. Like carrots, they need loose soil, so I really worked their wedge deep. If it hadn’t been so hot, I would have done the same for all the wedges. Then I spread 1″ of good homemade compost over the whole area and a bit of alfalfa meal and forked that in about 3 inches deep. Then I watered deeply to prepare for planting.

By the way, I made a mistake at this stage. While merrily amending and forking the soil, I forgot that chamomile likes crappy soil.  With chamomile, hard conditions yield many blossoms. So by putting my chamomile in a deluxe bed, I may have guaranteed myself lots of foliage and few flowers. We’ll see. The lesson? Pay attention. Don’t garden on autopilot.

Next I coiled drip tubing in each wedge…

pinning the tubing down with bent wire. Erik did the heavy lifting in setting up the drip system a couple of years ago. Now when we want to irrigate, we just have to move the tubes around or switch them out as necessary. You can see the tubing snaking around in the photo. Soon as the plants get a little bigger it will become invisible. The mainline tubing is visible at the bottom of the photo–this is where all the little tubes plug in. That will also be obscured later.

The final step is to protect newly planted seeds and seedling from marauding critters.

We do this by stretching bird netting over wire hoops. Bird netting, also called aviary netting, is a super light, fine plastic netting that can be bought at most nurseries. You can drape trees or garden beds with it to protect them when in fruit, or when plants are tiny and tempting.

Erik says he’ll do a whole post on the wire hoops one day, but right now can’t remember the name of the wire. But he gets in the chain-link fencing section of the Home Despot. But basically, it’s a sturdy galvanized wire. Because it’s sold in circular bundles, it’s easy to cut off a piece and use it as a hoop. The cut ends get thrust in the ground and the netting is spread over the arch. We weigh the ends down with bricks or boards. You can see the bricks on the far left wedge above–if not the netting itself.  This system isn’t elegant, but it’s temporary, and it works.

Now all I have to do is top water…

until the plants get roots deep enough to take advantage of the drip. It’s nice to have the chamomile and Calendula so far along. These seedlings are too big for bugs to bother, and should do fine. The poppies I planted by simply sowing the seed thick on the surface of the soil, and patting them down a bit.  When they germinate, there will be tons of teeny sprouts, and I’ll have to thin them ruthlessly so that each poppy has lots of breathing room. I’ve made the mistake in the past of planting them too closely. When you do that, they get spindly and sad.

And that’s that. I can hardly wait to see the beds fill in.

Tune in next time for… The Germinator!


Return of Bean Friday: Bean Broth or “Tuscan Crazy Water”

Yep, Bean Friday rears its head again–or is it Frugal Friday?

Whatever it is, I’ve got this thrifty idea for you. I read about in The Italian Country Table, by Lynn Rossetto Casper. We’ve had this book for years and years, and it has some really good recipes in it that have become standards in our house, along just with a couple of duds. I’d not paid attention to her entry on “Crazy Water” before, but by her introduction, I realized it was just the sort of thrifty cooking we’ve been focusing on here during Bean Fest. The only question for me was whether this recipe was a keeper or a dud, because it sounded pretty strange. The truth is it’s sort of in between.

According to Caspar, Tuscans like to cook beans with plenty of aromatics in lots of water, and then reserve that water as a broth. The bean broth is called Acqua Pazza, crazy water.

“This soup is a revelation” is how she opens the recipe. And later she claims it could be mistaken for chicken broth. That might be the problem–I was expecting twinkling lights and perhaps a chorus from a boys’ choir when I tasted it. What I got was a swallow of thin broth which tastes mostly like warm water when it first hits the tongue, but really does have a very nice, savory aftertaste. It’s delicate.

Caspar suggests serving it in bowls with croutons. I don’t have that much faith in it. But it is a decent vegetarian stock. It goes very well over rice, and I suspect it would be an excellent broth for cooking rice and other grains. I am fond of the waste-not, want-not philosophy behind it, and also the time saving angle. You can make a pot of beans for dinner, and end up with a supply of broth as a side benefit.

So now that all of those qualifications are done, this is how you make the broth:

First, you can’t use just any dried bean. Use light beans, like cannellini, pinto or borlotti. She particularly recommends chickpeas. I used pintos. Don’t use any dark or earthy bean, like black beans or black eyed peas. For fresh beans, she recommends cranberry beans or scarlet runners.

Basically you’re making a pot of beans with extra water. Simple stuff. I doubled her recipe, which only called for 1 cup of dried beans. I soaked 2 cups of dried pintos overnight. The next day I drained them and put them in a heavy pot and poured 2 inches of fresh water over them. To that water I added:

  • 8 fresh sage leaves
  • 6 good sized cloves of crushed garlic
  • 1 medium onion sliced in half and studded with 4 whole cloves

(Just fyi, her recipe calls for 8 sage leaves per 1 cup of dried beans. I chose not to double the sage.)

Throw these seasonings in with the beans. Bring the pot to a boil. Reduce to a simmer and cover. Don’t stir. This is supposed to make the broth clear. (It didn’t really help in my case). Foam might appear on top of the water–it did for me, but it vanished by the end of the cooking time.

Simmer the beans on low, covered, until tender but not falling apart. My pintos cooked in only 30 minutes. A speed record! The plenitude of water means you don’t have to worry about sticking or burning.

At the very end, add salt and pepper.

Strain the broth from the beans. She notes that the Tuscans dress these beans at the table using salt, pepper, olive oil and maybe vinegar.  I tried it, and it’s fine. Solid. Not super exciting, but healthy and hearty. I served the beans over rice with some of the broth. Another possibility, maybe a better possibility, would be to reserve the beans for a higher purpose, like frijoles refritos, or hummus-like applications.

The broth doesn’t keep. You know how stinky beans can get when forgotten in the fridge. I don’t even want to know what might happen to this broth. So use it the next day, or freeze it for the next time you need stock.

I got about 6 cups of bean broth from this recipe.

Anyone done anything similar? Any advice?

Chickens in the House!

Mrs. Homestead here:

I’d planned to give you all a progress report on the backyard redesign, which features such wonders as the Germinator ™, the Trough of Garlic ™, the Fan of Pharmacy ™ and the Screens of Discretion (also tm).

But the camera crapped out on me. So, until I figure it out (Which means until Erik gets home and I can shove the darn thing at him and say, “Fix your camera!”),  I’m offering up this picture of a home invasion, poultry style.

Don’t know about you other chicken keepers, but our ladies are obsessed with the house. If they’re loose, they sit on by the back door and watch us through the glass. And if we leave the door open, they try to venture inside–though they don’t seem to much like the texture of kitchen floor. We don’t let them stay, but it’s funny to watch them try to creep in.

I was cracking up when I took this picture. You probably can’t see it, but our Red there, Stewpot, is pecking at a jar of popcorn–and encountering the phenomenon of glass for the first time. She thought she’d hit the mother lode.

Cure for Prickly Pear Stickers

Mrs. Homegrown here:

Hallelujah! Last night, our friend Oscar (genius man!) told us how to deal with the dreaded, pernicious, invisible prickly pear fruit stickers (glochids) which somehow end up embedded in my hands every time Erik brings one of those fruits in the house. The answer? Pumice stone. It’s so simple. Just rub the site with a pumice stone. I think it just shaves off the top part of the stickler, and then lower part works its way out eventually, I suppose. But the important part is that the top part isn’t moving anymore, which means no more pain.

I’ve tried it–it really works.

Happy, happy, happy!

ETA: A round-up of alternate suggestions from the comments: you can also try spreading white glue (PVA/Elmer’s) over the area and pulling up the “skin.” Other people do something similar with rubber cement. Or you can try duct tape. None of these worked as well for me as pumice, but everyone is different.