Advances in Gardening Series: The Fan

Yet another heat wave slowed our backyard redesign project, but the weather is looking more cooperative at last and things are coming along. What we thought we might do over the next few days is share some of the new things we’ve put in, and how/why we built them, just in case any of it might be useful to you.

Everything is pretty rough and ragged right now, but it will be fun to report back in a couple months and do a compare/contrast.

The Concept:

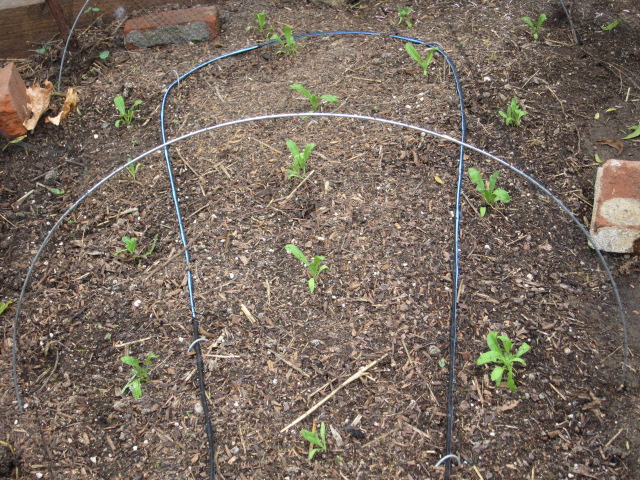
Above you see the bones of my herb fan (and lots of chaos beyond). This space used to be my herb patch, which consisted of a bunch of random plantings, some perennial, some seasonal. It somewhat useful and occasionally attractive, but  didn’t earn its keep. So what I’ve done is split my herb production into two categories: kitchen and medicinal.

The kitchen herbs are going to live in a smaller planter box, all compact and tidy (because really, how much marjoram do you need?). This new bed, The Fan, is for medicinal annuals, because I need more space to produce them in useful quantities. For instance, you need a good number of chamomile plants if you want enough to put away for tea and a little more for salves. With this in mind, I’m going to rotate “large” crops of annuals through this space, one variety per wedge.

This winter’s fan is planted with, from left to right, Calendula, chamomile and bread seed poppies. I started the Calendula and chamomile in flats ahead of time, simply to get a head start, then transplanted them into their wedges this week. Poppies don’t like to be transplanted, so I sowed those seeds today.

The original herb garden was a rough quarter circle. We kept that footprint, but used spare bricks to divide the shape into 3 smaller wedges. The bricks give me a way to walk between the wedges without compacting the soil. 

The Process:

To prepare the ground…

I first forked the original soil, because while it’s not bad soil, it was compacted. Poppies have deep taproots. Like carrots, they need loose soil, so I really worked their wedge deep. If it hadn’t been so hot, I would have done the same for all the wedges. Then I spread 1″ of good homemade compost over the whole area and a bit of alfalfa meal and forked that in about 3 inches deep. Then I watered deeply to prepare for planting.

By the way, I made a mistake at this stage. While merrily amending and forking the soil, I forgot that chamomile likes crappy soil.  With chamomile, hard conditions yield many blossoms. So by putting my chamomile in a deluxe bed, I may have guaranteed myself lots of foliage and few flowers. We’ll see. The lesson? Pay attention. Don’t garden on autopilot.

Next I coiled drip tubing in each wedge…

pinning the tubing down with bent wire. Erik did the heavy lifting in setting up the drip system a couple of years ago. Now when we want to irrigate, we just have to move the tubes around or switch them out as necessary. You can see the tubing snaking around in the photo. Soon as the plants get a little bigger it will become invisible. The mainline tubing is visible at the bottom of the photo–this is where all the little tubes plug in. That will also be obscured later.

The final step is to protect newly planted seeds and seedling from marauding critters.

We do this by stretching bird netting over wire hoops. Bird netting, also called aviary netting, is a super light, fine plastic netting that can be bought at most nurseries. You can drape trees or garden beds with it to protect them when in fruit, or when plants are tiny and tempting.

Erik says he’ll do a whole post on the wire hoops one day, but right now can’t remember the name of the wire. But he gets in the chain-link fencing section of the Home Despot. But basically, it’s a sturdy galvanized wire. Because it’s sold in circular bundles, it’s easy to cut off a piece and use it as a hoop. The cut ends get thrust in the ground and the netting is spread over the arch. We weigh the ends down with bricks or boards. You can see the bricks on the far left wedge above–if not the netting itself.  This system isn’t elegant, but it’s temporary, and it works.

Now all I have to do is top water…

until the plants get roots deep enough to take advantage of the drip. It’s nice to have the chamomile and Calendula so far along. These seedlings are too big for bugs to bother, and should do fine. The poppies I planted by simply sowing the seed thick on the surface of the soil, and patting them down a bit.  When they germinate, there will be tons of teeny sprouts, and I’ll have to thin them ruthlessly so that each poppy has lots of breathing room. I’ve made the mistake in the past of planting them too closely. When you do that, they get spindly and sad.

And that’s that. I can hardly wait to see the beds fill in.

Tune in next time for… The Germinator!


On miso, caffeine and the search for a morning brew


Mrs. Homegrown here:

I am a caffeine addict. Erik is too, though he doesn’t admit it. Actually, he was only a casual user until he met me, and then became habituated to the morning brew, and eventually graduated into the 3pm pick-me-up brew. In general, I think mild caffeine addiction is not very worrisome, and pretty much built into the fiber of America. However, my own addiction has always been demanding. And recently I had to go straight (long story) — which resulted in a full week of headaches and misery. But now I’m clean, and living in a much slower, less productive, somewhat dream-like reality. Is the world supposed to be this way??? Really?

Anyway, I’ve decided two things. One, that it is impossible that I should never again ingest caffeine. No more Turkish coffee? No more Thai iced coffee? Never again a Mexican Coke? No English Breakfast teas on a cold afternoon? No crisp iced tea with a nice lunch? Riiiiighht. It will have to come back into my life in some sort of managed way. (How’s that for addict thinking?)

But before I slide back into my habits, I’ve decided to stay entirely clean for a month to see how my head reacts. See, I get a lot of headaches, so much so that I’m a connoisseur of headaches, and I’m wondering if the vascular expansion roller coaster of caffeine consumption might not be very good for me. We’ll see.

All this brings me to the point of this post. I’m looking for interesting suggestions for hot beverages that I can drink in the morning which will ease my longing for the ritualized caffeine consumption.

I do not approve of any of the myriad fruit-flavored or otherwise flavored “herb” teas in the marketplace. I have my own mint, nettles and other herbs to make tea of, but thin herb tea is just plain depressing first thing in the morning. In the morning I want something substantial. I’m not afraid of the the bitter, the strange and the strong.

Do any of you know anything about chicory or the various bitter root brews? Those old-timey, war ration, hillbilly sort of brews? This is what I’m interested in pursuing. Let me know if you have any ideas or favorites.

What’s working for me so far is miso soup. It’s an important component of the traditional Japanese breakfast, and I can see why. Miso soup is big and interesting and hearty–somehow on par in terms of body satisfaction with a nice cup of coffee with milk. Of course, it’s crazy high in sodium, but it is rich in trace minerals, and if you use real paste (not dried mix) and don’t overcook it, you also get a dose of beneficial micro-organisms, because miso is a fermented product. I throw in a few strips of nori to give me something to chew on as I drink.

A few hints re: miso:

• Buy the pure paste, not the soup mix. Buy the paste in big bags at an Asian-foods supermarket. It is much cheaper than the little tubs sold in health food stores. After I open a bag I transfer it to a plastic yogurt tub and put it in the fridge. It keeps forever. There are different types of miso (red, white, brown…) Don’t let this confuse you. All are good. Just start somewhere and you’ll sort it out. I’m fond the red.

• Proper miso soup is made with the classic Japanese soup stock, dashi. You can make it with any stock you like, or do as I do in the mornings and just use water. It’s important not to simmer miso, because heat kills the beneficial critters in it. If you’re making a pot of soup, add the miso at the end, after you pull it off the heat. If you’re making it with hot water, take the kettle off heat before the boil, or let the water sit and cool some before using.

• I use about one rounded teaspoon of paste per coffee cup of water. This makes pretty strong drink, but I like that.

Big hint: when mixing miso paste into liquid, always dissolve the miso in a tiny bit of liquid first, and then add that solution to the larger volume of liquid. Otherwise you’ll never get the lumps out. For instance, I put a spoonful of paste at the bottom of the coffee cup, add a splash of water, mix that up until the lumps are gone, then add the rest of the water.

• You can make your own miso! Sandor Katz has instructions in Wild Fermentation. It actually doesn’t sound hard to do at all. You just cook up some beans and inoculate them, then store them in a crock. I’ve always wanted to try it, but miso needs to ferment for a year in a reasonably cool place. Living in SoCal without a cellar, I just don’t think I can give it the conditions it requires.

• You can make pickles using miso paste. I’m experimenting with that right now, and will report back.

Taut-line knot

Mrs. Homegrown here:

Knot tying is a skill that’s long been on my to-acquire list. I’ve finally learned how to tie a fancy knot, and it’s pretty exciting. This won’t impress ex-Boy Scouts and hardcore knot wonks, but if your knot skills are pretty much limited to shoelaces (as mine were until today), you might enjoy learning this one.

The taut-line hitch is an adjustable knot. It slides to adjust tension, but stays where you put it. So cool! If you’ve ever struggled to tie a line between two objects–say a laundry line–only to have it sag morosely, you’ll get my excitement. It’s also a useful for staking out tents and tarps.

I’m not going to show you how to do it here, but I’m going to save you the trouble of squinting at lots of poorly drawn diagrams and unclear videos, by sharing the the video that did it for me, one offered by a joint called The Art of Manliness. Official disclaimer: I haven’t read that site, so I don’t know what their program is, but I must say, I do feel rather manly.

It’s actually a very easy knot, though until I found this set of instructions, the procedure baffled me. Apparently there’s a few variations of this knot, but this version does work.

ETA: One of our commenters brought up the advantages of variations of this knot. If you’re new to knots, as I am, I’d recommend you learn one variation of this knot, so you get the general gist of it planted in your brain, and then venture into the Wikipedia page on the Tautline Hitch to look at the variations. The one shown here is #1857. Also important, I learned from Wikipedia that these knots may not be secure when made with slippery synthetic rope.

Birds on a Wire

A neighbor told me this morning that when the house next door to him was for sale the owners asked him not to hang laundry on his clothesline because it would, “bring down their property value.” And, of course, many housing developments have the same anti-clothesline restriction. Is it some distant cultural memory of 19th century tenement buildings, an id-based Ralph Kramden, an intense fear of anything urban? Maybe this clever design by Fabian van Sprecklsen might tip the balance for the clotheslineophobes. The ends are shaped like telephone poles and the clothes pins are shaped like little birds. I’m tempted to pull out a saber saw and make a copy, but that would be stealing! Via Doornob, an inspiring design blog I highly recommend.

What’s the dirt on soap nuts?

Sapindus mukorossi fruits, image from Wikimedia Commons

Mrs. Homegrown here:

I’m trying to take a temperature reading on soap nuts. Have you used them? Did you like them? How do you use them–as laundry detergent, shampoo, soap? Do you use whole nuts or make a liquid? How long have you been using them? Do you find a big difference between brands?

If you could shoot me a comment, I’d really appreciate it.

On a more advanced level, I’m curious about their interactions with soil and compost, so if you have any thoughts on that, I’d love to hear them. I’m curious as to how they’re harvested, and if their growing popularity is impacting their local ecosystems.

If you’ve never heard of soap nuts, let me know that, too! I’m wondering where they sit in the general public awareness.

Soap nuts are saponin-rich fruits, usually of a tree called Sapindus mukorossi (though all Sapindus make soaping fruits), which can be used for laundry and other cleaning purposes. They’re usually sold only lightly processed: seeded and dried. A handful of these dried fruits, which look somewhat like small dates, are put into a cloth sack and thrown in with the laundry. The fruits release saponins, natural surfactants, which clean the clothes. Supposedly. I hear mixed things. I’m experimenting with Maggie’s Soap Nuts right now (and Erik is complaining about their…uh…rich organic smell…which doesn’t seem to linger after drying), but I’ve not used them long enough really judge how they work. The truth is, so much soap is embedded in the fibers of our clothing that you can wash the average garment a couple of times in nothing but water and it would still come out pretty clean. And, for better or worse, Erik and I don’t do that much wash. I feel like I need to adopt a Little League team or something to really test drive this stuff! So send your comments, or your ball teams, this way…

Updated 12/14:
I’ve continued to use soap nuts off and on– I also use Oasis Laundry Detergent, which is a greywater safe detergent which I trust.  Soap nuts are also safe for greywater, by the way. As far as use goes, I’ve come to the conclusion that soap nuts work fine for regular soil, but for tricky whites I always use the Oasis plus some kind of oxygen bleach (which I don’t send out via the greywater). Dirty whites just need more oomph than the soap nuts can provide.
Also, I mention Maggie’s soap nuts above–they used to be available by Amazon, but they are no longer. We’ve also sampled soap nuts from Green Virgin Products and they worked well, and they are currently available via Amazon. You may find soap nuts in your local health food store, of course, though in some areas it can be hard to find them in stores.