How to Make a Mosaic Stepping Stone

Not liking the pre-fab stepping stone options out there, I decided to take matters into my own hands and make one with glass mosaic tile. It’s easy to do using what’s called the “indirect method” in which you press the tiles onto a piece of contact paper. You then use that sheet of tile to cast your new, custom stepping stone.

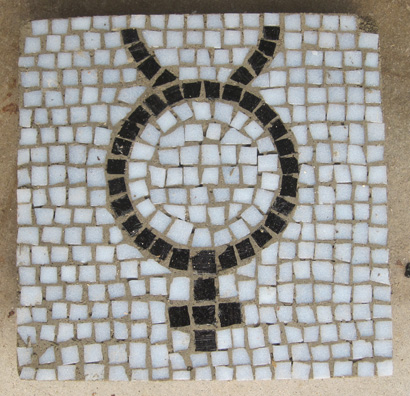
The first step is to come up with a design, either hand drawn or printed out from the computer. Since you’ll be working in reverse, you flip your design left-right. I chose the mercury, the symbol of transformation (it seemed like a good metaphor for a garden). No need to flip this particular image, of course. When sizing the design I like to keep in mind the size of the tiles I’ll be using so that any lines are about one tile wide.

I transferred the design to a piece of clear contact paper. Next, I taped the contact paper, with the sticky side up. to a piece of melamine coated fiberboard. Melamine is a good material to use because it helps it has a very smooth, even surface and is unlikely to warp. In addition, using melamine for the sides of the mold helps it release more easily. I built this mold out a piece of a discarded Ikea bookshelf.

While I was cutting the bottom piece, I cut four additional small pieces of the bookshelf to form the sides of the mold.The dimensions of these pieces determine the size of your stepping stone. I made a simple box by joining the pieces with screws at the corners. If you wish, you can spray the sides of the mold with WD-40 to help release the mold later. I forgot to do this, but it released fine anyway

For the mosaic itself, I used glass mosaic tile leftover from an old project. The glass picks up reflections and shimmers on a sunny day. The drawback is that it’s pretty expensive. The brand we’ve used in the past is Bisazza. You can also, of course, use broken plates, pebbles, pieces of metal or tile left over from other jobs.

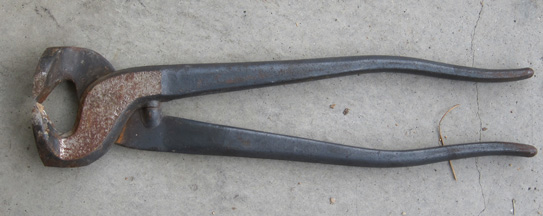
To cut glass tile I use a pair of tile nippers. I like to break the square tiles into four small pieces to simulate the irregular look of ancient mosaics. I wear a pair of safety glasses and do the cutting in a box to keep shards of glass from flying around. I also do this outside or in the garage so little shards of glass don’t end up in our house. Once cut, I press the little tile pieces against the sticky side of the contact paper–face down, or “good side” down.  The sticky paper holds them in place.

When you’re finished sticking all the tiles down, it’s time to mix up some concrete. I used one part Portland cement to three parts builder’s sand. I poured my concrete into the mold and used some chicken wire as reinforcement. I just cut the wire into a rough square that would fit in the mold, poured half the concrete, placed the wire in the mold, then finished the pour. 

Once cast, I put the stepping stone in a garbage bag to slow down the curing process. After a couple of days I carefully removed the mold. One advantage of this technique is that it’s “self-grouting”: the concrete should flow between the tiles during the pour. It worked well, but I will have to do a small amount of grouting to fix a few spots the concrete did not reach.  

You could also use this same reverse method to make designs that could be pressed into a mortar bed when tiling, say, a kitchen or bathroom.

For more garden mosaic ideas see a previous post we did on the subject that includes a link to the stunning pebble mosaic work of Jeffery Bale.

Easy To Make Furniture: Sunset DIY Manual From the 1970s

PVC pipe and an avocado colored cushion? Instant outdoor furniture, or so this campy 1970s furniture manual, Easy-to-Make Furniture,from the editors of Sunset Magazine, would have you believe.

While I think DIY furniture books from this period are somewhat horrifying, I have a respect for their can-do attitude in the face of the era’s declining wood shop skills. Then, WHAM, the global economy and Ikea came along and wiped out the last remaining economic reasons to try to make your own furniture.

That being said, I think some clever folks with time on their hands and an eye for discarded materials could make use of some of the concepts in this book.

So start dumpster diving! Let’s take those scavenged materials and revisit the bean bag. Easy-to-Make furniture has its own unique twist on the concept. Say hello to the “Multiposition Tube Seat”:


And yes you can have a particle board chair:

With a built-in magazine rack:

Scope out this book in its entirety here.

Make a Brigid’s Cross

A little cross hanging on our chicken coop

Spring is here. In LA, it’s definitely in full swing, but I suspect even in more northerly places folks may notice a slight change in the air, or find early flowers like snowdrops or crocuses pushing their way through the snow. Spring is stirring.

To celebrate spring this year, I made a few Brigid’s crosses to hang in the house and out on the chicken coop. They’re protective symbols, intended to ward off both evil and fire. Who doesn’t need that, I ask you? And it’s fun to put some fresh decorations up to counterbalance the post-holiday doldrums.

These symbols can be interpreted as Christian crosses, but they also have a definite pagan sun-wheel feel to them (energy circling around and around). Brigid herself did double-duty as a pagan goddess of smiths, poets and healers and later as a patron saint of…smiths, poets and healers.

Wikipedia says the symbol was unrecorded before the 17th century, so who really knows where it came from. (Shades of Spinal Tap!: No one knew who they were or what they were doing…)

But what the hay. St. Brigid’s day is February 1st, and the cross-quarter holiday of Imbolc, which marks the coming of spring, is celebrated around the 2nd. I think this weekend would be excellent time to make a few Brigid’s crosses for fun and luck.

A proper reed cross

They’re super-easy to make. Just go the Fish Eaters site for very clear weaving directions. Traditionally they are made out of reeds or long pieces of straw. I had neither, so I used some broom corn*, which didn’t result in a symmetrical effect that reeds give, but is sort of cute in its own way.  (FYI for you southerners: I tried palm fronds first, but they were too slippery. And seeing me trying to weave with them gave Erik flashbacks to Sunday school!)

*No, I haven’t made my broom yet! I’m hung-up on getting some nylon cordage in a decent color. For some reason our hardware store only stocks it in florescent shades.

The Chinese Wheelbarrow

From the very cool Low-tech Magazine, the Chinese wheelbarrow:

The Chinese wheelbarrow – which was driven by human labour, beasts of burden and wind power – was of a different design than its European counterpart. By placing a large wheel in the middle of the vehicle instead of a smaller wheel in front, one could easily carry three to six times as much weight than if using a European wheelbarrow.

 Read the rest here. So who will be the first to make one of these with an old bicycle wheel?

Gingerbread Geodesic Dome


Scout Regalia Reel 02: Gingerbread Geodesic Dome from Scout Regalia on Vimeo.

Now you can bake your own version of Drop City without getting “baked” yourself! Some local designers, Scout Regalia, have cooked up a gingerbread geodesic dome and offer a kit for making one.

Now when it comes to geodesic domes as shelter I’m with former dome builder Lloyd Kahn who concluded that “Domes weren’t practical, economical or aesthetically tolerable.”

But when it comes to gingerbread domes, I’m all for it!

Via the Eastsider.