Blue Garlic A-OK


Mrs. Homegrown here:

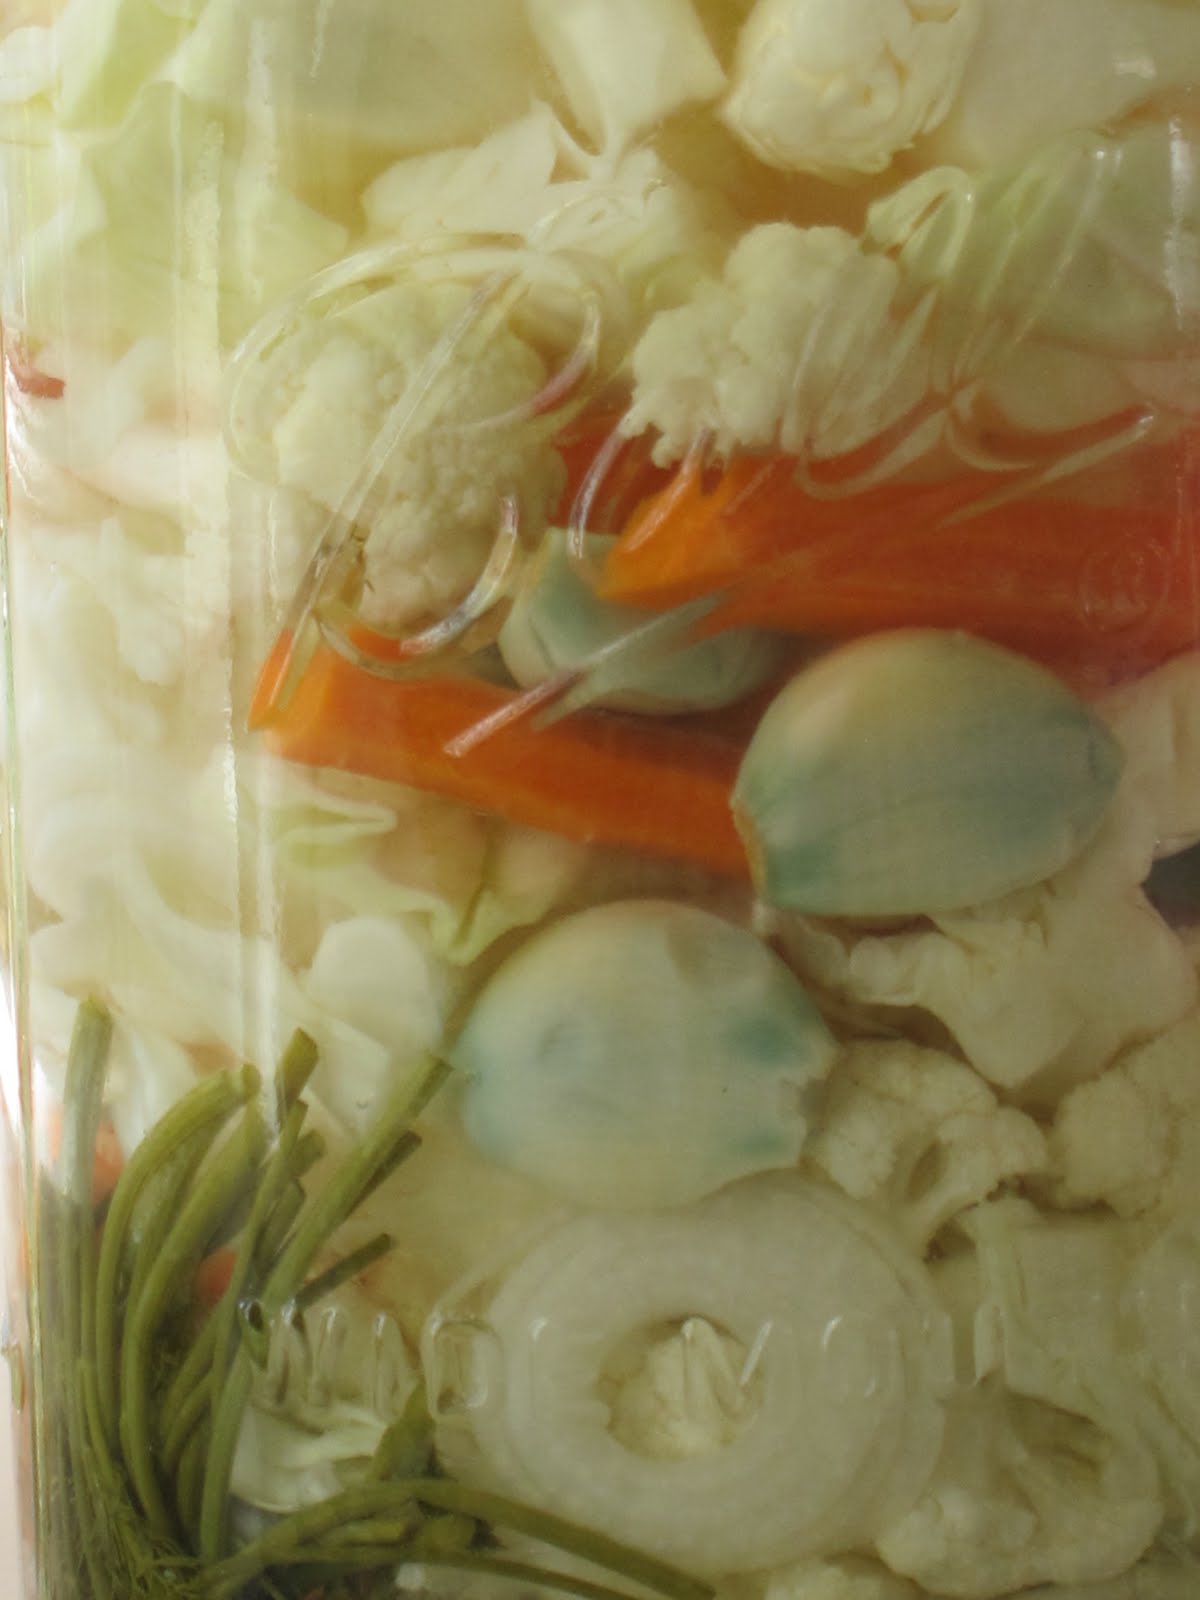
Note the lovely blue tinge of the garlic in my latest pickling adventure. Turns out that there’s a few reasons garlic might turn blue or green when prepared, but whatever the case, the coloring is harmless. What most likely happened here is that the garlic I used wasn’t fully dried, so it reacted with the vinegar in the pickling mix. I remember noting how moist the garlic cloves were as I worked with them that day.

If you want to read up more on this topic, and learn some of the science behind it (I’m too lazy to retype all the big words), check out this garlic fact sheet from What’s Cooking America. Scroll down to the bottom of the page.

By the way, the pickles I’m making are tourshi–Armenian pickles. If they work out, I’ll share the recipe.

Bean Fest, Episode 2: Falafel and Babaganoush Recipes

Welcome back to Bean Fest 2010, our ongoing celebration of the humble dried bean.

Last week we got a lot of great tips and hints in the comments. If you haven’t read those, I’d encourage you to take a peek. We also got a couple of recipes via email that we’re going to test out. Thanks, ya’ll! Again, if anyone has a favorite bean recipe, please send it this way ([email protected]).

One lesson to take away from last week is that beans do quite well in solar ovens, crockpots and the newer pressure cookers, and that if you eat a lot of beans, one of these devices would be a useful investment. I really wish I had any one of those items! We have a light, homemade solar cooker–as opposed to a more sturdy, enclosed solar oven–which is handy for grains, but really doesn’t have enough ooomph for consistent bean cooking. And we’re lacking in both space and money for new kitchen gadgets. So around here we’re stuck cooking beans on the stovetop. Seems everyone has their own bean cooking methodologies. This is mine, for what its worth:

  • Pre-soak beans for about 8 hours. Oversoaking can lead to mushy beans.
  • Rinse soaked beans and place in a heavy pot with 2 inches of water covering them. Simmer until done–however long that takes. Sometimes the bean gods are merciful, sometimes they are not. Never cook beans on a deadline. Cook them when you have plenty of time and other things to do around the kitchen.
  • Don’t salt ’til they’re almost done, because salt toughens the skins.

There seems to be a split in camps between people who a) cook the beans first, unseasoned, then incorporate them into a dish, b) throw onions & etc. into the water with the beans and let it all boil together, and c) people who do a saute of the onions & etc. at the bottom of the pan before adding the beans. I don’t know if any of these methods are better than the others, and admit to doing all three.

This Week’s Recipe: Falafel

The first lesson in food photography is not to consume your subject before you even get around to taking the picture. These few falafels were all we had left when we realized we needed to take a pic for this post.

I was thinking that a lot of people are just plain intimidated by cooking dried beans, so perhaps it would be fun to start out with a bean recipe that allows you to just skip all that trauma. Back in the day, Erik and I would sometimes make falafel out of that powdery stuff you buy in bulk bins. It tended to be salty and dry, but it was quick food. We were amazed to discover how easy it is to make real falafel–and how good the result is. Unlike bulk bin stuff, this falafel is moist and light and tender.

The secret is that it is made with raw chickpeas. They are soaked and ground up–but not cooked. This gives the falafel great texture and fresh flavor. You should not substitute canned or cooked beans in this recipe. If you do, the balls won’t hold together very well. If you must use canned beans, you’ll need to add some bread or cracker crumbs, and possibly even an egg, to create a dough which will hold together.

The other thing about this recipe is that it is very, very flexible. I’d encourage you to adapt this any way you think best.

We make this in our food processor. If you don’t have one, I’d suspect it could be done in batches in a mortar. If you don’t have a mortar and pestle, then you’d have to come up with some way to squish the beans. Perhaps in a bag with a rolling pin? The greens and the rest could be minced and stirred into the bean mash.

You’ll need:

(This quantity will make wraps for 4)

  • Dried chickpeas (aka garbanzos), 1 cup
  • Chopped greens/herbs: about 3 generous fistfuls. We usually use 2 handfuls of parsley and 1 handful of mint. But if we don’t have that, we improvise. Any flavorful green would work: mint, parsley, cilantro, chives, basil, flavorful wild potherbs, etc. Arugula works too, and even less flavorful greens, like spinach, will do in pinch.
  • Garlic, 2 or more cloves
  • Onion, about 1/2 of a reasonably sized onion, chopped (optional, could also be replaced with green onion)
  • Salt, about a teaspoon
  • Spices to taste. Here things get really individual. Spice as you please. We usually add about a teaspoon of cumin and a couple of big pinches of cayenne pepper.

Soak the beans for about 8 hours. You can put them out to soak at breakfast to make falafel for dinner. The one cup of beans will expand to 2 cups when soaked.

Toss the beans, garlic, onion, salt and spices into the food processor, along with a glug of olive oil. Whirl until you can’t see whole beans anymore. Add another glug of olive oil and all the greens. Let it whirl until the greens are cut down to speck size. The mix should be a pleasant spring green. Taste and add more salt or whatever you think necessary. Don’t mix it until it turns to smooth paste. Stop while it still has a little texture. Add olive oil to smooth it out, as necessary. When its done, it will be wet and light, but you should be able to easily roll the mix into balls.

At this point it would be fantastic if you could let the mix rest in the fridge for an hour or two for the flavors to blend and the mix to stiffen up, but you don’t have to.

Roll up a bunch of balls, or small patties, if you’re a patty person. We make balls that are smaller than golf balls. More like big gum balls. Or mountain state hail.

At this point you can deep fry or pan fry the balls. You could probably bake them, too, if you want to be righteously healthy, but we can’t advise you on time and temp.

We usually cook them via a method I call “half-assed deep frying.” Being somewhat too guilty minded (and cheap) to actually cook up a whole vat of hot oil and fry the falafel like a good falafel should be fried, I pour about a half inch of oil (I use grapeseed) into my littlest cast iron frying pan and heat that till it sizzles when I drop a bit of falafel mix into it. Then I put the balls in, about 5 or 6 at a time. The oil covers them about half way. When the bottoms are golden, I flip them and cook the other side. It doesn’t cost much oil. And while it doesn’t give that perfect crispness of true submersion deep frying, it tastes pretty darn good.

Serve your falafels wrapped in some sort of flat bread along with salad fixins, especially chopped tomatoes and onions. Good toppings include yogurt, tahini, hummus and baba ganoush.

Do you know how to make baba ganoush? Baba ganoush is eggplant spread, a close cousin to hummus, but lighter, and to my mind, better.

A Quick Baba Ganoush Recipe

All you need is eggplant, garlic, tahini , olive oil and lemon.

Take one huge eggplant or a few smaller ones, prick a few holes in them so they don’t explode and put them in a 400-450 degree oven on a baking sheet for about 45 minutes, or until they wrinkle and go flat on the bottom. Then cut them down the middle and scoop out the flesh into a mixing bowl. The skins could go to chickens, worms or compost.

From here, you could mix everything in a food processor or blender, or just use a fork if you don’t mind a more stringy texture. Even if I use power tools, I try to keep the baba ganoush a little lumpy. Stir in tahini to taste. To me, that means that if I have 2 cups of eggplant goop, I’d probably add 1/4 cup of tahini.

Mince up your garlic fine and stir that in next. How much garlic depends on how much bite you want the baba to have. 1 clove minimum, much more theoretically. Add salt to taste, and pepper, or hot pepper, if you like. Add a swirl of olive oil to give it some richness. The finishing touch is fresh lemon juice, and it’s an absolute must. Try adding about half a lemon’s worth of juice, see how that tastes, and go from there.

Baba ganoush tastes best if its allowed to chill for a couple of hours before serving. It’s pretty easy to whip up a batch of falafel mix and baba ganoush at the same time, and then put it all in the fridge until dinner time. Then it only takes a few minutes to fry up the falafel, and you’re good to go.

Figgy Rebuttal

Mrs. Homegrown here:

I had to register my disagreement with Mr. Homegrown’s Mission Fig vs. Kadota Fig post. Seems Erik decided to hold a taste test and invite only himself. The Kadota figs are certainly very good. But much of that goodness comes from their sweetness. They are sweet as honey, but not cloying. I respect that, but I don’t crave it. Unlike Erik, I don’t have a sweet tooth. Therefore, of the two I prefer the less sweet Black Mission figs–they’re figgier, for lack of a better word. So don’t go to bed thinking that you’re really missing out by not having one of them fancy Janice Kadota trees in your yard. They’re very good figs, but they’re not all that.

Black Mission Fig vs. Janice Seedless Kadota FIgs

Janice Seedless Kadota (top), Black Mission Fig (bottom)

Who wins the flavor battle between Black Mission figs and Janice Seedless Kadota figs? The verdict: Black Mission figs are damn good, but Janice Seedless Kadotas are damn better! We’re jealous of Homegrown Neighbor who has one of these beauties.

Patented in 1993 and sold wholesale by the Dave Wilson Nursery, Janice figs are white and incredibly sweet. Ask your local nursery to order one from Dave Wilson for you. But note, this is a variety for Mediterranean climates.

For excellent directions on growing figs see this info sheet from the California Rare Fruit Growers.

Italian immigrants desperate for the flavors of home pioneered growing figs in northerly climates. See this discussion over at GardenWeb for cold climate fig strategies.

On miso, caffeine and the search for a morning brew


Mrs. Homegrown here:

I am a caffeine addict. Erik is too, though he doesn’t admit it. Actually, he was only a casual user until he met me, and then became habituated to the morning brew, and eventually graduated into the 3pm pick-me-up brew. In general, I think mild caffeine addiction is not very worrisome, and pretty much built into the fiber of America. However, my own addiction has always been demanding. And recently I had to go straight (long story) — which resulted in a full week of headaches and misery. But now I’m clean, and living in a much slower, less productive, somewhat dream-like reality. Is the world supposed to be this way??? Really?

Anyway, I’ve decided two things. One, that it is impossible that I should never again ingest caffeine. No more Turkish coffee? No more Thai iced coffee? Never again a Mexican Coke? No English Breakfast teas on a cold afternoon? No crisp iced tea with a nice lunch? Riiiiighht. It will have to come back into my life in some sort of managed way. (How’s that for addict thinking?)

But before I slide back into my habits, I’ve decided to stay entirely clean for a month to see how my head reacts. See, I get a lot of headaches, so much so that I’m a connoisseur of headaches, and I’m wondering if the vascular expansion roller coaster of caffeine consumption might not be very good for me. We’ll see.

All this brings me to the point of this post. I’m looking for interesting suggestions for hot beverages that I can drink in the morning which will ease my longing for the ritualized caffeine consumption.

I do not approve of any of the myriad fruit-flavored or otherwise flavored “herb” teas in the marketplace. I have my own mint, nettles and other herbs to make tea of, but thin herb tea is just plain depressing first thing in the morning. In the morning I want something substantial. I’m not afraid of the the bitter, the strange and the strong.

Do any of you know anything about chicory or the various bitter root brews? Those old-timey, war ration, hillbilly sort of brews? This is what I’m interested in pursuing. Let me know if you have any ideas or favorites.

What’s working for me so far is miso soup. It’s an important component of the traditional Japanese breakfast, and I can see why. Miso soup is big and interesting and hearty–somehow on par in terms of body satisfaction with a nice cup of coffee with milk. Of course, it’s crazy high in sodium, but it is rich in trace minerals, and if you use real paste (not dried mix) and don’t overcook it, you also get a dose of beneficial micro-organisms, because miso is a fermented product. I throw in a few strips of nori to give me something to chew on as I drink.

A few hints re: miso:

• Buy the pure paste, not the soup mix. Buy the paste in big bags at an Asian-foods supermarket. It is much cheaper than the little tubs sold in health food stores. After I open a bag I transfer it to a plastic yogurt tub and put it in the fridge. It keeps forever. There are different types of miso (red, white, brown…) Don’t let this confuse you. All are good. Just start somewhere and you’ll sort it out. I’m fond the red.

• Proper miso soup is made with the classic Japanese soup stock, dashi. You can make it with any stock you like, or do as I do in the mornings and just use water. It’s important not to simmer miso, because heat kills the beneficial critters in it. If you’re making a pot of soup, add the miso at the end, after you pull it off the heat. If you’re making it with hot water, take the kettle off heat before the boil, or let the water sit and cool some before using.

• I use about one rounded teaspoon of paste per coffee cup of water. This makes pretty strong drink, but I like that.

Big hint: when mixing miso paste into liquid, always dissolve the miso in a tiny bit of liquid first, and then add that solution to the larger volume of liquid. Otherwise you’ll never get the lumps out. For instance, I put a spoonful of paste at the bottom of the coffee cup, add a splash of water, mix that up until the lumps are gone, then add the rest of the water.

• You can make your own miso! Sandor Katz has instructions in Wild Fermentation. It actually doesn’t sound hard to do at all. You just cook up some beans and inoculate them, then store them in a crock. I’ve always wanted to try it, but miso needs to ferment for a year in a reasonably cool place. Living in SoCal without a cellar, I just don’t think I can give it the conditions it requires.

• You can make pickles using miso paste. I’m experimenting with that right now, and will report back.