Citron

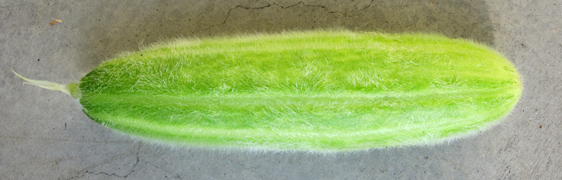
The Citron (Etrog) and its anatomy.

I just attended a fascinating lecture by fruit expert David Karp on the history of the citron (Citrus medica) or etrog in Aramaic. I’ve only encountered citron in a candied form buried deep within a fruit cake. I’ve also seen the bizarre Buddha’s Hand, another kind of citron popular in Asia as both food and medicine. What I did not know is the significance of citron in Jewish history. Citron is used in the rituals of the harvest festival of Sukkot. According to Karp, a tree mentioned in a passage in the Torah, “And you shall take for yourselves on the first day, the fruit of goodly trees.” was, at some point, interpreted as citron.

For orthodox Jews the citron must be perfect. Teams of rabbis equipped with magnifying glasses and jeweler’s loupes carefully inspect each fruit, with prized specimens going for several hundred dollars.  Karp said this has had unintended consequences. It’s virtually impossible to grow perfect citron without pesticides. Workers in citron growing areas have increased rates of cancer. And it’s forbidden under Jewish law to use the fruit of a grafted citron tree, or even a tree descended from a grafted tree, making growing healthy specimens even more difficult.

I have to say that after taste-testing citron products in the courtyard after the lecture I was not at all tempted to snag one of the trees that Karp gave away. And the intricacies of Jewish law make growing citron for ritual use an arduous and expensive proposition–sadly, citron will not be a road to riches for us, even in our perfect growing climate here in Los Angeles. We’ll stick with our quince and apricot trees which, incidentally, along with citron are contenders for the forbidden fruit of the garden of Eden (most apples don’t grow in Mediterranean climates). 

For more on the history of citron see, “The Secret Life of Etrogs” in the Jewish Journal.

Bean Fest, Episode 4: Frijoles Refritos

Refritos are not photogenic, so I decided to show the more tempting end use. Photo by Ernesto Andrade.

Mrs. Homegrown here:

I can’t believe I’ve never made frijoles refritos--refried beans–before. All these years of scooping that suspicious stuff out of the can–what was I thinking??? Now I see refritos as the natural destiny of any leftover beans.

Refried beans (that name is a mistranslation–refrito means well cooked, not re-fried, but the name stuck) are simply cooked beans that are mashed in a frying pan along with some seasonings and fat. What makes them a little shady to the health conscious and vegetarian set is that they are traditionally fried in lard. But vegetable oil can be used just as well, and I’d add for the sake of fairness, that real, home cooked lard from well-raised pigs is not such a bad fat. For what it’s worth.

To make refried beans you just need to have some cooked beans on hand, the classic choice being pintos.  In Tex-Mex cooking the pintos meant for refritos are first cooked with onion, garlic and a pork rind. Considering that refritos are fried in a bath in oil, garlic and onion, you could theoretically start with very plain boiled beans. But on the other hand, if the beans are tasty at the start, they’ll just be all that more tasty after frying with yet more onion and garlic. Which brings us back to the idea of them being the perfect use for leftover beans. I think this would work well with any leftover beans, whatever the type.

I cooked up my pintos for dual purpose eating. Half were to go over rice, and half reserved for this experiment, so I my beans weren’t plain. Because I liked John’s Bastardized Puerto Rican beans from last week so much, I followed that technique and did a long saute of onion, garlic and parsley in the bottom of the bean pot, then added the drained, pre-soaked pintos and enough stock to cover the beans by about an inch. These I simmered uncovered for a little more than an hour until everything was tender, then I added lots of salt and pepper.

The leftovers from that batch were put in the fridge overnight to become frijoles refritos.

If you read a refried bean recipe, it will ask you to drain your cooked beans and reserve the bean stock. So if you have a pot of beans with lots of liquid, do that: drain and reserve the liquid. My cooked beans were cold, and whatever liquid they still had around them had congealed into a sort of bean gravy.  Don’t worry if that’s true for you–don’t worry about any of it. Refritos are so easy to make its impossible to go wrong. Keep reading.

Just get yourself a big frying pan. Heat up a couple tablespoons of oil or fat of your choice in the bottom. Add a good quantity of minced onion. (I used 1/2 an onion for 3 cups of beans). Saute until the onion turns translucent. Then add in a clove or two of minced garlic, if you like, and cook that for another minute or so. If you like spicy beans, at this point you could also add some chopped fresh hot peppers or some red pepper flakes.

Once this flavor base is established, add a couple of cups of cooked beans to the pan and mash them with a potato masher or back of a spatula, stirring as you go to mix in all the fat and flavor. Here’s a little hint: if you’re making a big batch, don’t put all your beans in the pan at once, because smashing them will become a nightmare. Start with a couple of cups, mash those, then add more bit by bit.

Your goal is to make the beans into a paste, so you have take them to the correct level of dryness–and that is going to be dictated by your own personal preference. So if you’re smashing up well drained beans, you’d add the reserved liquid back in 1/4 cup at a time, until the beans had reached the consistency you like. In my case, I couldn’t separate the beans and liquid in my leftovers. As it turned out, they mashed up a little too wet, but the excess moisture quickly cooked off. If they’d seemed too dry, I would have just added a little water–or stock, if I had some.

That’s really all there is to it. It only takes a few minutes. Taste the beans as you go and adjust the seasoning. More salt is always a good call. It’s up to you whether you want a chunky or smooth texture. Make the beans richer, almost silky, by adding a little more oil or fat as you’re mashing and cooking.

Once they’re done, they’re ready for all the classic applications: burritos, quesadillas, sopes, tostadas, dips. They’re also good eaten with a spoon, hot out of a bowl with a little cheese and maybe some diced tomatoes or avocado on top.

***

Bean Fest continues next Friday! If you have a favorite recipe, send it in.

Back on the Yogurt Train: How to Make Yogurt

This is how I want my yogurt.
Dadiah, traditional West Sumatran water buffalo yogurt, fermented in bamboo segments. Courtesy of Wikimedia. Photo by Meutia Chaeran.
Mrs. Homegrown here:
One reason I make a lot of my own stuff is because I’m trying to avoid plastic packaging. And as I’m sure you know, that’s pretty much impossible these days–but I do what I can. Lately I’ve realized that one consistent source of waste plastic in our kitchen comes in the form of yogurt tubs. This is a little silly, because we know how to make yogurt. In fact, I do believe we covered it in our book.
Thing is, back in the day when we made yogurt, it was Erik’s job. When he slacked on it, I didn’t even consider picking it up. Chalk it up to the mysteries of division of labor in a household.
Anyway, we went to see Mark Frauenfelder talk about his great new book, Made by Hand, and one of things he mentioned was how much he and his family are digging making their own yogurt–and how cost effective it’s been for them. He inspired me to get back on the yogurt train.
It’s so darn easy, we should all be on the yogurt train. One great thing about it is that it not only saves money, but it saves packaging, and gives you more bang for your milk buck. We only use milk for coffee around here, so sometimes our milk goes bad. Now we make most of it into yogurt and there’s no waste, no excess packaging. And if we make some of that yogurt into yogurt cheese or use it instead of sour cream, that saves more packaging.
How to Make Yogurt:
Here’s how I’m making yogurt these days–it might vary a little from Erik’s methodologies in our book, but all yogurt making is basically the same. You’ll need a cooler for this.
Gather together:
  1. A cooler to keep the yogurt warm while it ferments. I’m sure there are many ways to keep yogurt warm, but I find the cooler straightforward, and that’s what I’m going to describe here. We make two quarts at a time in a little six pack cooler.
  2. Very clean canning-type jars
  3. Hot water bottle (optional)
  4. Towel(s) for insulation
  5. Your last store bought container of yogurt. You need live yogurt to start the culture, only a few spoonfuls. The label should say something about containing live, active cultures. You’ll need 1 Tablespoon of live yogurt for every quart of milk you’re transforming.
  6. Milk, of course. Make sure your milk doesn’t say “Ultra Pasturized” or UP on the label. That stuff is just nasty. Otherwise, you can use whole, 2%, 1% — and even skim, I presume, though I’ve never tried it. How much milk? As much as you want. But it seems to me that for the trouble, a quart would be the minimum it would be worthwhile making. After all, it keeps a long time. 
The procedure:
  • Heat milk gently to 180 degrees Fahrenheit. If you’ve got a thermometer, great. If you don’t, 180F is where the milk starts to simmer. Just watch for those first tiny bubbles to start rising. When they do, turn off the heat. (Heating the milk makes for thicker yogurt. You could skip this step if you like. I would skip it if I got my hands on some nice raw milk.)
  • Let the milk cool down to about 110F. This is the only hard part–waiting for it to cool. 110F is about as hot as a hot bath. You can put your finger in it and keep it there.
  • While you’re waiting, boil water to heat your jars. I like to fill my jars with boiling water, cap them, and let them sit until it’s time to use them, at which point I pour the water out. I know it’s not really sterilization, but it’s something, and it pre-heats the jars, which is important. You could also pull the jars straight from a hot dishwasher, or actually boil them. Also, you’ll want to pre-heat your cooler. Pour hot water in it as well and let it sit until the last moment. And fill up your hot water bottle, if you have one.
  • Stir in 1 Tablespoon of yogurt for every quart of milk in your pot. Use no more than that. Stir until dissolved.
  • Transfer the inoculated milk into warm jars, cap them, and stuff them into the warm cooler (which you’ve emptied of water). Do all this fast so you don’t lose much heat. Your mission is to fill the cooler up, so there’s no empty space, with some combination of jars of yogurt, towels and heating devices like hot water bottles or lacking one of those, just more jars filled with hot water. My routine is to put 2 quart jars in a six pack cooler, slide a hot water bottle between them, and pack the top of the cooler with an old towel, so that I can just barely manage to lock the lid in place.
  • The goal is to keep the yogurt very warm for about 8-12 hours. You might not be able to keep it at 110F the whole time, but it should be in that neighborhood. Certainly above body temperature. My set up described above seems to do that well enough. I’ve never checked the temp. inside, fearing to lose the heat. It just works.
  • After 8-12 hours the milk in the jars should look yogurty and taste yogurty. It might not appear thick enough, but remember that it is quite warm. It will thicken some after it goes in the fridge.
  • If it doesn’t look yogurty at all, add a smidge more starter, rewarm the cooler and everything, and try it again for another 8 hours. Consider that your starter–your store bought yogurt–may not be alive. Either that or the cooler wasn’t warm enough.

Bean Fest, Episode 3: Bastardized Puerto Rican Beans


Mrs. Homegrown here:

It’s been a tough week here on the bean front. I had two beanfail incidents trying to come up with a recipe for this week. The first, an Armenian recipe for white beans, failed through no fault of its own but because the beans were hopelessly old. No matter how long I cooked them, they stayed crunchy, yet somehow also tasted overcooked. Shudder.

Meanwhile, I’d been obsessing on Cuban-style black beans, but fell into a deep well of confusion–as so commonly happens when trying to find practical info. on the interwebs. Vinegar, sherry or wine? Sugar–really? How much? When does the sofrito go in? Is pork truly optional?

Last night I set aside my Cuban plans in frustration and opened up Mark Bittman’s How to Cook Everything Vegetarian–a generally solid cooking resource. He had a recipe for black beans and rice cooked together in a pot in the oven. Intrigued, I gave it a try. I won’t disect the recipe here, but suffice it to say the results were perilously close to hippie slop. Erik thought it was not a bad recipe, just not one that can stand on its own. It was sort of like an extra hearty rice pilaf that perhaps wanted something big and savory to accompany it. We threw lots of Bulgarian feta on it and called it a night.

This morning I decided to try one more recipe for lunch, so I’d have something to post today. I’m glad I did, because it was super tasty. Hallelujah!!

It was sent in by one of our readers, John of Yome Sweet Yome. I’m glad he wrote in, because that way I discovered his blog. He and his partner I doing what I’ve always wanted to do: building their own house on a nice chunk of land in the beautiful Northwest. Go check it out. I think I might be doing some vicarious living via the blog reader for the next few months.

I like his voice, so I’m going to post the recipe as he sent it, rather than reshaping it into a more traditional recipe form, but I’ll add some of my own notes, and hope they’re more helpful than confusing.

John’s Bastardized Puerto Rican Beans

One of my favorite recipes is a bastardized version on a traditional Puerto Rican dish. It goes like so…

Start them nice and early in the day and invite friends over for dinner. Slow is the only way…. Everything tastes better with a heavy dose of expectation….

The bean does not humor any shortcuts. Soak (at least) overnight.
Start cooking pre-soaked beans in lightly salted water (or broth, if you’ve got it lying around and feel decadent). Give them a bit of a head start before you start the rest of the dish.

• I made this with black beans (though later he says he usually uses pintos or reds). My beans measured 1 cup unsoaked, and after overnight soaking, 2 cups. You’d probably want to use more beans than that, but this was all I had pre-soaked. I put them in a saucepan, covered them with water, about an inch over the top of the beans, brought them to a boil and then reduced them to a simmer. I didn’t salt the water, because I’m of the “salt toughens the skins” school. Do what thou wilt.

Finely chop up equal parts cilantro and parsley, stems and all. More than you think you’ll need. A good handful of each.

• He doesn’t mean a handful of chopped herbs–he means you should start with a big fat handful of stems. I used a full bunch of each, and it was not too much. See, you’re going to cook the beejezus out of them, so they’ll reduce. You need to start with lots. I really don’t think you can use too much.

Saute diced yellow onion in oil, or rendered bacon fat, should you be of the persuasion. When they get translucent, toss in a generous amount of chopped garlic and your parsley and cilantro.

• I used one big onion and 3 or 4 large cloves of garlic. And I’d keep that 1 onion to 1 cup of dried beans proportion if I made a bigger batch. I did all of my chopping in the food processor. I usually chop onions and stuff with a knife, but I was in a hurry. In retrospect, I think it was good that everything was chopped very fine. So if you’re knife chopping, put in that extra effort.

Cook until it turns somewhere between a hunter green and brown in color. Deglaze with white wine or stock.

• This made me laugh. Hunter green? I like that he was color specific because I am afraid of overcooking, so I tend to undercook. The herbs looked gorgeous when they hit the heat and turned bright green. That’s where I would stop cooking if left to my own devices. But I understood that deglazing means scraping yummy brown bits off the bottom of a pan, and that meant that the herbs had to cook toward brown. Or at least hunter green. What this all means is that you will have to attend your onion/garlic/herb mix over medium heat, stirring pretty frequently, as you watch the pretty herbs turn from bright green to dull green. The onions will become more golden, and the volume will shrink down. I didn’t take it to brown, but it was definitely drab by the time I called it quits. Sort of army green. I splashed white wine around the edges of the pan and stirred everything up to collect any caramelized bits. He says you can use stock to deglaze instead, but the wine really zings up the flavors. And the smell was heavenly.
Add some pureed tomato and mix until you have an applesauce-y consistency. Strain your beans and add them to the pan, adding just enough liquid keep them covered. Put the fire on low and let the whole shebang cook for a good long time, stirring it occasionally.

• Pureed tomato? hmmm… I wondered if he meant tomato paste. But I decided to throw some canned plum tomatoes in the food processor, since it was out anyway. I added about 1 cup of the resulting puree to the pan and mixed well. The result didn’t scream applesauce, but it was a festive red and green. And it was thick.

Then I strained the cooking water off the beans, combined them with the puree, add added enough veg stock to cover all of it, and returned it to a simmer.

My black beans must have been extra fresh, because after a half hour of cooking by themselves while I did the other stuff, they were already tender enough to eat. But I understood that this was supposed to be a long cooking recipe, that long simmering would allow the combined flavors to marry, so I let them cook on for about 30 or 35 minutes more, adding stock and stirring to make sure they didn’t burn. But I was starving and Erik was nosing around, so that was all the time they got. Still, it was gooooood. But there’s more instructions to come–salt and pepper make an appearance, as does sour cream….

This is usually where I throw a jalapeno or bell pepper on the fire and roast them for later.
• Oh yes–I scorched whole jalapenos in a cast iron pan while I cooked down the onions and stuff.
When the beans are cooked through, season with salt, pepper and cumin. Add your chopped up roasted peppers and serve over rice with a dollop of sour cream and call it Sofrito! Unless you’re serving it to a Puerto Rican, in which case don’t call it anything, and you didn’t get the recipe from me!

• Sorry John. Now the whole internet knows you’ve taken liberties with Puerto Rican cuisine. Good thing you live in some undisclosed woodland location!

So yes, toward the end I added plenty of salt and pepper and cumin, and for thrills another splash of white wine. I was cooking black beans, and I think they can taste kind of dull without the help of some acid. But other beans might not want all this wine.

I usually use red or pintos. For a twist, use chickpeas and add some diced potatoes and turmeric for a more middle eastern taste.
Hoorah!

• Hoorah is right. These are the kind of beans I love. Savory. Luscious with sour cream or yogurt. And they really weren’t hard to make at all. The long cooking of the onion, garlic and herbs at the beginning gives it a deep flavor underpinning that just doesn’t happen when you just sort of throw onions, beans and spices together and hope for the best. There’s a lesson to be learned there.

I only wish I’d made two or three times as much. 2 cups of soaked beans makes about enough to feed two hungry people. I wish I had leftovers, because I suspect it would have been better the next day.


A Hairy Cucumber: Mezzo Lungo di Polignano

There’s a crass joke or limerick to be made here but I’ll leave that up to you, our dear readers. I’ll just say that this cucumber, an Italian heirloom called Mezzo Lungo di Polignano, has done well for us this summer. No powdery mildew and it’s tasty. I got the seeds from Craig Ruggless at www.gardenedibles.com. I wrote Craig to ask him about it and he replied,

“This is one of my favorites. They are also very good when left on the vine to get larger. Be sure to peel and remove the seeds. They make a great “boat” for salad fillings Like tuna or salmon with lemon and capers in maybe a mayo or yogurt dressing.”

The salad boat idea, in our case with tomatoes and a yogurt dressing, made for one of my favorite meals this summer. As for the hairy skin–biodiversity in action–and there something to be said for variety and aesthetics even though that crazy skin never ends up on the dining room table.