USDA Releases New Hardiness Zone Map

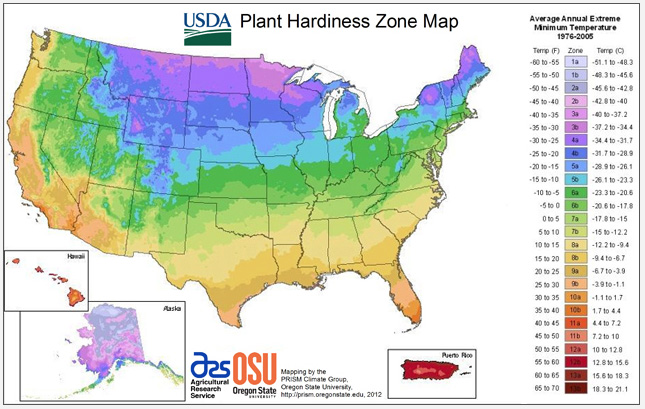
The United States Department of Agriculture has just released a new zone hardiness map that reflects both a warming climate and new algorithms that take into account things like terrain, and proximity to bodies of water.  The map is also now searchable by zip code.

You can access the new map here: http://planthardiness.ars.usda.gov/PHZMWeb .

For the background on how this map is different from the previous (1990) version, the USDA has a press release

How To Design a Garden Step III: Pathways

So you’ve set your goals and have a scale drawing of the land you plan to garden. What’s next? Paths! Paths keep you from compacting soil and lend visual interest to your garden. Some tips:

Establish a path hierarchy
Create wide paths with smaller branching paths. Think of the human circulatory system:

Or fractal patterns found in nature, like tree branches:

Now our property is so small that, when I’m done re-doing the backyard it will only have two main paths and one or two branching paths, but the path hierarchy concept is scalable to any piece of land large or small.

Put paths where people walk
Avoid what’s called in the landscape architecture biz “vanity paths,” i.e. paths that look good but aren’t actually used. If people are taking a shortcut, make that a path!

Path size
A comfortable path is probably no smaller than 18 inches. If you’re designing a public garden where wheelchair accessibility is an issue make the path no smaller than 3 feet. For two people to pass each other you need 5 to 6 feet, though a path that big would be for a larger piece of land than we own. Consider the size of any tools or wheelbarrows you might need to accommodate.

Materials
I’m fond of mulch. It’s free, easy to maintain and breaks down into soil. I’ve used gravel in the past–it looks nice but it can be hard to keep clean over time. Stepping stones also work nicely. As for edging, I’ve been using river rock as it’s easy to find in my area.

Create gathering areas
Paths should open up in to larger seating areas. We have a deck area for entertaining visitors and a smaller spot that I use as an outdoor office in the summer months. A school garden might have an outdoor classroom off of a main path.

I can’t emphasize how important paths are, both aesthetically and for preventing soil compaction. Years ago Kelly suggested the path we just put in and it’s a real improvement to the garden. Perhaps listening to your wife is a design lesson for another post!

Special thanks to Darren Butler and Scott Kleinrock for inspiring this post.

National Wildlife Federation Teams with Scotts

Time to take down those “certified wildlife habitat” signs as it seems the National Wildlife Federation has entered into a “partnership” with Scotts, manufacturers of a host of wildlife unfriendly synthetic fertilizers and pesticides.

Some thoughts:

Scotts products do grave injury to microbial and fungal life in the soil to say nothing of insects. The NWF has too narrow an idea of what constitutes “wildlife”.

And perhaps the era of big non-profit organizations like the NWF, that are little more than a mailing list, is over. We need more grass roots organizations at the community level that consist of actual people meeting face to face to do things like building school gardens, teaching permaculture and making our neighborhoods safer.

For more background on this controversy see Garden Rant.  And leave a comment on the NWF’s Facebook page.

Update: NWF has announced that they are giving up on this partnership citing Scott’s legal troubles  “related to events in 2008 that predate our partnership.” I’m still going to find an alternate use for my NWF wildlife habitat sign for even contemplating this partnership in the first place.

How To Design a Garden Step II: Using Google Earth to Draw Up a Plan

So you’ve set the goals for your garden, as we outlined in a post earlier this week, and you’re ready to start putting pen to paper. Google Earth makes it easy to quickly create a plan to scale.

Zoom in on the space you want to garden and print out an image. Next, take separate sheets of tracing paper and use them to map out:

  • your goals
  • existing conditions such as trees and buildings
  • future plantings
  • where water flows when it rains
  • sun and shade
  • problem areas
  • topography
  • future paths (more on this in tomorrow’s post)
  • permaculture zones

For a more accurate and sizable plan you can also use Google’s free 3D modeling program SketchUp. The drawback with SketchUp is that it requires a couple of evenings to learn.

If only we had taken the time to draw up a plan to scale when we first moved into our house back in 1998! Better late than never, and at least it’s easier now thanks to Google.

Special thanks to Darren Butler and Scott Kleinrock for inspiring this post!