 |
We’re finally ready for The Big One. In terms of emergency preparedness, we were pretty well set in terms of food, light, fuel, etc., but we didn’t have much water. Just some jugs, a rain barrel that’s empty most of the year, and the water in our hot water tank. This lack made me nervous, so we finally did took the bull by the horns–or the bung hole…
How much water should you store?
1 gallon of water per person per day. This is the minimal amount necessary for drinking, cooking and very basic hygiene. If you live somewhere it can get beastly hot, factor in extra water for drinking. In scorching temps you’ll need a gallon per person a day just for hydration.
Expect you’ll need at least a two week supply. That’s a minimum 14 gallons per household member. Then be sure to add extra water for pets and livestock. When we considered all of that, it seemed like a 55 gallon drum was not too much for the two of us and our pets. Ideally, we’d store more. It doesn’t rain here 3/4 of the year, and there isn’t any natural water source nearby. A second drum might be in our future.
What we’re using:
We shelled out the money for a brand new, food grade 55 gallon drum. The reason we didn’t go with a much cheaper used food grade drum is because some food stuffs leave behind residues which is impossible to clean from the drum. These might just manifest as off odors that make the water smell and taste bad, or they might even contain tiny traces of food will lead to bacterial growth during long term storage. For example, it is impossible to clean away traces of dairy, no matter how hard you scrub. It seemed better to just pay the extra money than to worry about it.
I don’t like plastic much, but short of buidling a concrete cistern or something like that, the only other similar option would be to buy a stainless steel drum. I’d much prefer to do so, but new ones priced out in the $800 to $1000 range.
Accessories for the barrel:
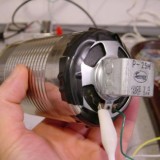
There are two vital accessories that go with any 55 gallon drum: a bung wrench (see pic above) to open and close the drum’s bung holes easily (it apparently can also be used as a gas shut-off wrench) and a siphon pump to get the water out of the drum. There are nice, solid pumps sold for frequent use, but we got a cheap one ($20) and hope it will hold up in our hour of need. All our equipment came from a surplus store, but many retailers can be found with a little simple googling.
Alternatives:
You might find sturdy 5 gallon water containers more versatile, both for handling and storage. And choosing them instead of a drum will preserve you from ever having to say “bung hole” out loud. Just make sure they are strong, BPA free, and suited both for stacking and long term storage. The less expensive ones may leak, and can’t be stacked. Find them at outdoor and surplus stores, and online.
If you want to recycle, you can store water in plastic 2 liter soda bottles. Don’t use the white milk jug-type containers (whether they held milk or juice) because they don’t age well and don’t seal well. Glass jars are nice because they’re not plastic, but they are heavy and must be carefully stored.
You can just store commercially bottled water. If you do this, change it out according to the expiry date.
Cleaning the container:
Whatever container you use, clean it first by washing with soap and water if necessary, then rinsing it out with a mild bleach solution (1 tsp in a quart of water). Bleach is what The Authorities always recommend. I’m no fan of bleach, but in this case have decided to toe the line instead of trying vinegar instead, because I just don’t want to take any risks in this case.
Filling the container:
City water is already treated with chlorine or chlorine variants, so if your house water comes from a municipal supply line you don’t have to treat it by adding extra chlorine or iodine prior to storage. You can store untreated city water for 6 months.
If your water comes from a well or other untreated source, then you should treat it prior to storage by adding 1/8 teaspoon of regular, unscented chlorine bleach to each gallon of water.
Treating dodgy water:
If you suspect that your water is contaminated–for instance, if after an emergency you doubt the cleanliness of the water from the tap, you should take steps to purify it before drinking. These are things to commit to memory, or maybe pin on the fridge, because in an emergency, you probably will not be able to check the internet.
Boil it: If you have the fuel, you can purify water by bringing it to a rolling boil for 1 to 3 minutes.
Bleach it: Even if you’re a bleach hater, like me, you should keep a small bottle of unscented, regular (not color safe, thickened, etc.) chlorine bleach on hand for emergencies.
Add 16 drops (1/4 teaspoon) of bleach to each gallon of water. Shake, and let sit for 30 minutes before drinking.
Iodine: If you have liquid 2% tincture of iodine, add 5 drops per quart. If you have tablets, follow the manufacturer’s instructions. Apparently adding a pinch of powdered vitamin C or orange drink hides the iodine flavor. And prevents scurvy!
The preceding directions are for clean-looking water. If your water is cloudy, you will want to try to filter it as best you can to remove sediment (filter it though a coffee filter or t-shirt or somesuch), and then be extra rigorous in the purification. Boil longer. If you’re using bleach, you should be able (unfortunately) to detect a faint odor of bleach in your water after treatment. If you don’t, it’s not clean. Repeat the process. If you’re using iodine, use 10 drops per quart instead of 5.
ETA: Forgot! Another way to disinfect water in an emergency situation is through solar water disinfection, or SODIS. Basically you fill up a clear plastic (PET) liter bottle–it has to be clear, and it can’t be bigger than a liter–and put it in intense sun for 6 hours. Filter the water first if it’s dirty. See AfriGadget for details.
Storage length:
Stored water should be swapped out for fresh every six months (except for commercially bottled water–again, check the expiry date on that). Use the old water for your garden, sanitize the containers and refill. We’ve got the swap date marked on our calendar so we don’t forget.
Where to store the water:
Somewhere dark and relatively temperature stable. Also, no matter how sturdy the container, there is always a chance for water leaks, so you should keep that in mind, too. We live in a very mild climate, so we’re keeping our barrel in constantly shady, protected corner of our back yard.
Some resources:
How to Store Water for Drinking and Cooking (PDF from Penn State)
Backpackers Guide to Water Purification


Great Post!
I have some large camping containers of water under the stairs, which DH mocked slightly (we don’t have the same view on the zombie apocalypse) but I was vindicated when an (irritatingly regular) water main leak in our village meant our water was off for several hours. I was able to offer water (in recycled mineral water bottles) to several neighbours who couldn’t even make themselves a cup of tea.
However, there are 5 of us (plus a family of 6 next door who can’t even keep in enough bread or paracetamol for day to day needs, and various elderly neighbours who I couldn’t see go without) plus 2 dogs, 3 cats and various poultry. That’s a hell of a lot of water to store, even in rainy England where you can count on the water butts having some water in for washing/flushing/animal drinking water.
So, I’ve been seriously looking at the Berkfeld/Berkey water filters. I think my main hestitation is that there is no pretending with a water filter. Wood fired cook stove? Cosy and fashionably retro. Extra food? We live in a valley that gets snowed in easily; I always keep in a bit of extra bread and milk to avoid running out in the winter. Stainless Steel gravity water filter as used by the British Army? Grade 1 certified nimrod who thinks the end of the world is coming- next step commando knife carrying and bunker building…
I do appreciate you need water to filter in the first place, which is far easier to obtain in the UK than LA. We’re not often short of rainwater, and the river (and a neighbour with a well) aren’t far away.
I’m completely water obsessed. Needed this info. Thank you!
Thanks for the informative post. When it comes down to it, everything is secondary to water. Mind sharing your total cost on the drum, wrench and pump combined?
@Hazel: Having a water filter doesn’t make you a survivalist wacko. Nothing is more vital than water–clean water at that. Remember, one can live weeks without food, but only 3 days without water. We have a small filter for both backpacking and extreme emergencies. Maybe you’d feel better with something like that?
Hey Elon: Total cost for all three was something like $110 before tax–the barrel was $79.99. I was able to open the wallet for it because, yep, as you say, nothing is more important. I told myself I’d be worried about the cost when we really needed the water.
Still, the cheapskate in me still wonders if I couldn’t have found a used barrel that held something innocuous…used barrels go for more like $20. But I didn’t want the search for the perfect cheap barrel to delay the project. We are so overdue for a quake. Next up–securing our pantry!
I meant to type above that I’d NOT be worried about the cost of the barrel…oh for a comment editor…
Good post. Have already had my commercial water bottles neatly tucked away in various residents, and have already had my commercial water bottles fail even though they were stored in the dark, without temperature extremes.
now its water filter at the ready with the creek nearby.
Mrs H, I thought that was a bit of sarcasm, not the leaving out of a word. What kind and size water filter do you have. I worry about my daughter. She seemed amenable to having a water filter last time I talked with her, not so many times before. She just exclaimed how wonderful and safe water was in NYC. I reminded her something could happen, and her children’s lives depended on safe drinking water. She was subdued and listened, agreeing she would like a water filter.
I did not know milk was so hard to clean from a container!
@Parsimony: We have a Katadyn water filter–one of their models for hiking.
Being new in this community, I was not sure why you have to store the water in the dark, other than maybe to stop evaporation? Anyway, I saw a design for a solar water bottle on the MOMA design page. Granted it is for a smaller bottle, but an interesting idea, even if it does use plastic. It would be ideal for sun rich environments.
http://www.moma.org/interactives/exhibitions/2008/elasticmind/#/246/
@Indigo: Ah, good question. I looked at the link too. That’s a fancified version of the clever “put a clear plastic 1 liter water bottle on the roof and let it bake” method of water purification. That’s totally true–you can purify small amounts of water that way. We’ve blogged that before, and I might amend this post with a link to that as another purification alternative.
This is an interesting case where a certain technique will work well under one set of conditions but not another. Intense sunlight applied to small water bottles = purification. But sunlight gently filtering into big drums and jugs (which have much more volume and are made of opaque plastic) over time would be just enough light to maybe start algae growing.
More than anything else, though, sunlight degrades plastic in long term storage situations–makes it brittle and unreliable.
It doesn’t have to be kept in pitch dark, but the less light the better. Basements and garages are perfect. Ours is outside, but in perma-shade behind a shed.
That notch in the wrench looks like it might fit a gas valve.
Ahhh. Ok. I understand that. In my perusing filtration methods, I saw another small battle system that uses the same method as sunlight, ie UV light. I know that UV lights are used in many places, especially restaurants and hospitals to kill airborne nasties, so it makes sense to use it for water as well. It is a shame there isn’t a UV light capable of being inserted in the larger capacity storage containers, like your barrels. And affordable version. Or maybe there is and I don’t know. A distinct possibility.
@Anon: Yep, as I said in the post, the wrench can also shut off a gas valve. Handy post quake.
@Mrs.Homegrown: I completely agree- I think it’s just common sense and will be getting one, no matter what anybody else thinks!
It’s just that sometimes, it’s wearing to be so different all the time. I raise quite enough eyebrows around here with my lifestyle and ideas without doing anything else! And as for encouraging others to be more prepared by my actions, as is often suggested, I’m still at the stage of trying to persuade neighbours that a bottle of milk and loaf of bread in the freezer when snow is forecast might be a good idea…
Mrs. H, Thanks. Katadyn is the brand I have read about the most in my searches.
I got one of those 55 gallon barrels. It was free, but it does smell of apricot. We’re using it as a rain barrel.
Oh I hope there’s a disaster preparedness book in the works. I used Just In Case when we lived in the Northeast, since the book is heavily focused on cold climates and their particular challenges & assets. But a book that skips the blizzards and frozen pipes to focus on earthquakes and wildfires would be hugely appealing now that we’re living in the Southwest. Having only been here a few weeks, I *assume* the year round growing season and mild winters means no one bothers with root cellaring around here. Is that correct?
Joss: It’s true that year-round growing makes food storage and preservation less urgent, or appealing, or something… But a more sound reason for it is the complete lack of basements and cellars in these parts. I’d give my eye teeth for a cellar, not only for storing root vegetables, but also for fermentation projects.
We don’t have a disaster preparedness book in the works–but maybe we should!
I think it’d fill a void; disaster books are often turn-offs because they can’t seem to help getting into how to dispose of bodies and make rat jerky. We used to have movies in which the hero realizes his life is a lie and throws it away (The Matrix, Fight Club). Then we switched to movies in which life as we know it is taken away (Book of Eli, I Am Legend). But either way, our culture seems to have a barely suppressed wish for it to all go to hell in a hand basket. I’d like a disaster book that is neither brimming with paranoia nor glee. Just something practical, a “as long as you’re already homesteading, you might as well also take these things into consideration.”
Terrific post!!! Did you look at bladders instead of barrels (similar to the ones you can get for grey water collection)? I’m just curious since I don’t have anywhere to stow drums.
Also, as an experiment in junior high school, we bleached water. I don’t remember the amount of bleach we added to the water, but I do remember that we aerated it by pouring it back and forth between two beakers for five minutes or so before consuming it. The bleach not only cleaned the water, but it also gave it a lemony scent and flavor. Since I am still alive — as are, to the best of my knowledge, all of the classmates with which I took the class — I figure it’s safe.
Have you ever come across any research on what sort of filtration/purification it would take to make LA River water drinkable in an emergency situation?
@Fixer: I’ve never seen LA River specific info, but I’d think it would be fine if passed through a proper ceramic filter–the kind you take camping/backpacking. If the water was really muddy you’d want to do a crude filtering of it first just to get out the dirt so you don’t muck up your expensive water filter. Like pour it through a tshirt and or sand or something similar.
If you didn’t have a filter, then again you’d want to filter out big sediment as above with a t shirt, sand and maybe even charcoal, then bring it to a boil for a couple of minutes.